Deprecated: This plugin has been removed from the Jenkins Plugin Center, it is not available for new downloads but will be available for existing users.
Archived versions of this plugin remain available for download. Source code is available on GitHub.
Due to data incompatibility, the plugin will no longer be distributed. Please migrate to the Official OWASP Zed Attack Proxy Jenkins Plugin.
This plugin allows you to launch the security software ZAProxy (https://www.owasp.org/index.php/OWASP_Zed_Attack_Proxy_Project) via Jenkins.
With this plugin, you can spider and scan a target URL, save alerts security reports in all available formats in ZAProxy (xml, html) and also load and save ZAP sessions.
It is recommended to use the “Custom Tools Plugin” plugin in order to make sure to have the ZAProxy tool available during build. This plugin allows you to install the ZAProxy tool on the node (master or slave) used by Jenkins during build and thus be able to use features of zaproxy-plugin.
Plugin Information |
|---|
No information for the plugin 'zaproxy' is available. It may have been removed from distribution. |
- “Custom Tools Plugin” configuration in administrator mode
- “zaproxy-plugin” configuration in administrator mode
- “zaproxy-plugin” configuration in jobs
- Observation
- Version history
- Version 1.2.1 (Feb 27, 2016)
- Version 1.2.0 (Jan 26, 2016)
- Version 1.1.9 (Dec 23, 2015)
- Version 1.1.8 (Oct 24, 2015)
- Version 1.1.7 (Sep 15, 2015)
- Version 1.1.6 (Sep 14, 2015)
- Version 1.1.5 (Jul 17, 2015)
- Version 1.1.4 (Jul 9, 2015)
- Version 1.1.1 (May 21, 2015)
- Version 1.1.0 (May 20, 2015)
- Version 1.0.5 (Apr 29, 2015)
- Version 1.0.4 (Apr 27, 2015)
- Version 1.0.3 (Apr 24, 2015)
- Version 1.0.2 (Apr 23, 2015)
- Version 1.0.1 (Apr 16, 2015)
- Version 1.0.0 (Apr 14, 2015)
“Custom Tools Plugin” configuration in administrator mode
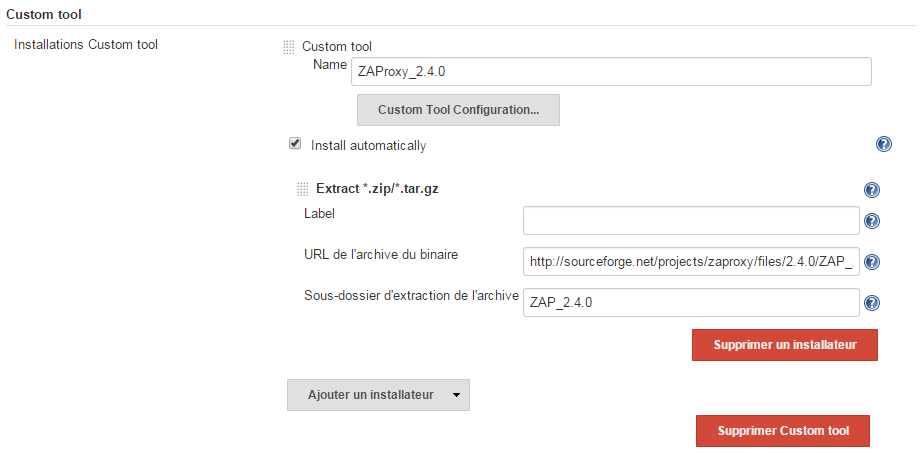
Once installed, add a tool in “Custom Tools” section in Jenkins administrator mode. Name the tool “ZAProxy” for example and add an installer. In case of *.zip/*.tar.gz installer, the URL will look like this http://sourceforge.net/projects/zaproxy/files/2.4.0/ZAP_2.4.0_Core.tar.gz/downloadhttp://sourceforge.net/projects/zaproxy/files/2.4.0/ZAP_2.4.0_Core.tar.gz/download https://github.com/zaproxy/zaproxy/releases/download/2.4.1/ZAP_2.4.1_Core.tar.gz for the ZAProxy version 2.4.0. Finally, specify a sub-directory for the archive extraction (e.g ZAP_2.4.0).
“zaproxy-plugin” configuration in administrator mode
Once “zaproxy-plugin” is installed, two fields are available in Jenkins administration allowing to specify the host and port on which ZAProxy will run. The Jira Base Url and Jira Username and thePassword fields are required ONLY if you are planning to use the create jira issues feature. If you are not using this feature then those 3 fields can be kept blank.
“Custom Tools Plugin” configuration in jobs
In “Build Environments” section, tick the “Install custom tools” box and select the tool corresponding to ZAProxy.
“zaproxy-plugin” configuration in jobs
In order to use the plugin, add “Execute ZAProxy” build step. Several parameters are available and are grouped into three categories below.
Configuration
This category shows to the user the plugin configuration informations in Manage Jenkins -> Configure System.
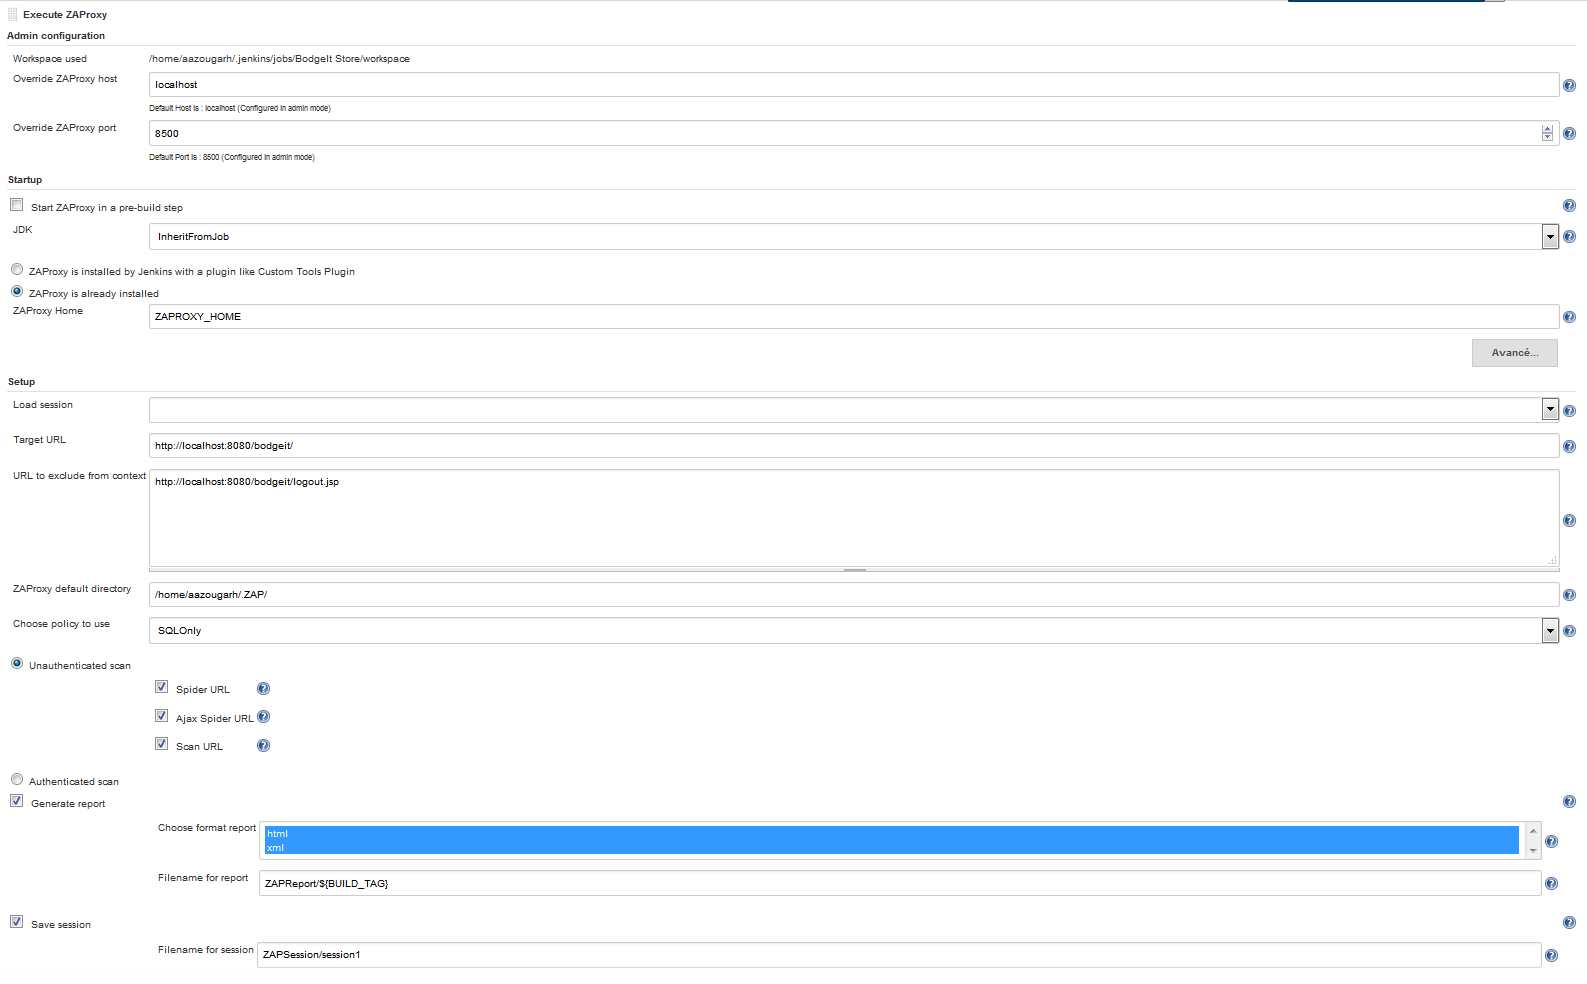
Workspace used: Represents the build workspace. It is in this repository where files will be saved (security reports, ZAProxy sessions).
Override ZAProxy host: Host when ZAProxy is used as a proxy. The default value is specified in administration mode and can be overridden here.
Override ZAProxy port: Port when ZAProxy is used as a proxy. The default value is specified in administration mode and can be overridden here.
Leaving the user the possibility to override ZAProxy host and port, it allows to run 2 or more builds at the same time but with different port and/or host.
Startup
This category allows setup ZAProxy launch during build.
Start ZAProxy in a pre-build step: If this box is checked, ZAProxy is started before all other build step (i.e. in a pre-build step). It can be used in harmony with a Selenium build step to let ZAProxy to catch all events throwing by Selenium (so, ZAProxy is used as a proxy: https://github.com/zaproxy/zap-core-help/wiki/HelpStartProxies).
The Selenium build step must be placed before the ZAProxy build step. So the lifecycle is Start ZAProxy > Run Selenium Tests > Scan urls with ZAProxy.
JDK: You can choose the JDK to use to start ZAProxy. ZAProxy requires Java 7 to run, so you must choose at least JDK 7.
Then comes a choice for how ZAProxy is installed:
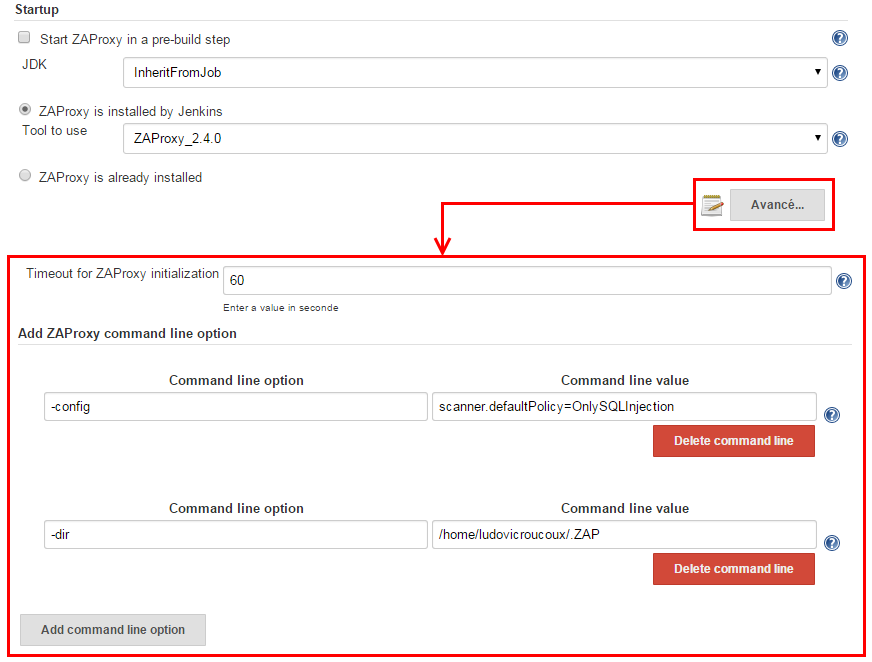
- ZAProxy is installed by Jenkins: indicates that ZAProxy is installed with a Jenkins tool (like Custom Tools Plugin). The user must choose the ZAProxy tool from the list of installed tools.
- ZAproxy is already installed: indicates that ZAProxy is already installed on the machine where the build is done. The user must then enter the environment variable that points to the path where ZAProxy is installed on the machine.
Advanced
Clicking the advanced button, a new block appears below :
Timeout for ZAProxy initialization: This is the maximum waiting time for ZAProxy is properly initialized. If ZAProxy has not finished its initialization, then the build fails.
Add ZAProxy command line option: You can configure the command line option and his value (if necessary) in this two appropriate fields. You can add as many command line as you want with the "Add command line option" button and delete them with the "Delete command line" button. More information on https://github.com/zaproxy/zap-core-help/wiki/HelpCmdline.
Add a ZAP command line option can interfere with other UI option of the plugin. Be careful !
Setup
Load session: Allows the user to load a ZAProxy session. The session must be in a folder's workspace, for example workspace/myFolder/mySession.session and the user must choose the wanted session in the list. If a session is loaded, it is not necessary to save it at the end because ZAProxy backup in real time until the session is closed.
Target URL: The URL will endure ZAProxy attacks.
URL to exclude from context : the URL(s) that ZAP has not to scan in order to prevent some edge effects (logging out while performing an authenticated scan, performing dangerous actions like deleting users, …)
ZAProxy default directory: Uses the specified directory instead of the default one for ZAProxy (https://github.com/zaproxy/zaproxy/wiki/FAQconfig). This allows to choose your policy below (if the specified directory contains policy files into a "policies" folder) or the authentication scripts (if the specified directory contains authentication scripts files into a "scripts/authentication" folder).
Choose policy to use: This list contains all policy files located in "specifiedDirectory/policies". If no policy file is chosen, so the default policy file will be used for the scan.
Unauthenticated scan : ZAP will perform teh scan with no user profile
- Spider URL: If this box is checked, ZAProxy will do a spider (passive scan https://github.com/zaproxy/zap-core-help/wiki/HelpStartConceptsPscan) of the specified URL.
- Ajax Spider : If this box is checked zaproxy will do a Ajax Spider scan (Ajax spider https://github.com/zaproxy/zap-core-help/wiki/HelpAddonsSpiderAjaxConcepts#ajax-spider) of the specific URL.
You need ZAProxy 2.4.2 or higher to use this functionnality.
- Scan URL : If this box is checked, ZAProxy will do a scan (active scan ) of the specified URL.
Authenticated scan :
ZAP will perform the scan in the point of view of the defined user.Two authentication modes are available :
- Form based authentication : can be used in the most of cases
- Login URL : URL of the login page.
- Logged in indicator : Indication that the Authentication is successful (existence of a sign out Link. This should be insert as a regular expression
- POST Username parameter : Parameter (variable name) that used to carry user name for the authentication (https://github.com/zaproxy/zaproxy/wiki/FAQformauth).
- POST password parameter : Parameter (variable name) that used to carry password for the authentication (https://github.com/zaproxy/zaproxy/wiki/FAQformauth).
- Username : Username for authentication.
- Password : Password for the given user for authentication.
- Other post data : Other post data needed to perform the authentication scenario (e.g : action=login&perform=yes)
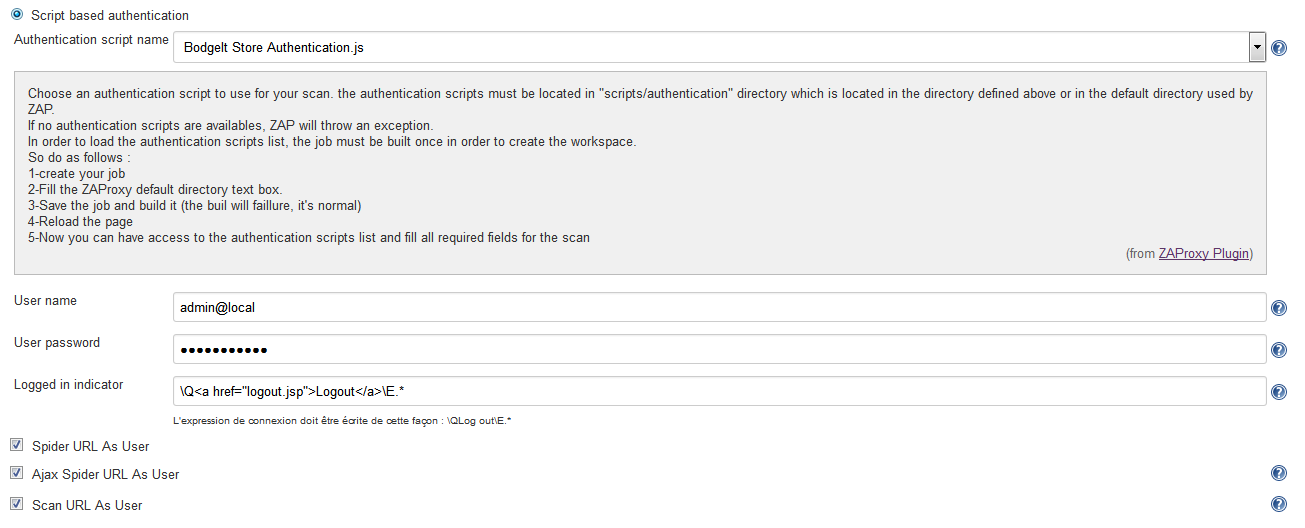
- Scripts based authentication : can be used in the rest of cases where authentication process is more complicated (redirection to an authentication server,...)
In order to work correctly the full path to the scripts directory must be filled in the ZAP config file "config.xml" between the tags :<dirs></dirs>.Be sure that this path corresponds to the one filled in "ZAProxy default directory" text box or to the default one.You can find here the authentication script used in the example above : BodgeIt Store Authentication.js
- Spider URL as User : If this box is checked zaproxy will do a spider as user (https://github.com/zaproxy/zap-core-help/wiki/HelpStartConceptsSpider#spider) of the specific URL. (Perform authentication automatically and spider the URL as an authenticated user)
- Ajax Spider URL As User : If this box is checked zaproxy will do a Ajax Spider scan as authenticated user (Ajax spider ) of the specific URL.
- Scan URL As User : If this box is checked, ZAProxy will do a scan as authenticated user (active scan https://github.com/zaproxy/zap-core-help/wiki/HelpStartConceptsAscan) of the specified URL.
Generate report: If this box is checked, the security alerts emitted by ZAProxy will be saved into a file in the build's workspace. File settings are:
- Choose format report: This is a list of all available formats to save the report. You can selected several formats with CTRL + click.
- Filename for report: The file name that will contain the security alerts. The addition of an extension is not required and user can user environment variables to rename the report (e.g : report_${BUILD_NUMBER})
With ZAproxy version 2.4.2, a new option is set by default. This option merge related alerts in report. If you want get back to the classic report, add a command line typing "-config" in command line option field and "alert.mergeissues=false" in command line value field.
Save session: Saves the current ZAProxy session in the build's workspace. If a session is already loaded, it is not necessary to save it again because it is automatically persisted as we go along.
- Filename for session: The file name that will contain the ZAProxy session. If a session is loaded and the user saves the session with the same name, the build will fail.
Create Jira Issues (version 1.2.0)
This is an optional feature which can be ONLY used with Jira issue Creator Plugin for ZAP installed. The plugin can be installed by following the instructions mentioned in this document (pdf version here). A screenshot of this feature is attached below.
The Jira Base Url, Jira Username and Jira Password has to be set in the global configuration of Jenkins. In using this feature the project key has to be set along with an assignee and the issues can be created depending on the alert level of each issue. A user can choose to export alerts as jiras depending on their threat level. At least one alert level has to be checked or else the plugin would fail.
Filter issue URLS by resource type is an optional feature which can be used to categorize the urls by resource type. (eg css,html, js, jsp etc..)
Observation
Due to an issue in zaproxy (https://github.com/zaproxy/zaproxy/issues/1617), exceptions can be thrown when you execute the plugin on headless machine although ZAProxy is launched in daemon (headless) mode. To bypass this problem, you can export DISPLAY variable before to start ZAProxy like that: "DISPLAY=:0.0". This variable can set in Jenkins -> Configure System -> Global properties or with a plugin like EnvInject Plugin.
If it's not enough, you can install Xvfb on the node of the build to emulate frame buffer X11 server. After Xvfb is installed and running, export the DISPLAY variable like previously (with the Xvfb configuration) and launch the build. It should work.
Another solution is to use the Xvfb jenkins plugin to install and use Xvfb. It's certainly the best solution pending the issue in zaproxy is resolved.
Version history
Version 1.2.1 (Feb 27, 2016)
- Jira features are now optional.
- Script based authentication is now supported.
- Fix Github issue #11
- Fix Github issue #25
- Fix Github issue #27.
Version 1.2.0 (Jan 26, 2016)
- Added support for the ZAP Jira issue creator plugin.
Version 1.1.9 (Dec 23, 2015)
- Fix Github issue #4.
- Fix Github issue #10.
- Add the possibility to exclude some URLs from scan (log out url, dangerous actions,...)
- Add the possibility to make either an unauthenticated or authenticated scan.
Version 1.1.8 (Oct 24, 2015)
- Fix Github issue #8.
Version 1.1.7 (Sep 15, 2015)
- Fix JENKINS-29687 issue.
- Minor fix according to the new zap-api (zap-api-2.4-v6).
Version 1.1.6 (Sep 14, 2015)
- Added Authentication and Ajax spider features.
Version 1.1.5 (Jul 17, 2015)
- Fix a bug introduced by 1.1.4 version.
Version 1.1.4 (Jul 9, 2015)
- Add the possibility to override ZAP proxy host and port for each build.
Version 1.1.1 (May 21, 2015)
- Bug correction with ZAP command line option.
Version 1.1.0 (May 20, 2015)
- Problem's resolution when the plugin is used with slaves. Now, ZAProxy is correctly launched on the node.
- Add the possibility to choose a specific JDK to start ZAProxy.
Version 1.0.5 (Apr 29, 2015)
- Modification to load session : now, the user must choose a session in the list instead of type the relative path.
- Modification to generate report. Now, "true" report are generated instead of write alert security in a file (for more informations, see here). With this modification, json format is not available.
Version 1.0.4 (Apr 27, 2015)
- Resolution of an internal conflict with imported library.
Version 1.0.3 (Apr 24, 2015)
- Remove the possibility to override ZAP config using "-config".
- Add the possibility to add ZAP command line option (more generic than just use "-config")
Version 1.0.2 (Apr 23, 2015)
- Add the possibility to choose a policy file for a scan.
- Add the possibility to override ZAP config using "-config".
Version 1.0.1 (Apr 16, 2015)
- Minor changes.
Version 1.0.0 (Apr 14, 2015)
- Initial version.


