Plugin Information |
|---|
View ZAP Pipeline on the plugin site for more information. |
Older versions of this plugin may not be safe to use. Please review the following warnings before using an older version:
OWASP ZAP is one of the world's most popular free security tools, it can help you automatically find security vulnerabilities in your web applications. This plugin allows you to control ZAP in Jenkins pipeline builds, and also adds additional functionality like the ability to fail a build if a certain amount of alerts are found, a graph, and much more! It is recommended you proxy your tests through ZAP for maximum coverage, but you can also import a list of URLs to scan or load a session to attack.
Features
- Gives you full control over ZAP through Pipeline, including starting ZAP, running the crawler, running an attack, importing a list of URLs, importing scan policies, loading a session & user, ect.
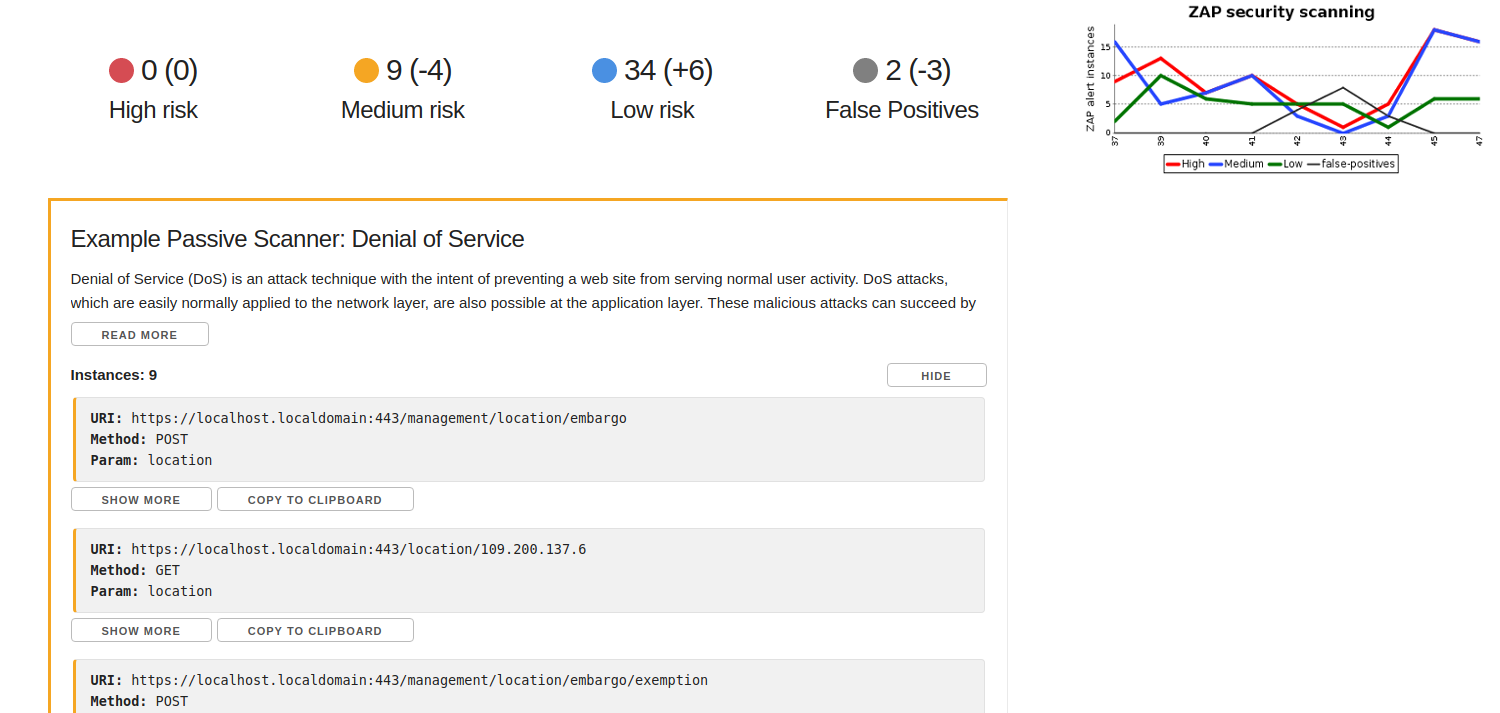
- Generates a graph showing amount of ZAP alerts over builds
- Generates an interactive report (viewable after ZAP has run through the sidebar button). This report incorporates the results of the previous build to show you new alerts, automatically filters out false-positives, and more!
- Ability to fail builds if a certain amount of high/medium/low alerts are found
- Allows you to provide a false positive file
- Support for distributed builds
- Supports Windows & Linux
- Simple & easy to use
Installation Steps
- Go to the Jenkins Dashboard
- Click on "Manage Jenkins" in the sidebar
- Click on "Manage Plugins"
- Press the "Available" tab next to the "Updates" tab
- Search for "zap pipeline" and select the checkbox, then press "Download now and install after restart"
- Tick the "Restart Jenkins when installation is complete and no jobs are running" check box
How to use
The plugin provides additional functions for you to use in your Jenkinsfile. An example of a declarative pipeline is below, the functions work the same on a scripted pipeline. See the API below for more information.
pipeline {
    agent any
    stages {
        stage('Setup') {
            steps {
                script {
                    startZap(host: "127.0.0.1", port: 9091, timeout:500, zapHome: "/opt/zaproxy", sessionPath:"/somewhere/session.session", allowedHosts:['github.com']) // Start ZAP at /opt/zaproxy/zap.sh, allowing scans on github.com (if allowedHosts is not provided, any local addresses will be used
                }
            }
        }
        stage('Build & Test') {
            steps {
                script {
                    sh "mvn verify -Dhttp.proxyHost=127.0.0.1 -Dhttp.proxyPort=9091 -Dhttps.proxyHost=127.0.0.1 -Dhttps.proxyPort=9091" // Proxy tests through ZAP
                }
            }
        }
    }
    post {
        always {
            script {
                archiveZap(failAllAlerts: 1, failHighAlerts: 0, failMediumAlerts: 0, failLowAlerts: 0, falsePositivesFilePath: "zapFalsePositives.json")
            }
        }
    }
}
Available functions
Listed below are functions that you can use in your Jenkinsfile.
startZap(host: "127.0.0.1", port: 9095, timeout: 900, zapHome: "/opt/zaproxy", allowedHosts:['10.0.0.1'], sessionPath:"/path/to/session.session")

Starts the ZAP process and configures the plugin.

host: 						The host to run the ZAP proxy server on. Passed to ZAP in the -host parameter.
port: 						The port to run the proxy on
timeout (optional): 		If a scan takes too long it will stop
allowedHosts (optional): 	Once the active ZAP scan starts, it won't scan any hosts unless they are here. If you don't set this it will only scan if the host is localhost
sessionPath (optional): 	If you want to load a previous ZAP session that you have expored, you can do that here. Useful when you want to run a scan but don't want to run all your tests through ZAP.
runZapCrawler(host: "https://localhost")

Runs ZAP's web crawler on a specific host
importZapScanPolicy(policyPath: "/home/you/yourattackpolicy.policy")

Imports a ZAP attack scan policy from the path you specify (Scan Policy Manager -> Export). This is to be used with the runZapAttack function
importZapUrls(path: "/path/to/your/urls")

Imports a list of URLs from a file. Usually you would use this with Report->Export all URLs to file in ZAP.
runZapAttack(userId: 5, scanPolicyName: "yourScanPolicy")

Once you have proxied your tests through ZAP, imported a session in startZap or loaded a list of URLs, you can run the ZAP attack. This function runs an active scan on all the hosts that have been provided in the allowedHosts parameter in startZap. If the parameter is not provided it will default to local hosts only.

userId (optional): 			Run the scan with a specific user, loaded from the session
scanPolicyName (optional): 	The attack policy to use when running the scan. Loaded with importScanPolicy
archiveZap(failAllAlerts: 1, failHighAlerts: 0, failMediumAlerts: 0, failLowAlerts: 0, falsePositivesFilePath: "zapFalsePositives.json")

Reads the alerts found by ZAP, filters out any false positives if a false positives file is provided in the project, checks if there are any alerts that are higher than the fail build parameters - and fails the build if so - generates a report, and finally shuts down ZAP. This should be the last thing you run.

failAllAlerts (optional): 			The maximum number of total alerts required to fail a build.
failHighBuild (optional): 			Maximum amount of high risk alerts that can happen before a build will fail
failMediumAlerts (optional):		The maximum number of medium alerts required to fail a build.
failLowAlerts (optional): 			The maximum number of low alerts required to fail a build.
falsePositivesFilePath (optional):	The path relative to your workspace / project of the false positives file. See below for information on creating this file.
Proxying your tests
sh "mvn verify -Dhttp.proxyHost=127.0.0.1 -Dhttp.proxyPort=9095 -Dhttps.proxyHost=127.0.0.1 -Dhttps.proxyPort=9095"
You may need to exclude some hosts from ZAP. If so you can use the -Dhttp.nonProxyHosts parameter, eg -Dhttp.nonProxyHosts=.com\|.co.uk
Proxying localhost
By default Java will not proxy localhost, 127.0.0.1, or any common loopback addresses. There is no way to disable this unless you set -Dhttp.nonProxyHosts= (empty). This means it is impossible to proxy just localhost without editing project code. You can mitigate this issue by changing your applications host to localhost.localdomain, which isn't checked by Java. An alternative to this is to edit your machines 'hosts' file and add your own local hostname.
Generating a false positives file
You can provide a JSON file of false positive definitions from your workspace to the plugin during the archive step. The default filename is zapFalsePositives.json. The file must consist of a JSON array of false positive objects. For example:
[
  {
    "name": "Cross Site Scripting (Reflected)",
    "cweid": "79",
    "wascid": "8",
    "uri": "https:\/\/yourdomain.com\/a\/certain\/url",
    "method": "POST",
    "param": "param1",
    "attack": "<script>alert(1);</script>",
    "evidence": "<script>alert(1);</script>"
  },
  {
    "uri": "https:\/\/yourdomain.com\/another/*.",
    "method": "GET"
  }
]
All alert instances that match to a false positive object are ignored when the plugin decided whether to fail your build or not, and are initially hidden in the UI report. A match is when ALL fields provided in the false positive object are equal to an alert instance. It is best practice to be as specific as possible to not hide true positives that may occur. The false positive URI is a regex string, alert instance URIs will be tested against this, it is useful to use if you have a dynamic path.
To aid in the generation of a false positives file, the UI report provides a 'Copy to Clipboard' button under each instance. This copies the alert instance as JSON, which can be used as a false positive object in the false positives file.
Version History
1.9.0 (14th January 2019)
Fixed start-up error on certain networks
1.8.0 (9th January 2019)
Added export as XML and export as JSON buttons to the report.
Stopped spamming the console with scan progress messages
1.5.1 (31st October 2018)
Lowered minimum required Jenkins version from 2.7.3 to 2.121.1
1.5.0 (23rd October 2018)
Added 32 unit and integration tests.
ImportZapUrls fails the build if you do not provide the path parameter or if the file failed to load.
RunZapCrawler no longer provides a default host to start the crawler on and will fail if you do not provide the host parameter.
If zapHome in startZap is not set the build will now fail, instead of carrying on silently.
Changed "Zap alert instances" to "Alert instances" on the chart, so the text is larger. Additionally, the chart now counts the alert instances rather than the number of alerts (bug)
Improved the UI report.
1.4.1 (15th October 2018)
Fixed archiving, general bug fixes and code improvements. If you were using a previous version before this the report view button will be lost on your old builds due to naming changes.
1.4 (9th October 2018)
Instead of comparing alerts to the previous build, you can now provide a false positives file in your projects, and alerts will be filtered using this file.
There is now a graph that displays on the Jenkins job page that shows you the amount of alert instances over your builds.
Previously, it was impossible to know that the build failed due to ZAP without checking the build console. There is now text on the build page which makes that clear.
The plugin was renamed since the previous version, remember to uninstall zap-comp.hpi so you don't have it installed twice.
1.2.0 (14th September 2018)
You can now have multiple nodes running at once
1.1.0 (12th September 2018)
Added support for Windows
1.0.0 (11th September 2018)
Initial release