Immediately after installation, Jenkins will allow anyone to run anything as user jenkins, which is bad. This page shows you how to set up basic security using the Configure Global Security page.
The Configure Global Security page has two sections in which you:
- Set the security realm to determine who is allowed access
- Set the authorization to determine what each user is allowed to do
Security Realm
First, establish the user authentication method. For smaller, more informal installations, you can use Jenkins' own user database. For enterprise installations, you will want to use your corporate service, which allows users to log in to Jenkins with their usual username and password.
Jenkins' Own User Database
This is the simplest authentication scheme--Jenkins maintains its own independent user database. People can sign up for their own accounts, and you as the administrator decide who can do what in Jenkins.
- Go to the Jenkins dashboard, usually http://_server_:8080 or http://_server_/jenkins:8080, where server is the host on which Jenkins is running
- Select Manage Jenkins, then Configure Global Security
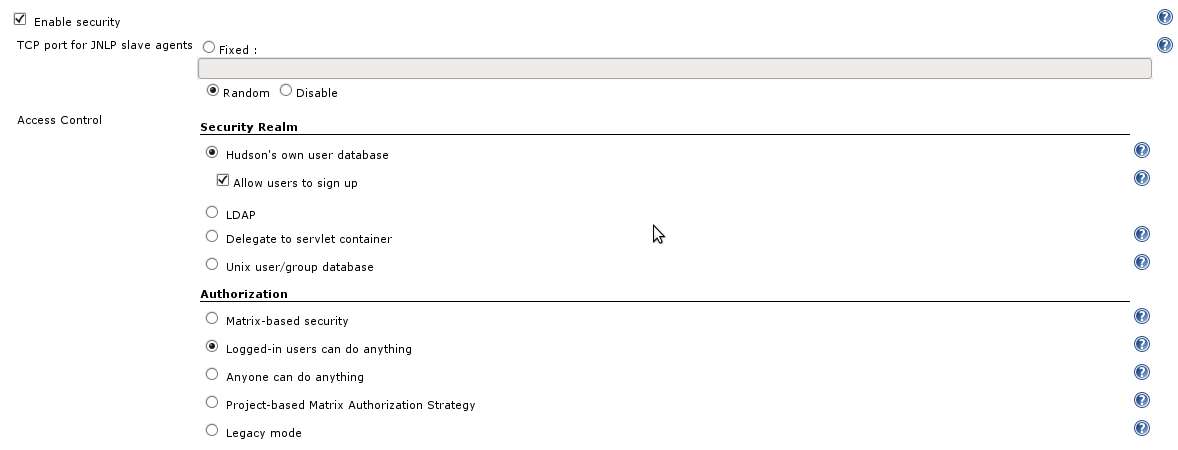
- Click Enable Security. The page will expand to offer a choice of access control.
- Select Jenkins’ own user database
- Place a check mark next to Allow users to sign up
- Continue with Authorization, below. In particular, do not forget to press the Save button at the bottom of the page.
Active Directory On Linux Server
If Jenkins is running on a Windows server then it is better to install the Active Directory plugin.
On a Linux host you have an option to either use the Active Directory plugin or an LDAP based authentication. To configure the LDAP to work with Active Directory, provide the following:
Server |
mydomaincontroller.mycompnay.com:389 |
|---|---|
Root DN |
dc=mycompnay,dc=com |
User Search Filter |
sAMAccountName={0} |
Manager DN |
cn=mymanageruser,ou=users,ou=na,ou=mycompany,dc=mycompany,dc=com |
Manager Password |
***** |
Note that the correct Manager DN value can vary greatly depending on your Active Directory set up.
UNIX NIS
To set up Network Information System:
- Go to the Jenkins dashboard, usually http://_server_:8080 or http://_server_/jenkins:8080, where server is the host on which Jenkins is running
- Select Manage Jenkins, then Configure Global Security
- Click Enable Security. The page will expand to offer a choice of access control
- Select Unix user/group database#* Push the Test button (on the extreme right)
- If Success is displayed, everything is set up properly
- If not, follow the instructions to fix the problem and repeat
- If you still do not succeed, push the Advanced button and specify Service Name sshd and repeat
- Continue with Authorization, below. In particular, do not forget to press the Save button at the bottom of the page.
LDAP
See LDAP Plugin. Then continue with Authorization, below. In particular, do not forget to press the Save button at the bottom of the page.
Authorization
The Authorization section of the Configure Global Security page allows you to configure what users are allowed to do once authenticated.
Matrix-based Security
Matrix-based security offers the most precise control over user privileges.
- Select Matrix-based security as the Authorization
- Give the Anonymous user only Overall Read access
- In the text box below the matrix, type your user name (or the user name you plan to use when you register as a new Jenkins user) and click Add
- Give yourself full access by checking the entire row for your user name
- Repeat for other users who deserve full access. The configuration should look like the picture below:
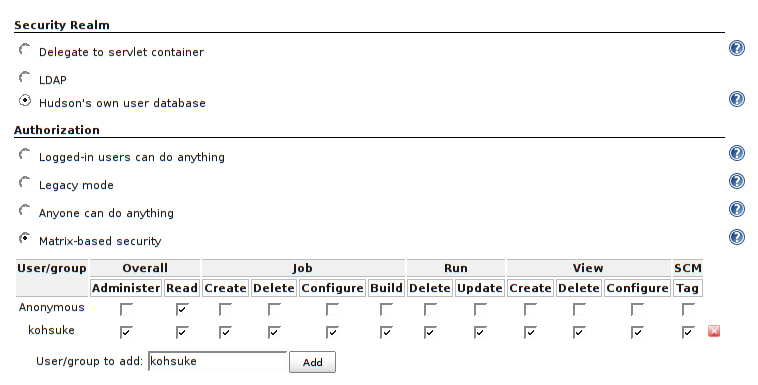
- Click Save at the bottom of the page. You will be taken back to the top page. Now Jenkins is successfully secured.
- Restart Jenkins (service jenkins restart on Linux)
If you set up a service like NIS, Active Directory or LDAP, you can now log in to Jenkins using your network credentials. If you are using Jenkins' own user database, create a user account for yourself:
- Click the Login link at the top right portion of the page
- Choose Create an account
- Specify the user name you used in the above step, and fill in the rest
If everything works smoothly, you are now logged on as yourself with full permissions. If something goes wrong, follow this to reset the security setting.
TBD
More docs to come. Suggestions on what needs to be written are greatly appreciated.