Plugin Information |
|---|
View meliora-testlab on the plugin site for more information. |
Older versions of this plugin may not be safe to use. Please review the following warnings before using an older version:
This plugin publishes the unit test results of a build to Meliora Testlab ALM/QA Tool. The plugin pushes the results to Testlab by creating a test run with Jenkins run unit tests mapped to Testlab's test cases. The plugin allows you to automatically open up issues in Testlab if tests in your Jenkins build should fail. Issues can also be automatically assigned to a user in your Testlab project. The plugin can be used as a post-build step in a traditional styled Jenkins job or as a step in a pipeline script. As pipelines are supported, the plugin should also work with the Blue Ocean UI.
In addition, this plugin optionally injects the needed CORS (Origin) headers for the Testlab's Jenkins Jobs widget to be able to communicate with your Jenkins.
To use the latest version (1.17 or newer) of this plugin, you must be running Meliora Testlab - Automaton release. If for some reason, you are running an unsupported version such as Meliora Testlab - Lost Cosmonaut (or earlier), you must use the v1.16 of this plugin.
Pushing results from Jenkins To Testlab
How it works
- A job in Jenkins is run. The job has some unit tests (JUnit or TestNG tests), Robot Framework tests or TAP tests and is configured to publish the test results.
- The job is also configured to publish the test results to some project in Testlab. The plugin parses the test results from step 1. and
- checks if an existing automated test run is found in Testlab (by matching test run's title, milestone, version, environment and automation source) and
- if so, the found test run is updated with test results,
- if not, a new test run is added to the Testlab project.
- The results are mapped to test cases by applying the rules from the specified ruleset in your project. The rules map the test identifiers (typically class + method name such as com.some.package.TestClass.failingTest) to test cases and
- optionally create the needed test case stubs to the Testlab project if a test case is missing ("Add and map" rules) and
- adds new items with the result found to the test run created or found above.
- If the ruleset (or plugin) is configured to add issues for failed unit tests the plugin
- adds new issues or re-opens existing issues for failed tests by honoring the issue adding strategy set and
- assigns the issues to a user in Testlab if preferred.
- checks if an existing automated test run is found in Testlab (by matching test run's title, milestone, version, environment and automation source) and
Mapping Testlab's test cases to Jenkins run tests
When pushing results from Jenkins to Testlab the identifiers of automated tests sent by Jenkins are mapped to Testlab's test cases. The logic of which tests are mapped to which test cases are defined by the rules in a ruleset defined in your Testlab project. Automated test cases in Testlab hold an "Automation rule value" which can be used to map the test cases against test identifiers.
Test cases can be mapped to exact unit test identifiers or to a unit test class/method hierarchy. By using rules of rulesets, you can make complex logic on how your automation rules should be mapped to your Testlab project's test cases. A simple, quite typical, example follows where a simple "startsWith" typed map rule is in place:
- Test case: "User login", Automation rule value: "com.example.ui.login"
- Test case: "Validate user password", Automation rule value: "com.example.ui.login.Form.validatePassword"
- Test case: "Validate user e-mail", Automation rule value: "com.example.ui.login.Form.validateEmail"
.. would, for example, fail both "User login" and "Validate user password" test cases in your Testlab project if unit test "com.example.ui.login.Form.validatePassword" reports as failed by Jenkins.
For a parent level mapped Test case to report as passed all unit tests under it must pass. In the example above, if either "com.example.ui.login.Form.validatePassword" or "com.example.ui.login.Form.validateEmail" reports as failed the "User login" test case will be set as failed in Testlab.
You can find rulesets on "Test automation" view in Testlab and read more about the logic of rulesets in Testlab's help manual. Also note: Versions before Testlab - Automaton used a custom field for holding the automation rule value. This is not needed anymore for Testlab - Automaton. "Automation rule value" field is inbuilt for automated typed test cases.
What is a test identifier?
The test identifier for which the linking of Testlab's test cases is made against is the classname + name pair of your xUnit results. Under the hood, if your build generates a results XML file as
<testsuite ...>

    ...

    <testcase classname="com.example.MyTests" name="testThis" ...></testcase>

    <testcase classname="com.example.AnotherTests" name="testThat" ...></testcase>

</testsuite>
.. the test case mapping field values are matched against values
- com.example.MyTests.testThis
- com.example.AnotherTests.testThat
For Robot Framework tests, the same logic applies. The identifier is constructed from the test suite name and the names of tests in the test tree hierarchy.
Test identifiers for TAP tests
In addition to the xUnit compatible testing results, this plugin can be used to push the results of TAP tests (see "Pushing TAP results" below). The mapping identifiers for TAP results are constructed as follows:
<optional Mapping identifier prefix><name of the results file with . replaced with _>.<title of the step with number of the step optionally included>
For example, if the TAP results file mytaptests.tap includes
1..2
ok 1 Furry test
not ok 2 Cat test
.. and the plugin is configured as
- Include TAP file name in mapping identifier ?: Yes
- Include test number in mapping identifier ?: No
- Mapping identifier prefix: tap
.. the identifiers for the tests in the file are constructed as
- tap-mytaptests_tap.Furry test
- tap-mytaptests_tap.Cat test
Setting up and configuring the plugin
Testlab configuration
API key
As the plugin calls your Testlab via Testlab's REST API an API key must be configured for security. Go to Company management > API keys in Testlab and configure an API key to be used for authentication. Please see the Testlab’s inbuilt Help manual for more information on the configuration of API keys.
Ruleset
The ruleset and rules in it is needed to map the incoming results to test cases in your Testlab project. All projects have a "default" ruleset in place which follows the logic of earlier Testlab versions. If you wish to make alterations on rules, you can do them in the mapping workbench found in "Test automation" view in Testlab.
Configuring the plugin
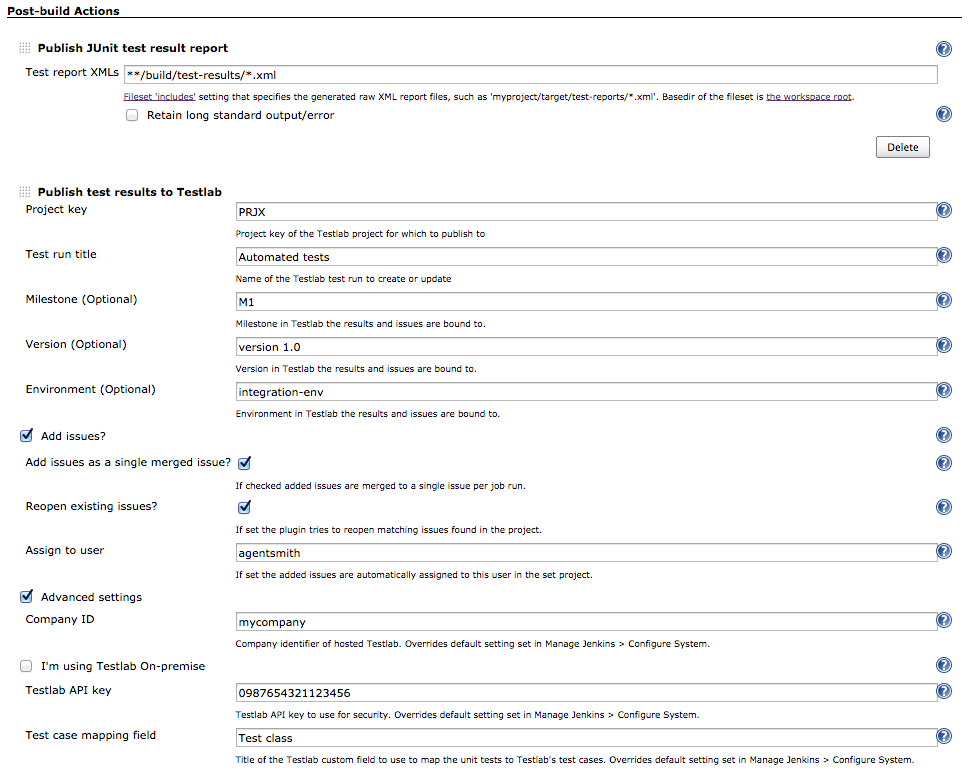
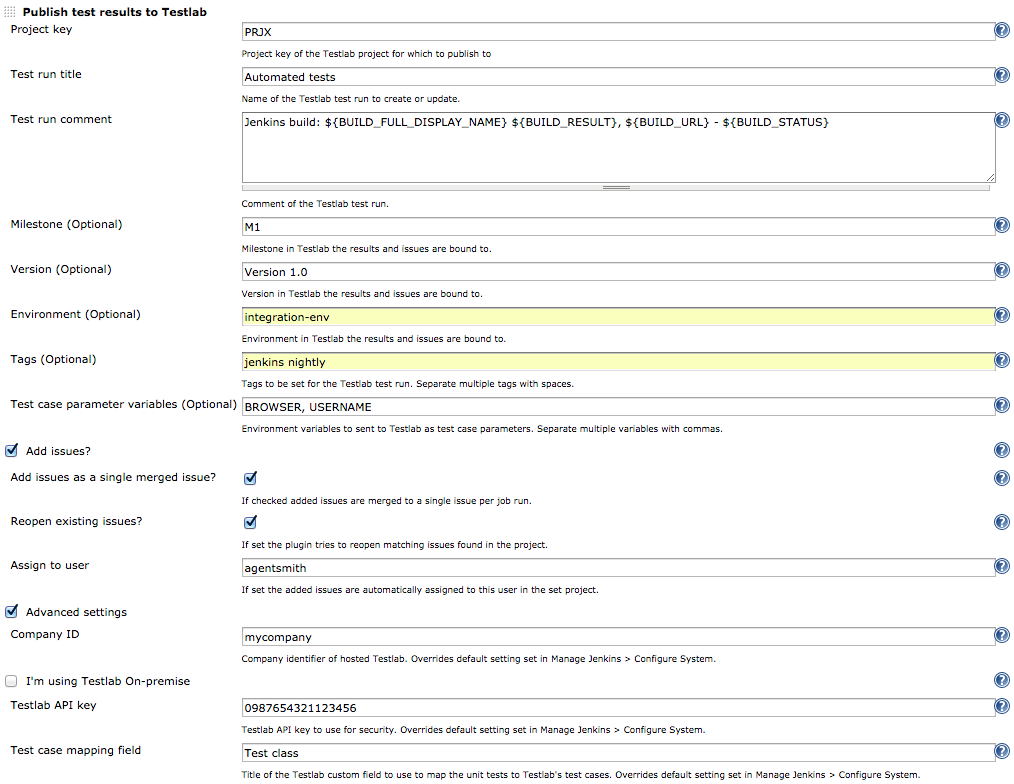
A typical configuration for this plugin in a free-style project job is seen in the picture below:

- The job has some unit tests and is configured to publish the results - JUnit tests in this example.
- The plugin is configured to
- publish the test results to project PRJX in Testlab,
- use ruleset "jenkinsrules" to map the tests to test cases,
- assign the name of the Jenkins job as the automation source of these results,
- create or update an automated test run titled 'Automated tests' with
- milestone as 'M1',
- version as 'version 1.0',
- environment as 'integration-env',
- to add issues
- per set strategy (a single issue with all failures merged) and
- by trying to re-open issues in Testlab by looking up existing issues by matching the issue title and
- assigning issues to Testlab's user "agentsmith",
- tag test run with tags 'jenkins' and 'nightly',
- to catenate steps of Robot Framework steps as a flat list,
- set test run description according to the provided template,
- pass values from environmental variables BROWSER and USERNAME to Testlab to be set as values to test case parameters,
- to publish Robot Framework tests from output.xml found in the build workspace,
- to push TAP results parsed by the TAP plugin
- by mapping each TAP step to a test case in Testlab and
- by including the file name of the TAP results file to the mapping identifier and
- by dropping the number of the TAP step from the mapping identifier and
- by prefixing the mapping identifier for TAP results with "tap-".
- The plugin is set to push the results to Testlab
- at testcompany.melioratestlab.com with
- Testlab's API key set as something.
For a more detailed description of each setting, please see the inbuilt help of the plugin by clicking the question mark icons in the plugin's configuration panel.
Maven2/3 styled jobs
When configuring the plugin to be used with "maven2/3 project" styles jobs, using a post-build action to publish the result report should not be needed. Maven jobs make their aggregated Surefire reports available to the Testlab Plugin automatically. So, if your Maven job produces testing results (for example JUnit test results) configuring the "Publish test results to Testlab" post-build action is enough.
Connecting to hosted Testlab
If you are using hosted Testlab (Testlab as a service from .melioratestlab.com) you should
- set your Company ID to match your ID in hosted service. This most likely matches your virtual host meaning, that if you are using Testlab from mycompany.melioratestlab.com your Company ID is mycompany.
- Leave I'm using Testlab On-premise unchecked and when doing so, leave Testlab URL field blank.
- Set other fields such as Testlab API key in accordance with the instructions.
Connecting to Testlab on-premise
If you are using Testlab from your own premises, you should
- leave Company ID field blank.
- Check I'm using Testlab On-premise.
- Enter a full URL address (including scheme, host name & domain, and optional port, for example https://testlab.mycompany.com) of your Testlab server to the Testlab URL field.
- Set other fields such as Testlab API key in accordance with the instructions.
Pushing TAP results
The plugin supports publishing the results from TAP (Test Anything Protocol) files found in the build. If not checked, the possible TAP results produced by the job are ignored.
Important: For the results to be available for publishing, your Jenkins must be installed with TAP Plugin and the job must be configured with "Publish TAP Results" post-build action for the .tap files you wish to publish the results from.
Publishing Robot Framework results
With the plugin, you can upload your Robot Framework generated results in a detailed format. Check the appropriate option in your plugin settings and provide a resource pattern for your output.xml file. Please note that you must be running the Lilliput Sight (or later) build of Testlab for the server to have support for this feature.
Common plugin configuration
You can set default values for Company ID, Testlab URL and Testlab's API key via Jenkins' global configuration. This way the 'Advanced settings' part of the plugin configuration seen above can be left unset and all jobs will use the values from global configuration.
Using environmental variables in the configuration
Most configuration fields of the plugin can be decorated with common Jenkins set environmental variables. These tags are replaced with values of matching environmental variables. Please see the above picture of the plugin configuration for the format of the actual tags.
In addition to the default variables set, plugin sets some easy to use common variables for your use:
Variable | Description |
|---|---|
BUILD_FULL_DISPLAY_NAME | Combined full display name of the build with job name and build number. For example 'my jenkins job #133'. |
BUILD_RESULT | The result of the build. For example 'SUCCESS' or 'UNSTABLE'. |
BUILD_STATUS | Summary of the overall build. For example 'broken for a long time'. |
Keep in mind that in addition, many Jenkins plugins set variables of their own which you may use. For example version control plugins often expose the changeset or revision number via an environmental variable.
Common uses of variable tags
Using tags makes it possible for you to make your publishing dynamic. For example, let's say you make your product releases with a Jenkins job. You would like to preserve all test results of these release in your Testlab project. Using a static configuration will always overwrite the latest test run in Testlab (as the "Test run title" stays always the same). To remedy this, you could add a BUILD_NUMBER tag to your Test run title field. This way every time the release job is built in your Jenkins, this plugin would push the results of the job to a different test run in your Testlab project.
Test case parameters
In Testlab, you can design test cases as templates which include parameters. These parameters are given values when the test case is executed.
If the test cases you map your automated tests include test case parameters, you can pass values to these parameters from Jenkins' environmental variables. For example, if your test cases should contain a parameter BROWSER indicating the web browser the automated test was run with, you can set an environmental variable BROWSER and configure the plugin to pass this parameter to Testlab. Setting environmental variables in Jenkins is easy with the appropriate plugin.
Using the plugin in a Pipeline script
Previously, the plugin could be used in a Pipeline script by wrapping the plugin action to a job which was to be triggered by the actual script. From 1.16 version forward, the plugin officially supports Pipelines and can be used in a script with a "melioraTestlab" keyword.
Minimal step configuration
As an example, the below publishes and sends all (junit compatible) results generated by the pipeline script to a SaaS hosted Testlab mapped with default ruleset:
pipeline {
    agent any
    stages {
    	...
    }
    post {
        always {
            junit '**/build/test-results/**/*.xml'
            melioraTestlab(
                projectKey: 'PRJX',
                advancedSettings: [
                    companyId: 'mycompanyid',
                    apiKey: hudson.util.Secret.fromString('verysecretapikey'),
                    testCaseMappingField: 'Test class'
                ]
            )
        }
    }
}
Step configuration example with all settings
The below example includes all possible configuration values for the step. To know which configuration key is which, you can compare the values in example below to the screenshot in the chapter 'Configuring the plugin' above.
pipeline {
    agent any
    stages {
    	...
    }
    post {
        always {
            junit '**/build/test-results/**/*.xml'
            melioraTestlab(
                projectKey: 'PRJX',
                ruleset: 'rulesettouseformapping',
                automationSource: 'identifying source for the results'
                rulesetSettings: [
                    testRunTitle: 'Automated tests',
                    milestone: 'M1',
                    testTargetTitle: 'Version 1.0',
                    testEnvironmentTitle: 'integration-env',
                    tags: 'jenkins nightly',
                    addIssueStrategy: 'DONOTADD' or 'ADDPERTESTRUN' or 'ADDPERTESTCASE' or 'ADDPERRESULT',
                    reopenExisting: true,
                    assignToUser: 'agentsmith',
                    robotCatenateParentKeywords: true
                ]
                description: 'Jenkins build: ${BUILD_FULL_DISPLAY_NAME} ${BUILD_RESULT}, ${BUILD_URL}',
                parameters: 'BROWSER, USERNAME',
                publishTap: [
                    tapTestsAsSteps: true,
                    tapFileNameInIdentifier: true,
                    tapTestNumberInIdentifier: false,
                    tapMappingPrefix: 'tap-'
                ],
                publishRobot: [
                    robotOutput: '**/output.xml'
                ],
                advancedSettings: [
                    companyId: 'mycompanyid',						// your companyId in SaaS/hosted service
                    apiKey: hudson.util.Secret.fromString('verysecretapikey'),
                    usingonpremise: [
                        onpremiseurl: 'http://testlab.mycompany.com/'	// optional, use only for on-premise installations
                    ]
                ]
            )
        }
    }
}
Using Testlab's Jenkins Jobs dashboard widget
Enabling the use of Testlab's Jenkins Jobs widget
Testlab offers a dashboard widget called Jenkins Jobs which enables you to control your Jenkins jobs from Testlab's dashboard. To make it possible for Testlab to communicate with your Jenkins server you must enable the needed options in the plugin configuration.
To enable remote calls from Testlab to your Jenkins server:
- Check Allow remote calls from Testlab option in the plugin configuration.
- Enter the full URL address of your Testlab server to the Origins field. If you are using Testlab hosted, you should enter a value in format _https://mycompany.melioratestlab.com_. If you are using Testlab on-premise, make sure to enter the full URL address of your Testlab server. If for some reason you have to enter multiple allowed origins, you can enter multiple values by separating the values with a comma.
What this does is that it adds the needed CORS-headers (Access-Control-Allow-Origin, Access-Control-Allow-Methods, Access-Control-Allow-Headers, Access-Control-Allow-Credentials) to your Jenkins server responses. If your Jenkins is behind a reverse proxy you must set up your proxy to pass these headers through.
A typical global configuration for the plugin is seen in the picture below. Please note, that the screenshot is for a configured On-premise installation: 
My Jenkins is secured and uses authentication
When using Jenkins Jobs widget, there are some security considerations if and when your Jenkins server is configured for security.
If and when your Jenkins server is configured for security and requires authentication,
- Jenkins Jobs widget on your Testlab dashboard must be configured with
- User name, which should match to the user name of your Jenkins server account,
- API token, which is your personal API token found in your user account view and
- Cross-Site Request Forgery prevention enabled in Jenkins must be checked if your Jenkins server is configured for CSRF-protection.
If you are using a Jenkins server without authentication the above is not needed. The Origins value of "*" will allow requests from any domain, but it is not recommended for production use - always set a valid Origins value to protect your Jenkins server).
My Jenkins Jobs widget cannot connect to my Jenkins server
If you have problems getting the Jenkins Jobs widget on your Testlab dashboard to connect to your Jenkins server, a good place to get some information why is your browsers logging console. Usually, browsers log out messages on cross-origin requests indicating the reason why the connection fails.
Some common errors you might encounter include:
- XMLHttpRequest cannot load https://myjenkins.server/job/somejob/api/json. The 'Access-Control-Allow-Origin' header contains the invalid value '*.somedomain.com'. Origin 'https://mytestlab.server' is therefore not allowed access.
Your Origins value in plugin configuration is invalid. The value must be a full URL of your Testlab server ("https://mytestlab.server" in the example above) or "*" wildcard for any domain.
- GET https://myjenkins.server/crumbIssuer/api/json 404 (Not Found)
Your Jenkins Jobs widget on your dashboard has "Cross-Site Request Forgery prevention enabled in Jenkins" checked and your Jenkins server is not configured for CSRF protection. You should uncheck this option on your dashboard widget and try again.
- Mixed Content: The page at 'https://mycompany.melioratestlab.com/testlab/#view1' was loaded over HTTPS, but requested an insecure XMLHttpRequest endpoint 'http://myjenkins.server/crumbIssuer/api/json'. This request has been blocked; the content must be served over HTTPS.
Modern browsers block all traffic from secured host pages (pages served over HTTPS) to insecure addresses (HTTP). In this case, please set up your Jenkins to use HTTPS/SSL and use a secured Jenkins URL instead. There might be browser specific switches or configuration to go around the problem, but going around the security restriction on your own browser is not really a solution.
Common pitfalls and frequently asked questions
Publish fails with 'org.codegist.crest.io.RequestException: Internal Server Error' or some other non-descriptive exception
Make sure you
- target your project correctly in your plugin configuration. Enter the key of your project to "Project key" field instead of the name of the project and
- enter the company ID correctly.
How do I enable logging for this plugin?
To enable verbose logging of this plugin,
- go to Manage Jenkins > System Log and click "Add new log recorder".
- Enter Name: testlab and add a new "ALL" level logger for package "fi.meliora.testlab.ext", Save the changes.
Run a job with the plugin configured and inspect the log for any activity by the plugin.
Publish fails with 'Could not find a test case mapping field <field> for the project.' error
You have configured the plugin to use a field named <field> for the mapping of tests to your Testlab test cases. The project you are pushing the results to does not have a custom field with a matching title. Please read through the chapter 'Mapping Testlab's test cases to Jenkins run tests' above and make sure to configure an appropriate custom field to your project.
Please note, if this error is received, you most likely are using a non-supported old version of the plugin. You should highly consider upgrading the plugin and your Testlab to the latest Automaton version.
I'm still having problems - what do I do?
Please, submit a support ticket via your Testlab and provide us
- a relevant fragment from your Jenkins' log file (see above), if any, and
- a screenshot or other description of your plugin configuration.
We are happy to help!
Changelog
Version 1.17 (2019-10-04):
- Meliora Testlab - Automaton related changes
- Add support for rulesets,
- automation sources and
- issue adding strategies.
Version 1.16 (2019-01-30):
- Add official support for Jenkins' Pipelines (bump required Jenkins core version to 2.7.3)
- Clean up logging for CORSFilter
Version 1.15 (2018-07-06):
- Updated to comply with Testlab REST API changes
- Try to remove unneeded class level dependency to TAP plugin when the feature is not really used
- Fix security issue
Version 1.14 (2017-04-24):
- Fix: Added compatibility with TAP Plugin 2.1
Version 1.13 (2017-04-24):
- Native support for Robot Framework output
- Fix: CORSFilter with correct crumb parameter
- Upgrade Jenkins plugin parent POM
Version 1.10 - 1.12 (-)
Version 1.9 (2016-04-22):
- Better error reporting on Testlab API calls
- Fix: Added missing junit plugin dependency
Version 1.8 (-)
Version 1.7 (2015-10-23):
- Support for TAP (Test Anything Protocol) results
- Support for automatically creating test cases which cannot be mapped
Version 1.6 (2015-07-10):
- Support for passing environmental variables as test case parameters
Version 1.5 (2015-04-24):
- Support for settings tags for pushed test runs
- Support for environmental variables in the configuration
- Test run comment can now be set via a template
Version 1.4 (-)
Version 1.3 (2015-03-26):
- Fix: support aggregated reports in maven styled jobs
Version 1.2 (2014-10-24):
- Support for Testlab's milestones
Version 1.1 (2014-07-07):
- Support for Testlab's Jenkins Jobs dashboard widget added (CORS)
- Support for Testlab on-premise
- Better error handling
Version 1.0 (2013-09-26):
- Initial release.
Known issues
- -