Programming Research Static Analysis Plugin
This plugin enables the PRQA static analysis tools QA·C and QA·C++ to be easily integrated in Jenkins.
This plugin is maintained by Programming Research. It was developed and maintained by Praqma up until release 1.2.2. All service and feature requests should be sent directly to Programming Research.
Plugin version 2.1.0 supports PRQA Framework version 2.0.1
Contents
|#_Toc430878846
|#_Toc430878847
|#_Toc430878848
|#_Toc430878849
|#_Toc430878850
|#_Toc430878851
|#_Toc430878852
|#_Toc430878853
|#_Toc430878854
|#_Toc430878855
|#_Toc430878856
|#_Toc430878857
Features
This plugin allows source code to be analysed with QA·C or QA·C++, PRQA's static analysis tools. The plugin performs the following key tasks in the post-build stage automatically:
- Analyzes a PRQA project – optionally including dataflow and cross module analysis.
- Generates a compliance report
- Compares the total number of messages in the project against a configurable threshold and sets the build status to 'unstable' if the threshold is exceeded: this can be used as a gate to stop subsequent tasks from running.
- Optionally uploads the analysis results to QA·Verify, the PRQA web-based Quality Management System
This plugin is able to analyze configured PRQA projects.
The projects are configured using PRQA Framework. They can be configured using PRQA Tool to support the old analysis interface.
The plugin allows the automation of the creation and analysis of PRQA enabled projects. This enables the analysis to be performed as a part of a continuous integration strategy.
The plugin displays a graphical history depicting the number of messages, and overall compliance levels in the project.
Download
Download the latest version manually HERE or alternatively, use the Jenkins CI Update Center.
Prerequisites for "PRQA Framework"
![]() Supported versions of PRQA Framework We currently support PRQA Framework 2.0.1. If you encounter any issues drop us a note.
Supported versions of PRQA Framework We currently support PRQA Framework 2.0.1. If you encounter any issues drop us a note.
Installed Applications
Prior to installing and using this PRQA plugin, the user must ensure that the following PRQA applications are installed:
- PRQA Framework
- Reprise license manager
- QA·Verify Server (Optional)
PRQA Framework Setup
The plugin should be configured to use the installed version of PRQA Framework. This is done by going to the 'Manage Jenkins' -> 'Configure System'. There will be an option to add a PRQA Framework installation.

To add details of PRQA Framework, press the Add PRQA Framework button.
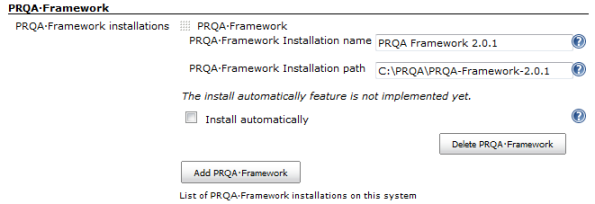
This is an example of a PRQA Framework configuration, where the default installation directories have been used. The plugin will automatically expand locations and add the necessary bin folders to the path. Please enter the correct details for the PRQA Framework installation.
As there might have multiple versions of PRQA Framework installed on the machine, it is best practice to include the PRQA Framework version number (or some other identification in the PRQA Framework Installation Name. The plugin allows for multiple versions of the PRQA Framework to be installed.
![]() Automatic install This option lets Jenkins install PRQA Framework on demand, to the location configured above. If this option is checked, a silent installer for PRQA Framework will have to be configured.
Automatic install This option lets Jenkins install PRQA Framework on demand, to the location configured above. If this option is checked, a silent installer for PRQA Framework will have to be configured.
Note: This feature is not implemented yet.
PRQA Tool Setup
The plugin can be configured to use the old interface using PRQA Tool. This is done by going to the 'Manage Jenkins' -> 'Configure System'. There will be an option to add a PRQA Tool installation.

To add details, press the Add PRQA Tool button.

This is an example of a PRQA Tool configuration, where the default installation directories have been used. The plugin will automatically expand locations and add the necessary bin folders to the path. Please enter the correct details for the PRQA Tool installation.
The plugin allows for multiple versions of the PRQA Tool to be installed.
![]() Automatic install This option lets Jenkins install PRQA Tool on demand, to the location configured above. If this option is checked, a silent installer for PRQA Tool will have to be configured.
Automatic install This option lets Jenkins install PRQA Tool on demand, to the location configured above. If this option is checked, a silent installer for PRQA Tool will have to be configured.
Note: This feature is not implemented yet.
QA·Verify Setup
The plugin can be configured to use a QA·Verify server instance if required. This is done by going to the 'Manage Jenkins' -> 'Configure System'.

To add details of a QA·Verify server instance, press the Add button.

This is an example of a QA·Verify configuration. Please add the correct credentials for the QA·Verify Server.
Job Configuration
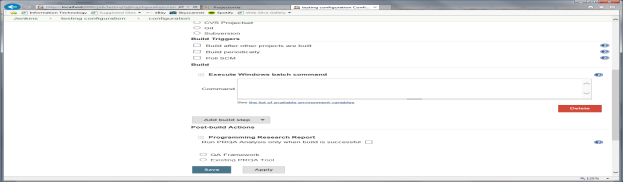
The Jenkins job will have to be configured to perform PRQA static analysis. This is done by adding a post build action to the job. This is done by going to the build job home page -> 'Configure'.

Click on the Add post-build action button and select Programming Research Report.

By default the PRQA analysis is always performed, whether project build steps pass or fail.
If Run PRQA Analysis only when build is successful is selected, the analysis will only be performed if the build steps pass.
The set up of the PRQA analysis depends on whether PRQA Framework is used or the existing PRQA tool is used.
The set up for these is described later in Setup - PRQA Framework and Setup - PRQA Tool.
Threshold:
The number of messages generated by the PRQA static analysis can be compared against thresholds for build stability. If a threshold is exceeded the build status is set to unstable. This can be used as a gate to stop subsequent tasks from running.
The messages are organised into message levels according to the severity of the message with Level 0 being the lowest.
The thresholds can be set to operate at a message level allowing the severity of the messages to be taken into account. Code that contains low-severity maintenance and style issues may pass but code which contains critical issues would fail.
There are 3 kinds of threshold: Messages, File Compliance and Project Compliance.
Click on the Add threshold button and select the type of threshold.
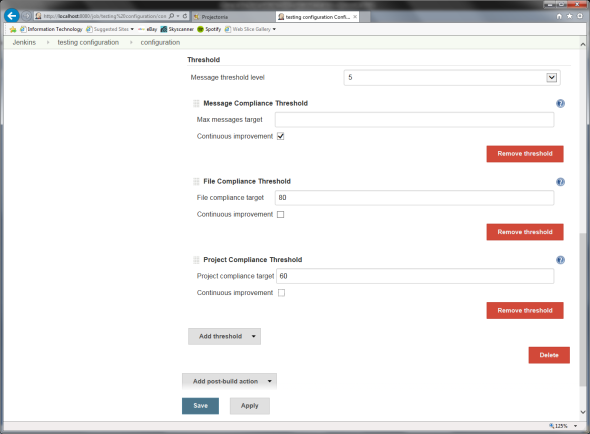
Message Threshold Level
This sets the message level from which the message total is calculated. Only messages from this level and above are summed to give the message total which is used for the Messages Threshold comparison. Note that File and Project Compliance thresholds are not affected by this setting.
Message Compliance Threshold
Either enter the maximum messages target or select continuous improvement.
The maximum messages target is the total number of messages that are allowed on all levels for all the files in the project. Messages in header files are de-duplicated (they are only counted once and not for each source file the header is included into).
The Message Compliance value is the total number of messages for all the files in the project which are on the Message Threshold Level or above.
If the Message Compliance value for the build is higher than the maximum messages target, the build is marked as unstable.
Continuous improvement states the Message Compliance value for the build will be less than or equal to the Message Compliance value found in the previous build. If the Message Compliance value for the build is higher, the build is marked as unstable.
Project Compliance Threshold
Either enter the project compliance target or select continuous improvement.
The project compliance target is the minimum percentage of message groups (a coding standard 'rule') that have no messages in the project.
The Project Compliance Level is the percentage of message groups that have no messages in the project.
If the Project Compliance Level for the build is lower than the project compliance target, the build is marked as unstable.
Continuous improvement states the Project Compliance Level for this build will be greater than or equal to the Project Compliance Level for the previous build. If the Project Compliance Level for the build is lower, the build is marked as unstable.
File Compliance Threshold
Either enter the file compliance target or select continuous improvement.
The file compliance target is the minimum mean across all files of the percentage of message groups (a coding standard 'rule') that have no messages in each file.
The File Compliance Level is the mean across all files of the percentage of message groups that have no messages in each file.
If the File Compliance Level for the build is lower than the file compliance target, the build is marked as unstable.
Continuous improvement states the File Compliance Level for this build will be greater than or equal to the File Compliance Level for the previous build. If the File Compliance Level is lower, the build is marked as unstable.
A high File Compliance level and low Project Compliance level indicate that each file violates only a small number of rules but each file violates a different rule.
If the File and Project Compliance levels are close then each file is violating more or less the same rules.
If any of these thresholds are not met then the build will be marked as unstable. Note only configuration errors or analysis errors will mark the build as failed.
The plugin will default to no thresholds.
Plugin output
The plugin will create graphs showing the current number of messages and the current compliance levels. The Job project page
- Will show historical depiction of the overall compliance history
- Will create a link to the QA·Verify server that was used in upload.
- Will have relevant build artifacts in artifacts list, for easy access to generated reports and logs

PRQA Framework Project creation A prerequisite for PRQA Jenkins plugin is that the source project has PRQA Project file, prqaproject.xml.
It is also possible to create a PRQA Project file as a build step prior to the PRQA static analysis. This step determines the location of the project file.
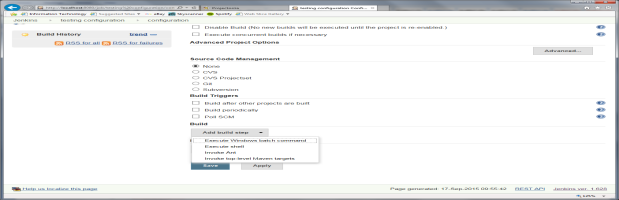
To do this, press the Add build step. If the build machine is a windows machine then select the Execute Windows batch command option otherwise select the Execute shell option.
It is possible that one of these steps is already set up to run the make or some other build script. This step can be used instead of adding a new step.
Enter into the command box the command line entry options to create and configure the PRQA project.
The QACLI tool is command line interface to PRQA Framework and PRQA Tools. QACLI allows these to be integrated with builds on build servers. It features a command line interface of the form:
qacli <subcommand> [options...]
where related features are grouped under a subcommand.
The address of the PRQA license server should be set where the system can retrieve a license. The following command can be used to accomplish this:
qacli admin --set-license-server <port
where the argument refers to an application layer address, for example, 5055@192.168.1.10 or 5055@myhost.
A PRQA project file contains the names of all configuration files which contain related settings. Creating a new PRQA project file is a case of specifying the directory where the project should be created and specifying the configuration files that it should contain. A PRQA project consists of:
- at least one Compiler Compatibility Template (CCT)
- one Rule Configuration File (RCF)
- one Analysis Configuration File (ACF)
The PRQA project can also contain:
- a Naming Convention File (NCF)
- a Version Control Compatibility File (VCF)
- a QA·Verify Connection File (QCF)
The following command creates a new PRQA project file:
qacli admin --qaf-project-config --qaf-project <directory> --cct <path>
--rcf <path> --acf <path>
For example:
qacli admin –qaf-project-config –P . –C MS_VC++_CL_16_x86_C.cct
–C MS_VC+_CL_16_x86_C+.cct –A default.acf -R default-1.0.rcf
After creating the PRQA project file, the next thing to be done is to populate it with the source files and analysis data (i.e. the include paths and macro definitions used to compile each source file) from the build. This data can be extracted using build process monitoring. PRQA will monitor the build process, extract the relevant data and add it to the specified project.
The following command can be used to accomplish this:
qacli admin -P <project-path> --build-command <command>
where project-path is a path to a valid PRQA project file and build-command is a command that will set the build in motion and compile the files.
If the build command contains more than one word, it should be wrapped in quotes. If the build command is complex (e.g. has quotes within it), the command should be placed in a script. The path of this script should be used as the argument.
The above command can be reused to replace the old data with the data gathered from the build. This is useful for keeping PRQA projects synchronized with the build projects.
For example:
qacli admin -P . –build make
It is also possible to create a CMA Project file as a build step prior to PRQA static analysis. This is done in a similar way to create the PRQA project file in a build step using the command line interface
Setup of PRQA analysis using PRQA Framework

Select PRQA·Framework option by clicking on radio button.

PRQA Framework Installation:
Select one of the PRQA Framework installations that was setup in the global Jenkins configuration.
PRQA Framework Project:
Enter the path to the directory containing the PRQA project file, prqaproject.xml for the project to be analyzed.
If the project file is in the top level directory of this module in the repository, then this can be left blank.
It is also possible to create a PRQA project file as a prior build step: that step will determine the location of the project file.
If the project file is inside the Jenkins workspace, then can just supply the relative path to the directory from the project root directory.
The plugin will automatically run static analysis on this project and produce the report.
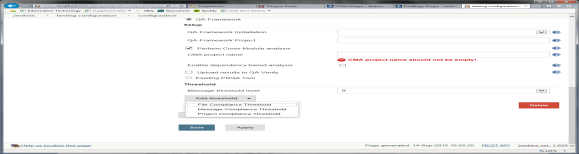
Project Based Cross-Module Analysis:
Project Based Cross-Module Analysis (CMA) is link time checking and is performed once all of the source files have been analyzed. CMA must be enabled to fully enforce a coding standard.
Note that CMA may take a long time to complete. If enabled, it will always be run regardless of the dependency based analysis setting.
![]()
If Project Based Cross-Module Analysis is required, select Run Project Based CMA Analysis.
![]()
The plugin will by default analyse all the source files. The amount of time to analyze the project can be decreased by only analyzing the source files that need analysis.
Select Enable dependency based analysis if this condensed analysis is required. Only source files that have changed or have no previous analysis output will be analyzed. Files that have up to date analysis output will not be analyzed.
Upload result to QA·Verify:
One of the most powerful features is the ability to upload the results of the analysis to QA·Verify. This enables developers to see the in-depth results of the analysis including annotated source code via a web browser showing the exact location of the coding standard violations. The non-compliances can then be fixed before re-committing the code.
It also allows deviations from the coding standard to be added, managed and reported providing the proof required to comply with coding standards such as MISRA C.
QA·Verify also allows other stakeholders such as managers and even customers to view the quality information. They are able to see how many defects there are in the code – and whether this is increasing or decreasing. This visibility of project level information equips managers with the data needed to make decisions on where to deploy resources if required.
If the results are wanted to be put in QA·Verify, select Upload results to QA·Verify. This will enable uploading the project analysis as a snapshot to QA·Verify.

Select a server configuration to be used when uploading to QA·Verify that was setup in the global Jenkins configuration.
Enter the name of the QA·Verify project to be uploaded to. Once a project has been uploaded to QA·Verify the project name must stay the same, or the snapshot will not be attached to the correct project. It is recommended to create the project first in QA·Verify so can check the project configuration is correct before uploading snapshots.
Enter the location of the QA·Verify Config file and VCS Config file to be used. Use the versions that are configured for the PRQA project if they have been configured otherwise use the default files located under the config directory of product install directory.
- By default performing Cross Module Analysis and uploading results to QA·Verify are not selected. But the text boxes linked to these options still have an error message associated with the text boxes because of a known limitation to Jenkins plugin. The error message is "This field is mandatory and should not be empty!"
- A workaround for this is to select and deselect the relevant option.
Setup of PRQA analysis using existing PRQA Tool
Select Existing PRQA Tool option by clicking on radio button.
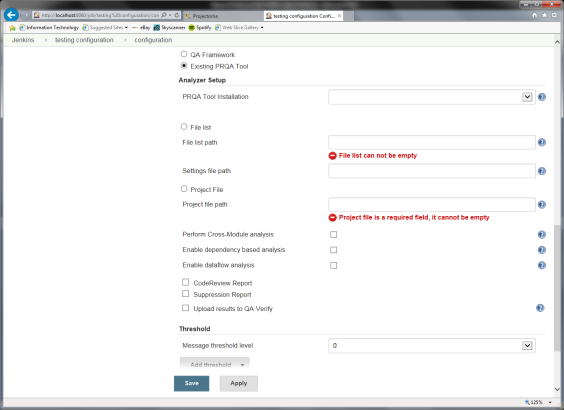
PRQA Tool Installation:
Select one of the PRQA Products that was setup in the global Jenkins configuration. The list has two default values, QA·C and QA·C++: these are the default installations and only used when the machine has be setup manually.
File List:
Select File List if the source files have been analyzed as part of the build process. This could be for example using Wrapper as a Makefile integration process.
Enter a path to a PRQA file list containing the output paths and source file names for the files that have been analyzed.
The Settings file should contain all of the analysis settings used: this can be created by simply concatenating the Message, Analyzer (if used) and Compiler personalities together into a single file.
If the files are within the Jenkins workspace, can just supply the relative path to them from the project root directory.
Project File:
Select Project File to analyze the project.
Enter the full path to the PRQA project file to be analyzed.
If the project file is part of the project in the repository, then it will be checked out in the project structure into the Jenkins workspace.
It is also possible to create a PRQA project file as a prior build step: that step will determine the location of the project file.
If the project file is inside the Jenkins workspace, can just supply the relative path to them from the project root directory.
![]()
Cross-Module Analysis:
Cross-Module Analysis (CMA) is link time checking and is performed once all of the source files have been analyzed. CMA must be enabled to fully enforce a coding standard. The CMA project must have been created previously.
Note that CMA may take a long time to complete. If enabled, it will always be run regardless of the dependency based analysis setting.
![]()
The plugin will by default analyse all the source files. The amount of time to analyze the project can be decreased by only analyzing the source files that need analysis.
Select Enable dependency based analysis if this condensed analysis is required. Only source files that have changed or have no previous analysis output will be analyzed. Files that have up to date analysis output will not be analyzed.
![]()
Dataflow analysis:
If dataflow is already enabled in the PRQA project, this option has no effect.
If dataflow is not enabled in the PRQA project, then enabling it here will make it use the default timeouts.
A PRQA project must be set up to use a User Defined dataflow personality if different timeouts and dataflow options are required.
This file should contain just the dataflow settings and not the -EnableDataflow+ or -ed+ option to turn on dataflow (or it will be always enabled).
For example:
*Dataflow is enabled when analysis launched from Jenkins
*Use 10 seconds timeout
-po df::query_timeout=100001
-po df::function_timeout=100000
*Maximum interfunction depth
-po df::inter=5
Reports:

Select Code Review Report if this report is required.
Select Suppression Report if this report is required.
Upload result to QA·Verify:
If the results are wanted to be put in QA·Verify, select Upload results to QA·Verify. This will enable uploading the project analysis as a snapshot to QA·Verify.

Select a server configuration to be used when uploading to QA·Verify that was setup in the global Jenkins configuration.
Code upload settings controls if the source code is uploaded to QA·Verify.
- All code uploaded will unconditionally upload all source and header files to QA·Verify so it will not need to access the repository. The VCS can still be used during upload to get the file versions and authors - specify a VCS configuration file below.
- No code uploaded will not upload any code. QA·Verify will retrieve all required code from the repository. A VCS configuration file must be specified below.
- Only code not in VCS will only upload files that are not in the Version Control System (e.g. generated files). Files that are in the repository will not be uploaded.
Enter the name of the QA·Verify project to be uploaded to. Once a project has been uploaded to QA·Verify the project name must stay the same, or the snapshot will not be attached to the correct project. It is recommended to create the project first in QA·Verify so can check the project configuration is correct before uploading snapshots.
Enter the location of the QA·Verify Config file and VCS Config file to be used. Use the versions that are configured for the PRQA project if they have been configured otherwise use the default files located under the config directory of product install directory.
Specify the full path to the top level of the source directory structure as the source origin. The source origin will default to the current workspace if nothing is specified
This value is only used when source code is uploaded to QA·Verify (i.e. using All code uploaded or Only code not in VCS settings) and is used to remove the leading parts of pathnames in the Web Message Browser.
If left blank, the plugin assumes that the top level of the source code directory is the job's workspace: this is usually the correct setting.
Select Use Single Snapshot to enable Single Snapshot upload to QA·Verify. Each snapshot will overwrite the previous snapshot. The project will only consist of a single snapshot and there will be no trending or baselining.