Configuring Liberty Server
Updating server.xml
1) Open server.xml for the Liberty profile you want to connect to (i.e. <Liberty_Install_Root>/usr/servers/defaultServer/server.xml)
2) Enable the restConnector-1.0 (Note: this imports SSL features as well)
<featureManager>
<feature>restConnector-1.0</feature>
</featureManager>
3) Add a quick start security implementation
<quickStartSecurity userName="bob" userPassword="bobpassword" />
4) Add remote file access (Note: "server.output.dir" is a valid variable)
<remoteFileAccess>
<readDir>${server.output.dir}/dropins</readDir>
<writeDir>${server.output.dir}/dropins</writeDir>
</remoteFileAccess>
5) Edit host attribute to listen on all interfaces (i.e. the default is 'localhost', so change it to '*')
<httpEndpoint id="defaultHttpEndpoint" host="*" httpPort="9080" httpsPort="9443" />
Generating a keystore for SSL (required for remote connectivity from Jenkins)
6) Create SSL Certificate/KeyStore
Execute the following command (assuming defaultServer is the server name) to create a key.jks file)
<Liberty_Install_Root>/bin/securityUtility createSSLCertificate --server=defaultServer --password=anypassword
Note the response generated by the previous command. Copy just_ _the keyStore line to your server.xml configuration
<keyStore id="defaultKeyStore" password="....." />
The key.jks file will be located in <Liberty_Install_Root>/usr/servers/defaultServer/resources/security/key.jks
7) Copy the generated key.jks file and place it in a directory on the server where Jenkins resides.
Example server.xml configuration after following the above steps
<server description="default server">
<featureManager>
<feature>jsp-2.2</feature>
</featureManager>
<featureManager>
<feature>restConnector-1.0</feature>
</featureManager>
<keyStore id="defaultKeyStore" password="..." />
<quickStartSecurity userName="bob" userPassword="bobpassword" />
<remoteFileAccess>
<readDir>${server.output.dir}/dropins</readDir>
<writeDir>${server.output.dir}/dropins</writeDir>
</remoteFileAccess>
<httpEndpoint id="defaultHttpEndpoint"
host="*"
httpPort="9080"
httpsPort="9443" />
</server>
Configuring Jenkins
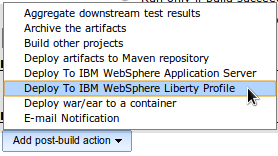
8) Select "Add post-build action" & select "Deploy To IBM WebSphere Liberty Profile"
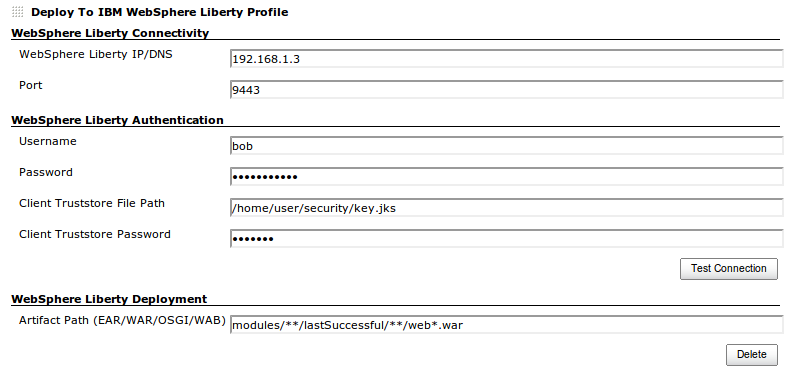
9) Enter the IP/DNS Address of IBM WebSphere Liberty
10) Enter the secure port to connect to defined in step #5. (unsecured deployments are not allowed)
11) Enter the Username defined in step #3
12) Enter the Password defined in step #3
13) Enter the location of the key.jks file defined in step #7
14) Enter the password defined in step #6
15) Enter the location of the module you want deployed. (You can use ANT style GLOBS).
16) Point your browser to https://<liberty_server>:<port>
17) Export the SSL certificate and save it on the Jenkins server
18) Import the certificate into "cacerts" for the JVM that's running Jenkins
keytool -keystore <jre_home>/lib/security/cacerts -importcert -alias websphere-liberty-remote -file liberty.crt
Note: The default password for cacerts is "changeit"
19) Restart Jenkins so the imported certificate to be picked up. Enjoy!
Example Jenkins Configuration
