type
key
priority
summary
status/
Data cannot be retrieved due to an unexpected error.
The HP OO Automation Execution plugin enables you to leverage the capabilities of HP OO as part of your build and testing cycles, providing DevOps capabilities for your application.
This plugin is open source. If you identify any issues or want to submit enhancement requests, please use JIRA. The component for this plugin is the hp-operations-orchestration-automation-execution-plugin. Your feedback will allow us to stabilize and enhance the plugin.
Use the Case Study document to investigate several use cases that can be implemented using the plugin.
This new version is backward compatible with the OO 9.x servers but with limited functionality. In other words you can use this version to run the 9.x flows as you already did but for all the new features you need to have OO 10.x version.
This version is also compatible with the HP OO Community Edition of 10.x version.You can download this free version here:HP OO Community Edition
About this plugin
HP Operations Orchestration
HP Operations Orchestration (HP OO) software is a leading product in the IT Process Automation market. HP OO automates the tasks and processes in datacenters using workflows that help IT teams execute change with greater speed, quality, and consistency.
HP Operations Orchestration software includes HP OO Central and HP OO Studio. OO Central is a web-based application used for promoting, running and scheduling flows, administering the system, and extracting and analyzing data resulting from flow runs. OO Studio is an intuitive and easy-to-use tool for authoring and designing workflows.
HP OO comes with a large OOTB content library, offering the ability to integrate with many other HP software products and 3rd party vendors like VMware, Microsoft and Openstack
For more details see the HP Operations Orchestration product page.
HP OO Content for Jenkins
** **
As part of the HP OO Community, content for Jenkins was created. This content is open for changes and free for use by any OO customer. The content can be used to interact with Jenkins continuous integration application and implements basic use cases such as running jobs and getting details about different jobs. The content allows you to communicate back to the Jenkins CI Server from the same workflow that was triggered by the plugin
Installation and Configuration
Manual Installation
- Stop the Jenkins service.
- Copy the hp-operations-orchestration-automation-execution-plugin.hpi file in the JENKINS_HOME\plugins folder.
- Start the Jenkins service.
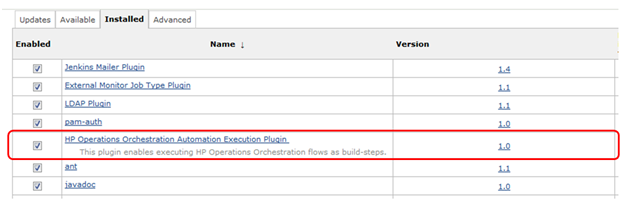
- Go to the Jenkins dashboard and select Manage Jenkins and then Manage Plugins.
- In the Installed tab, the plugin list displays the Operations Orchestration plugin.
Manual uninstallation
- Stop the Jenkins service.
- Delete the hp-operations-orchestration-automation-execution-plugin folder in the JENKINS_HOME\plugins folder.
- Delete the hp-operations-orchestration-automation-execution-plugin*.hpi* file in the JENKINS_HOME\plugins folder.
- Delete the com.hp.mercury.ci.jenkins.plugins.OOBuildStep.xml in the JENKINS_HOME folder.
- Start the Jenkins service.
Automated Installation
- Go to the Jenkins dashboard and select Manage Jenkins and then Manage Plugins. In the Available tab, search for the plugin as hp operations
- Select the plugin and hit Install without restart
Automated uninstallation
- Go to the Jenkins dashboard and select Manage Jenkins and then Manage Plugins. In the Installed tab identify the plugin and hit uninstall button.
- Next time you restart Jenkins the plugin will be automatically uninstalled.
Configurations
- Go to the Jenkins dashboard, and select Manage Jenkins and then Configure System*.*
- Scroll down until you see the HP Operations Orchestration field
- In the Truststore File field, enter the absolute path of the JKS truststore used for communication with the Operations Orchestration server over SSL. For details on how to generate the JKS truststore please refer to the section Configuring SSL for the plugin on 10.x versions of OO. This field is only mandatory if one of the defined Operations Orchestrations servers is running on HTTPS.
- In the Truststore Password field, enter the password for the JKS truststore. The password must be at least 6 characters in length.
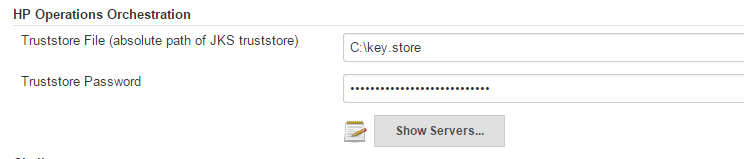
To see the list of servers just click on the Show Servers... button
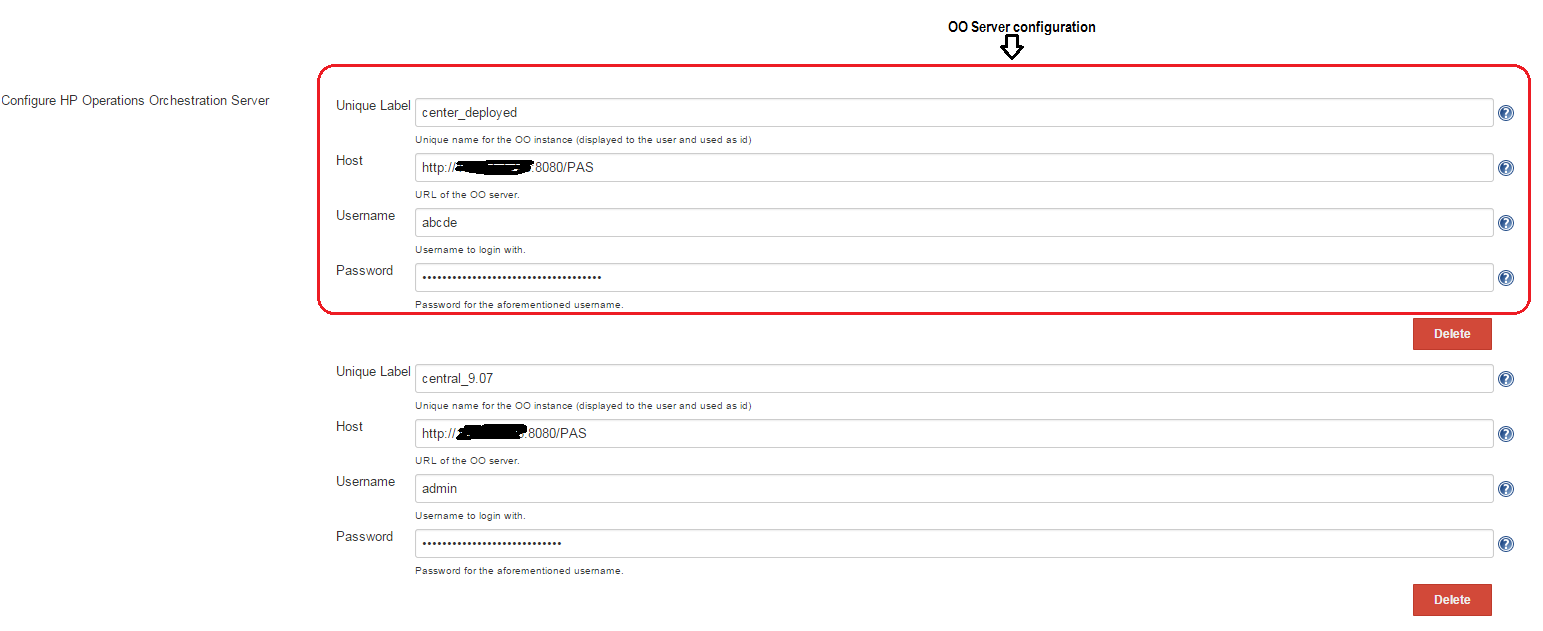
Inside the Configure HP Operations Orchestration Server section:
- In the Unique Label field, enter the name of the Operations Orchestration server. The unique label acts as a global identifier across all defined Operations Orchestration servers.
- In the Host field, enter the HP Operations Orchestration URL. For example, https://<host>:*<*port>/PAS for an HTTPS configured Operations Orchestration server. See the configuration sample.
- In the Username and Password fields, enter the HP Operation Orchestration authentication account.
- Click the Apply or Save button to save the Operations Orchestration server configurations in the Jenkins global settings.
Optional actions:
- To add a new Operations Orchestration server, click the Add button.
- To delete an Operations Orchestration server, click
the Delete button.
Integrating Operations Orchestration in the Jenkins build
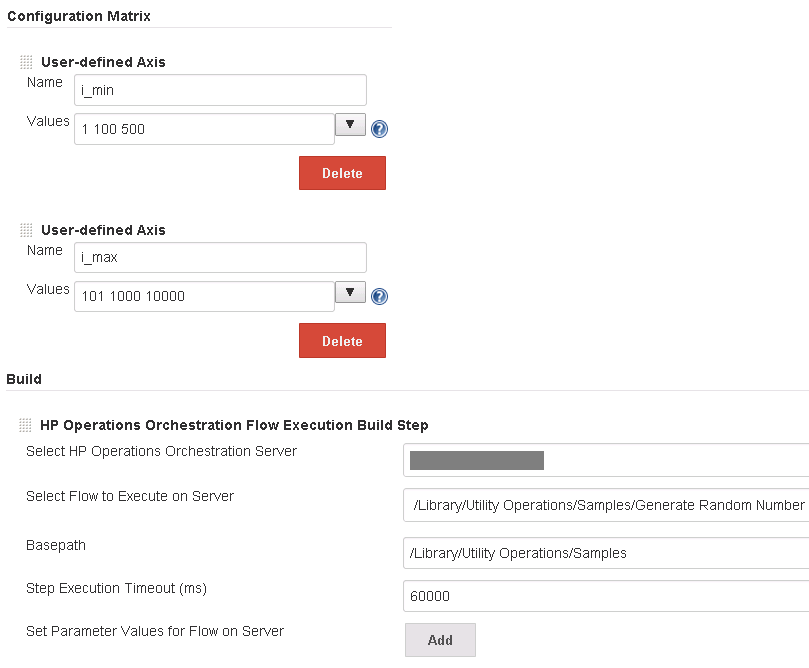
From the job configuration page go to the Add build step menu and select HP Operations Orchestration Flow Execution Build Step.
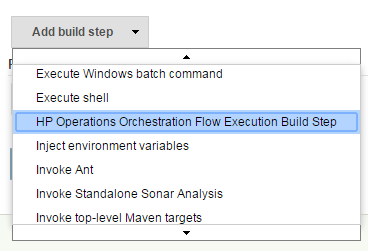
Inside the HP Operations Orchestration Flow Execution Step section
you should see the plugin like in the picture below:
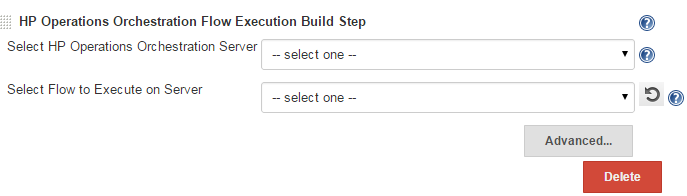
Click on the Advanced... button to have the list of all the options.
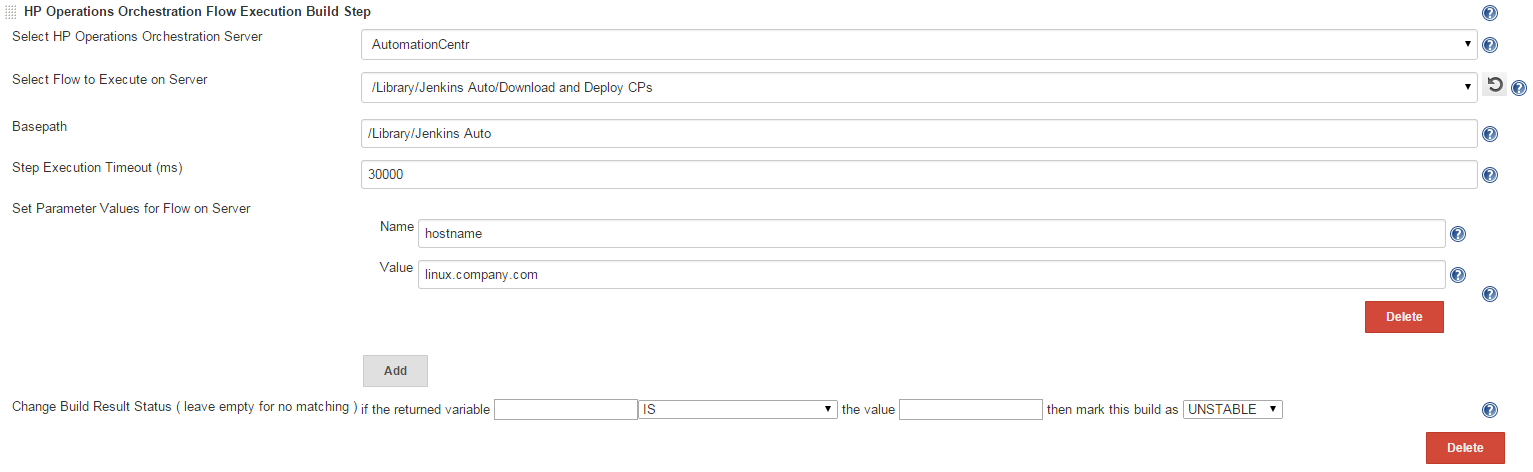
- From the Select HP Operations Orchestration Server list, select the Operations Orchestration server. If the Unique Label of an Operation Orchestration server was changed, you must update the Jenkins job configurations wherever that server is referenced.
- From the Select Flow to Execute on Server list, select the flow to execute.
- In the Basepath field, enter the parent folder where the flow to execute is located.
- The Select Flow to Execute on Server list is populated with the flows residing in the folder entered in the Basepath field.
- The Basepath value represents the absolute folder path from the Operation Orchestration Content library.
- In Step Execution Timeout (ms) field, enter the maximum amount of time (in milliseconds) that the plugin should wait for each step to execute before it ends the Jenkins build.
- If the timeout expires, the execution log will not be available.
- Click the Refresh button to refresh the flows shown in the Select Flow to Execute on Server list.
- Optional actions:
- To add the flow inputs to the selected flow, click the Add button. (see the image below)
- To delete flow inputs from the selected flow, click the Delete button. (see the image below)
- You can change the build result status to
either FAILURE or UNSTABLE by testing a certain output
against a constant, through the use of the following operators: IS,
CONTAINS, STARTS_WITH, DIFFERS_FROM, IS_A_REGEX_MATCH_FOR.
To change the build status, you must input the necessary information in the fields.
For more information about each field you can use the
help button. You can find configuration examples for setting up a server
or running a flow.
Reporting in the Jenkins console
The plugin writes in the Jenkins console the following
information: <serverName>
Authentication will be used for the user : <username>
Central version : <centralVersion>
Global Keystore : <globalKeystoreFile>
Running <flowName> on <serverName> with parameters <parameters>
The flow: <flowName> with UUID <flowUUID> is executing...
Step Execution Timeout : <stepExecutionTime> ms After this
information is logged, the actual execution starts on the OO Central
server. After the execution completes, the plugin outputs
the entire JSON from the execution log. The last bit of
information written by the plugin in the console is the actual URL to
the execution from Central.
Configuring SSL for the plugin on 9.x versions of OO
If the Operations Orchestration server is configured to run over HTTPS, then in order for the Operations Orchestration plugin to be able to communicate with the Operations Orchestration server, the OO plugin trustStore must contain the public key of the certificate used by the server.
To manually import a security certificate into the Operations Orchestration plugin’s JKS truststore, you must perform the following steps:
- Export the OO server’s certificate public key, from <INCONCLUDE_HOME>\conf\rc_keystore : >keytool -export -keystore rc_keystore -alias pas -file PasPublicCert.cer * Import the OO server’s certificate into the plugin truststore on the Jenkins machine :>keytool --importcert --keystore oo_plugin_truststore --file PasPublicCert.cer -alias pas* After the import, verify that the import was successful using the command: >keytool --list --keystore oo_plugin_truststore The Operations Orchestration plugin truststore will contain the TrustedCertEntry with the imported key and the provided alias (pas).
Configuring SSL for the plugin on 10.x versions of OO
A. Self-signed certificate
- Stop Central and back up the original key.store file, located in
<installation dir>/central/var/security/key.store
* *
- Open a command line in <installation dir>/central/var/security.
- Delete the existing server certificate from the Central key.store file, using the following
keytool -delete -alias tomcat -keystore key.store -storepass <changeit>
- Generate a self-signed certificate:
keytool -genkey -alias tomcat -keyalg RSA -keypass <changeit >-keystore <path/for/new/Keystore> -storepass <changeit>-storetype pkcs12 -dname
* "CN=<CENTRAL_FQDN>, OU=<ORGANIZATION_UNIT>, O=<ORGANIZATION>, L=<LOCALITY>, C=<COUNTRY>"*
Note: If you do not enter a path for generating the new keystore, it is created in the folder where you entered the command, for example <installation dir>/central/var/security.
- Import the self-signed certificate to the Central key.store file:
keytool -v -importkeystore -srckeystore <new/path/created/Keystore> -srcstoretype PKCS12 -srcstorepass <changeit> -destkeystore key.store -deststoretypeJKS - deststorepass <changeit>
6. Start Central.
B. CA Certificate
This information is present in the Hardening guide delivered with OO 10.10 and newer versions. The following procedure uses the Keytool utility that is located in <installation dir>/java/bin/keytool on the Central server.
1. Stop Central and back up the original key.store file, located in
<installation dir>/central/var/security/key.store.
_2. _Open a command line in <installation dir>/central/var/security.
3. Delete the existing server certificate from the Central key.store file
keytool -delete -alias tomcat -keystore key.store -storepass changeit
4. If you already have a certificate with .pfx or .p12 extension, then go to the next step.
If not, then export the certificate with private key into PKCS12 format (.pfx, .p12).
For example, if the certificate format is PEM:
>openssl pkcs12 --export --in <cert.pem> -inkey <key.key> -out <certificate name>.p12 --name <name>
If the certificate format is DER, add the --inform DER parameter after pkcs12.
>openssl pkcs12 --inform DER --export --in <cert.pem> -inkey <.key> -out <certificate name>.p12 --name <name>
Note: Make a note of the password that you provide. You will need this password for the private key when you input the keystore passphrase later in this procedure.
5. Extract the alias for your certificate’s alias, using the following command:
keytool -list -keystore <certificate_name> -v -storetype PKCS12
The alias is displayed.
6. Import the PKCS12 format server certificate to the Central key.store file:
keytool -importkeystore -srckeystore <PKCS12 format certificate path> -destkeystore key.store -srcstoretype pkcs12 -deststoretype JKS -alias <cert alias> -destalias tomcat
7. It is recommended to change the default “changeit” password in the automatically-generated keystore in the Central server.
8. Start Central.
Matrix Configuration Job
A matrix is a collection of smaller jobs. Each job runs a flow on a Central with a certain combination of inputs. If any of the smaller jobs fails, the main job will fail.
Invoking simple operations is not supported.
The 3 types of information that can generate the matrix are:
- What flow runs
- What Central the flow runs on
- What inputs the flow runs with
The plugin can be used to trigger the following types of scenarios:
- Running a flow on the same Central with different values for some input(s).
- Running different flows on different Centrals with the same, hardcoded inputs.
- Running different flows on different Centrals with different input values.
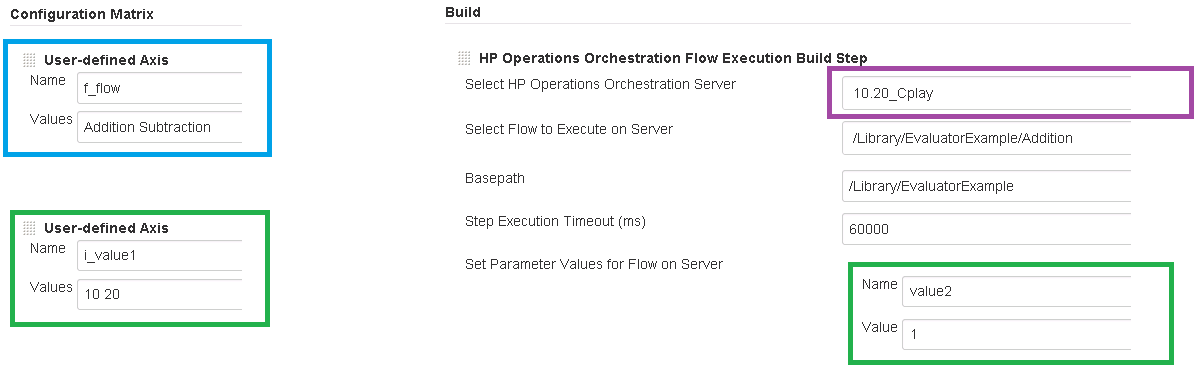
In order to create a matrix, add a new Multi-configuration project item in Jenkins.
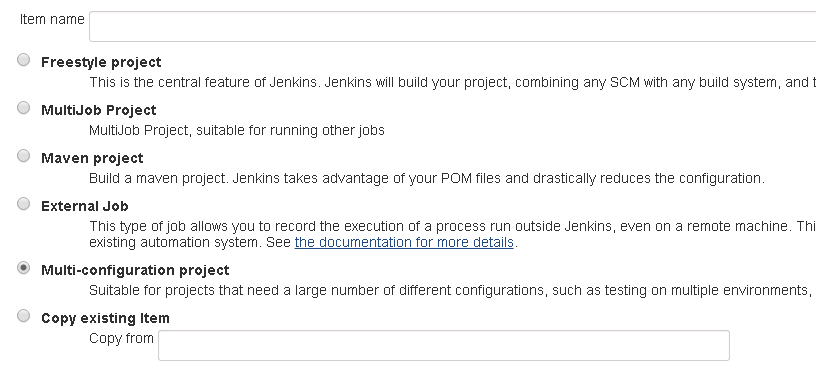
After the project is created, the next step is to add the axis and a HP
Operations Orchestration Flow Execution Build Step.
*** Example 1:*
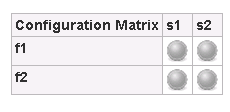
If you want to run the flows f1 and f2 on the Central servers s1 and s2, there will be a total of 4 smaller jobs (mini-jobs), each testing one of the 4 combinations.
The flows and servers are actually generating the 2x2 matrix with the 4 mini-jobs.
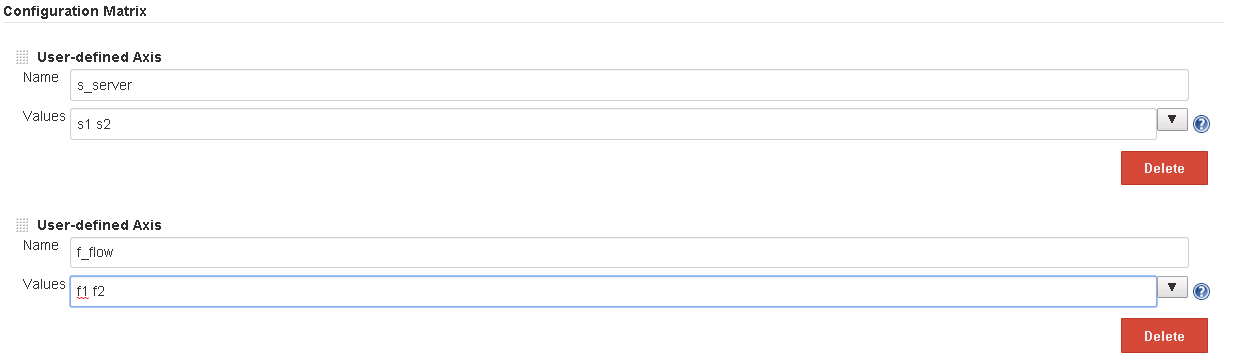
 s_server
 f_flow
 i_${inputName}
For the plugin to know what servers, flows and inputs you want to use,
you need a specific syntax to input the axis values in a matrix
configuration job, as follows:|
The f_flow values are relative to the Basepath defined in the build
step.
The axis Values list elements will be injected at runtime in each mini-job.
The s_server values must match labels already defined in the Manage Jenkins/Configure System/HP Operations Orchestration section (see Example 3); otherwise the corresponding jobs will fail because the target server does not contain a valid Central on which to run the flows on.
If s_servers are not specified, the server set in the build step will be the target Central.
If the f_flows values are used to generate the matrix, the flows they represent must be located in the Basepath folder. The value from the “Select Flow to Execute on Server” is ignored in this case, but must be supplied.
*** ***
Example 2:
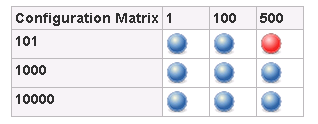
For the sample flow Random Number Generator (from Base CP),
that has 2 inputs min and max and generates a random number between
min and max, the axis could be specified like:
A 3 x 3 matrix will be generated; each of the 9 mini-jobs will run the
flow on the server specified in the build step, with different values
for min and max.
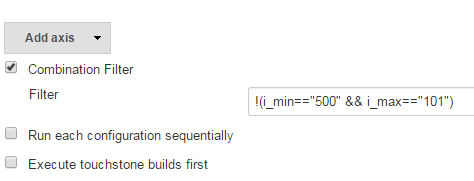
* * The mini-job that has min=500 and max=101 fails because this is an invalid input combination for the flow.
In this situation you can use the Combination filter option in the
Jenkins job to skip the invalid configuration. For more options on this
combination filter you can use the help button available to the right of
the field.
Example 3:
If one of the axis is generated with _f_flow_, and multiple flows have common inputs with common values that do not generate the matrix, those can be specified in the Build step section like in the normal, non-matrix scenario.
In this example, the matrix will run 2 flows: Addition and
Subtraction, located in the same folder in Central,
/Library/EvaluatorExample.* * Both flows have 2 inputs called value1
and value2. The first input is populated through the matrix axis, and
the 2nd through the build step.
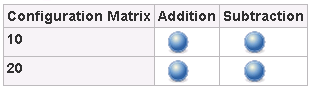
After the execution finishes, the matrix will look like this:
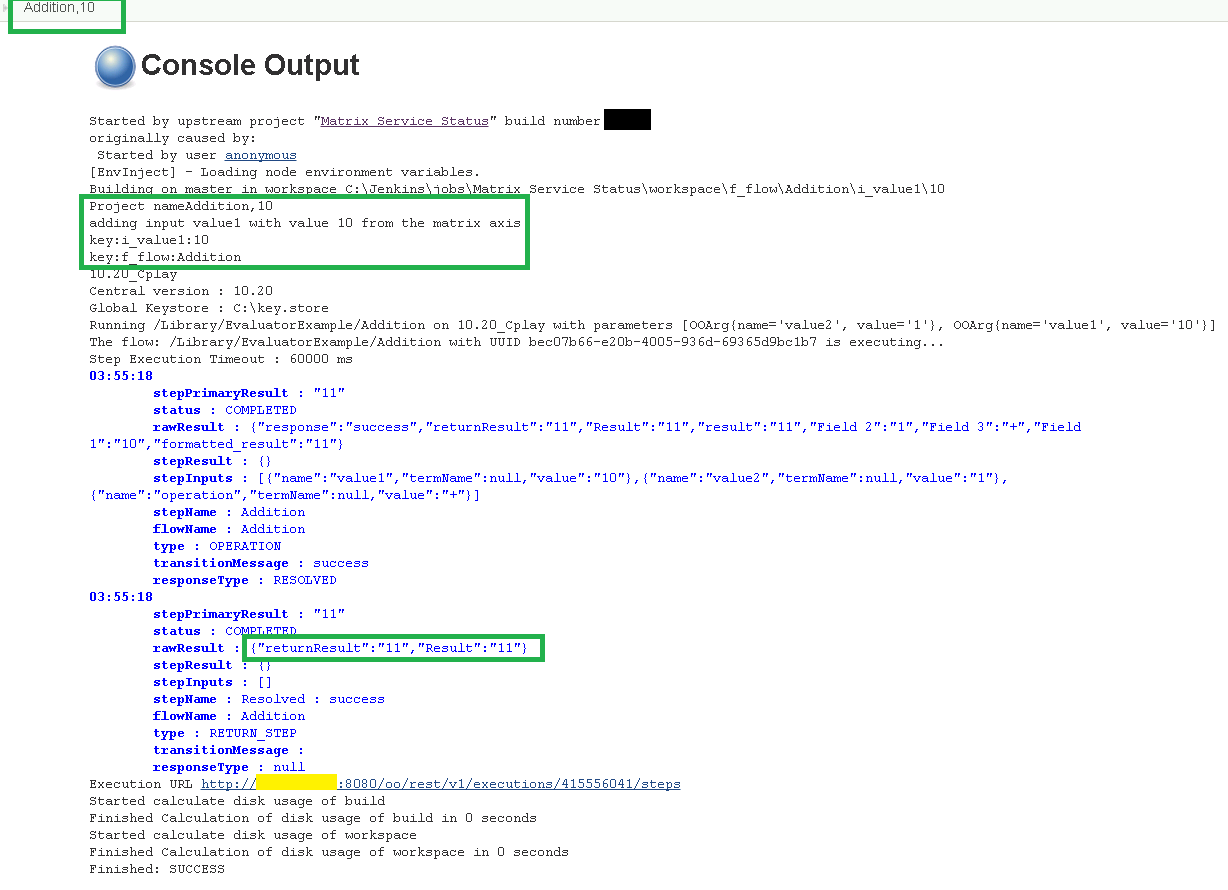
Below is the console output corresponding to the “Addition, 10” mini-job.
Changelog
Version 2.1.1 (July 5, 2016)
This is the list of issues that were fixed:
- Increased global & route connections limit to 100 (it was limited to 2 runs) (9x version)
- Added support for CSRF (10x version)
- Added stack trace for failed flows
- Build wasn’t failed when timeout is reached
- Trigger in 9x didn’t work (get version throw exception)
- No report for 10x runs
- Added support for customize run name
- Code refactoring
Version 2.1.0 (July 5, 2016)
Failed release
Version 2.0.0 (May 13, 2015)
Plugin enhancements :
- support for 10.02 and newer versions of OO
- saving the password when adding a new server
- improve reporting by adding HTML formatting to the execution log,
- support for running inside Jenkins multi-configuration jobs
- improving timeout mechanism
- improving build step view in the Jenkins job
- adding help tags to build step text fields.
Version 1.0.x
Obsolete