Google Cloud Storage Plugin Documentation
This plugin provides functionality to communicate with Google Cloud Storage, as build steps, post-build steps, or pipeline steps.
Credentials
All steps consume credentials surfaced by the Google OAuth Credentials Plugin for authenticating storage requests. Once you have register a credential (e.g. “my-project”) that provides storage access you will see:

If no suitable credentials are found, you will see:

In this case, you will need to set up credentials in the Credentials tab (see instructions for Google OAuth Credentials Plugin.
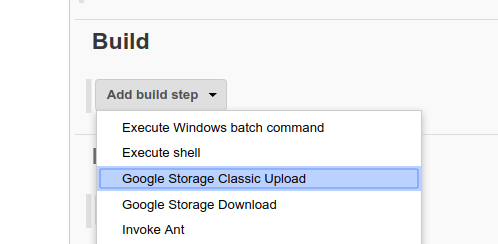
Build Step
Two build steps are supported by this plugin:
- Classic Upload step to upload files to Google Storage.
- Download step to get files from Google Storage into the local Jenkins workspace.
Classic Upload Build Step
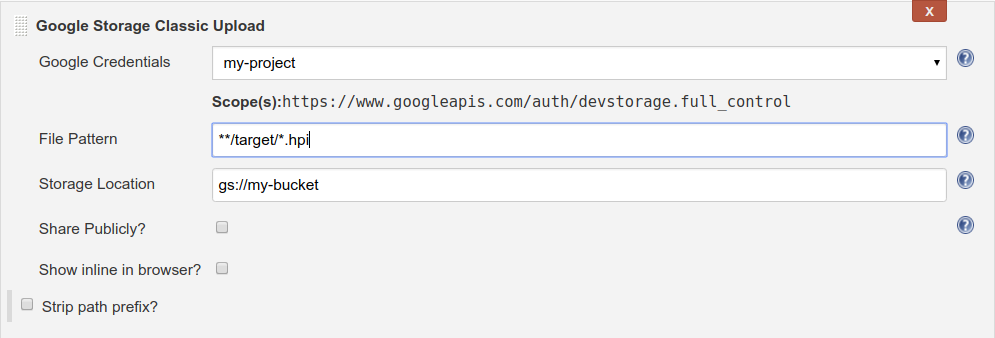
Use the Classic Upload Build Step to upload an ant-style glob of files (File Pattern) to the specified storage path (Storage Location). Select:
- Share Publicly to make the uploaded files publicly accessible.
- Show inline in browser to set the metadata of the files such that the file is shown inline in browser, rather than downloaded.
- Strip path prefix and specify the prefix you want to strip if you don’t want the whole path of the local files reflected in the bucket object name.
Pipeline Example
pipeline {
    agent any
    environment {
        CREDENTIALS_ID ='<YOUR_CREDENTIALS_ID>'
        BUCKET = '<YOUR_BUCKET_NAME>'
        PATTERN = '<OBJECT_TO_UPLOAD>'
    }
    stages{
        stage('Store to GCS') {
            steps{
                sh '''
                    env > build_environment.txt
                '''
                // If we name pattern build_environment.txt, this will upload the local file to our GCS bucket.
                step([$class: 'ClassicUploadStep', credentialsId: env
                        .CREDENTIALS_ID,  bucket: "gs://${env.BUCKET}",
                      pattern: env.PATTERN])
            }
        }
    }
Download Build Step
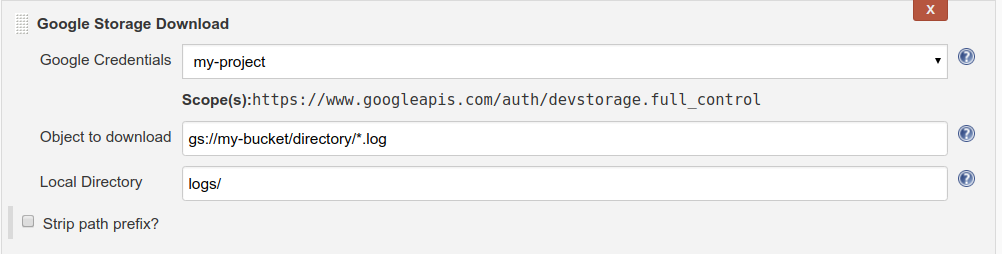
Use the Download step to download files (Object to download) from Cloud Storage into the local directory. The wildcards here act the same way as in GSUtil tool. Currently only a single asterisk at the lowest level of the object name is supported.
If you don't want the whole path of the object to be reflected in the directory structure, select Strip path prefix to strip a prefix from the object names.
Pipeline Example
pipeline {
    agent any
    environment {
        CREDENTIALS_ID ='<YOUR_CREDENTIALS_ID>'
        BUCKET = '<YOUR_BUCKET_NAME>'
        PATTERN = '<OBJECT_TO_DOWNLOAD>'
        LOCAL_DIR = '<DIRECTORY_TO_DOWNLOAD_TO>'
    }
    stages {
        stage('Download from GCS') {
            steps{
                // Download from GCS bucket object named PATTERN to directory LOCAL_DIR.
                step([$class: 'DownloadStep', credentialsId: env
                        .CREDENTIALS_ID,  bucketUri: "gs://${env.BUCKET}/${env.PATTERN}",
                      localDirectory: env.LOCAL_DIR])
            }
        }
    }
}
Post-build step
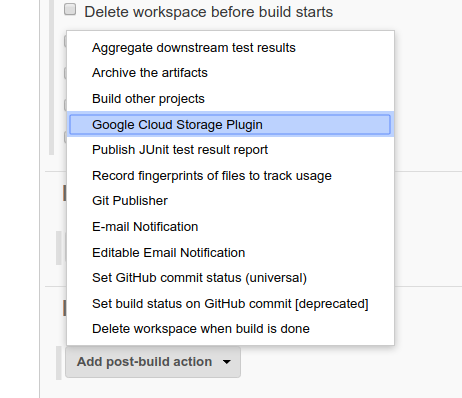
This plugin provides the “Google Cloud Storage Uploader” post-build step for publishing build artifacts to Google Cloud Storage. Download functionality is not supported, but can be accessed as a Build Step (see above).
Configure the post-build step with any combination of the following sub-steps:
Bucket with expiring elements lifecycle
Use this step to set a time to live for a given Google Cloud Storage bucket. It will configure the named bucket to delete objects after the specified number of days.

Pipeline Example
pipeline {
    agent any
    environment {
        CREDENTIALS_ID = '<YOUR_CREDENTIALS_ID>'
        BUCKET = '<YOUR_BUCKET_NAME>'
        TTL = '<TIME_TO_LIVE>'
    }
    post {
        always {
            // After build, set the items in our GCS bucket to live for TTL number of days before deletion.
            step([$class: 'ExpiringBucketLifecycleManagerStep', credentialsId: env.CREDENTIALS_ID, bucket: "gs://${env.BUCKET}", ttl: env.TTL])
        }
    }
}
Build log upload
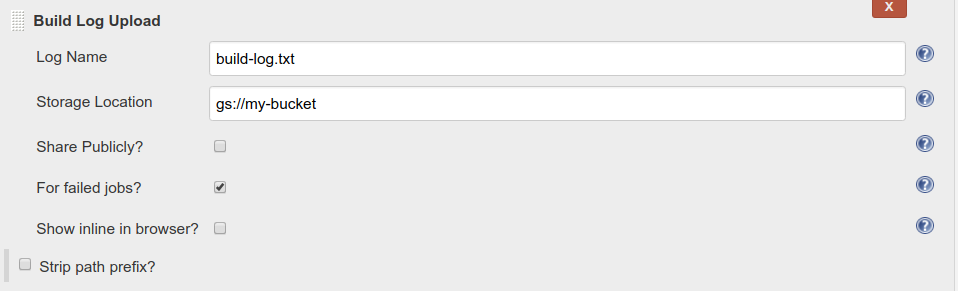
This step uploads the contents of the Jenkins build log to the specified storage path.
To configure this operation to upload stdout even if the build fails, check "For failed jobs". To configure the operation to make the uploaded logs publicly accessible, check "Share publicly".
Pipeline Example
pipeline {
    agent any
    environment {
        CREDENTIALS_ID ='<YOUR_CREDENTIALS_ID>'
        BUCKET = '<YOUR_BUCKET_NAME>'
        PATTERN = '<OBJECT_TO_UPLOAD>'
    }
    stages{
        stage('Store to GCS') {
            steps{
                sh '''
                    env > build_environment.txt
                '''
            }
        }
    }
    post {
        always {
            // After build, always upload build log under name PATTERN to GCS bucket.
            step([$class: 'StdoutUploadStep', credentialsId: env.CREDENTIALS_ID,  bucket: "gs://${env.BUCKET}",
                logName: env.PATTERN])
        }
    }
}
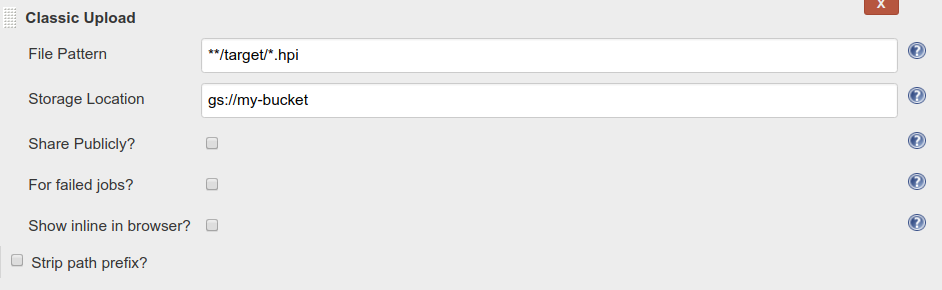
Classic upload
Classic Upload has the same functionality as the Build Step Classic Upload step. One additional option is "For failed jobs". Check this box to do the upload to Google Cloud Storage even if the build fails.
Pipeline Example
pipeline {
    agent any
    environment {
        CREDENTIALS_ID ='<YOUR_CREDENTIALS_ID>'
        BUCKET = '<YOUR_BUCKET_NAME>'
        PATTERN = '<OBJECT_TO_UPLOAD>'
    }
    stages {
        stage('Store to GCS') {
            steps{
                sh '''
                    env > build_environment.txt
                '''
            }
        }
    }
    post {
        always {
            // After build, always upload local object named PATTERN to GCS bucket.
            step([$class: 'ClassicUploadStep', credentialsId: env.CREDENTIALS_ID,  bucket: "gs://${env.BUCKET}",
                pattern: env.PATTERN])
        }
    }
}
Pipeline Step
Both Classic Upload and Download functionality are available through pipelines and can be generated with Pipeline Syntax builder. Build Log Upload and Bucket with Expiring Elements Lifecycle are available as steps to be run in post in pipelines.
Example
In this example, we will do a Classic Upload build step with a Build Log Upload step in post-build.
- Create a file named "Jenkinsfile" in the root of your project.
- Within your Jenkinsfile add the following:
pipeline {
    agent any
    environment {
        CREDENTIALS_ID ='<YOUR_CREDENTIALS_ID>'
        BUCKET = '<YOUR_BUCKET_NAME>'
        PATTERN = '<OBJECT_TO_UPLOAD>'
        LOG = '<NAME_FOR_BUILD_LOG>'
    }
    stages{
        stage('Store to GCS') {
            steps{
                sh '''
                    env > build_environment.txt
                '''
                // If we name pattern build_environment.txt, this will upload build_environment.txt to our GCS bucket.
                step([$class: 'ClassicUploadStep', credentialsId: env.CREDENTIALS_ID,  bucket: "gs://${env.BUCKET}",
                 pattern: env.PATTERN])
            }
        }
    }
    post {
        always {
            // Uploads build log with name LOG as an object to our GCS bucket.
            step([$class: 'StdoutUploadStep', credentialsId: env.CREDENTIALS_ID,  bucket: "gs://${env.BUCKET}",
                logName: env.LOG])
        }
    }
}