Provides full integration between Jenkins and ElasticBox (http://elasticbox.com). With this plugin, Jenkins can launch, provision, and manage Jenkins slaves on-demand in different cloud providers via ElasticBox. It also provides build steps to deploy and manage your applications, including complex, multi-tier applications that are defined as boxes in ElasticBox.
Version compatibility
The plugin is always compatible with the latest version of ElasticBox.
If you're using a previous version of ElasticBox (<4.0), the latest
compatible version of the plugin is the 0.9.14
The latest documentation and tutorials can be found at https://elasticbox.com/documentation/integrate-with-jenkins/ci-cd-overview/
Installation / Configuration
- Jenkins must be restarted after installation of this plugin for it
to work properly. You can trigger a hot restart of Jenkins by
checking the check box as shown below after your selection to
install ElasticBox CI plugin.

- If you are starting a JNLP Jenkins slave agent in your slave instance and your Jenkins server is not wide-open at every port, configure a fixed JNLP port for your Jenkins server under Manager Jenkins > Configure Global Security.
- Set Jenkins URL in configuration page of your Jenkins server with a host name or IP address that are accessible to the slaves.
How To Use
-
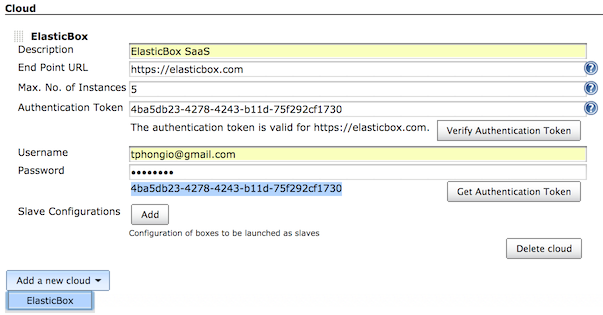
Add ElasticBox as a cloud in the configuration page of Jenkins. You can add multiple ElasticBox clouds, one for each user at elasticbox.com or your own ElasticBox appliance. An authentication token is required to access ElasticBox. You can retrieve an authentication token from your ElasticBox account or enter the username and password, click Get Authentication Token button, then copy the returned token to the Authentication Token field. Click Verify Authentication Token to make sure that the specified token is correct.
-
Create a Jenkins Slave box in ElasticBox (you can sign up at http://elasticbox.com and use it right away if you don't have an ElasticBox account yet). The box must have required variables JENKINS_URL and JNLP_SLAVE_OPTIONS. ElasticBox CI plugin will set the value of JENKINS_URL variable to the URL configured for this Jenkins server, and fill the value of JNLP_SLAVE_OPTIONS automatically. Those variable are needed to download the slave agent from Jenkins server and start it from within the slave instance as shown in the following scripts.
Install event script
-
#!/bin/bash

# Download the slave agent from Jenkins server
wget $JENKINS_URL/jnlpJars/slave.jar -O slave.jar
Start event script
-
#!/bin/bash

# Execute the agent and save the PID
nohup java -jar slave.jar $JNLP_SLAVE_OPTIONS > /dev/null 2>&1 &
echo \$! > slave.pid
You also need to add the following command in the stop event script of the Jenkins Slave box to kill the slave agent process when the instance is shutting down
#!/bin/bash

# Stop the agent
kill -9 $(cat slave.pid)
- Configure slave to be provisioned on demand by clicking on Add
button next to Slave Configurations in the ElasticBox cloud form.
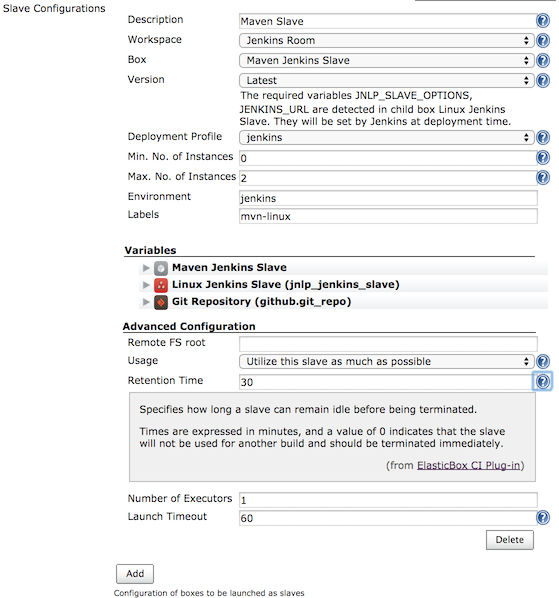
Specify labels for the slave that any job can use to tie with slaves deployed with the configuration. The Environment is required and must be unique among slave configurations of the same ElasticBox cloud.
- You also can configure your Jenkins project or job to be built on
ElasticBox-managed slaves as following. The slaves deployed with
this per-project configuration are used exclusively for the
project.
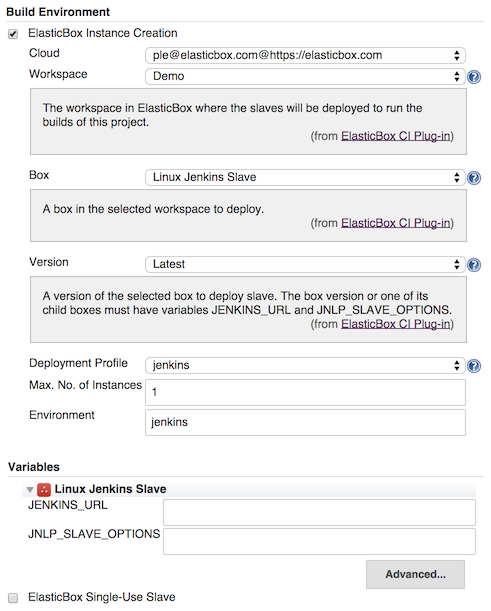
Select ElasticBox Single-Use Slave if you want to create a new instance for every execution of the job. After the job finished and the retention time elapsed, the instance will be terminated.
- Add ElasticBox - Deploy Box to deploy an instance of a specified
box
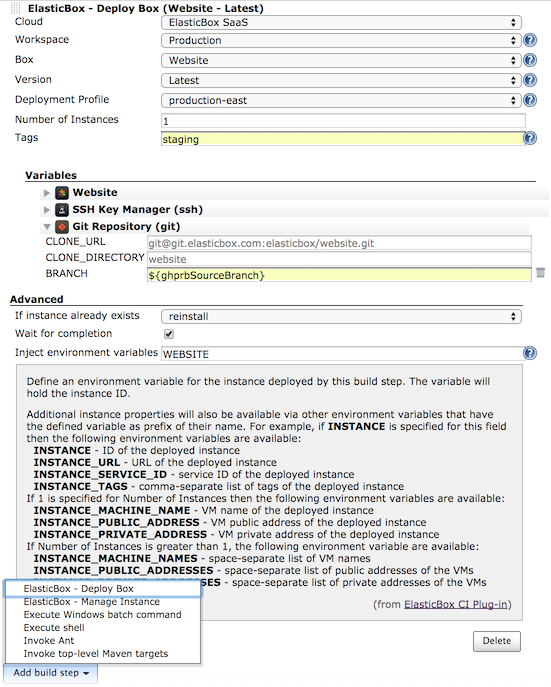
You can specify build parameters or build environment variables as value of the variables or environment of the box you select to deploy. In the above picture, the GitHub Pull Request build parameterghprbSourceBranchis specified as value for the variable BRANCH to receive the Git source branch to be used during deployment of the box.
- Add ElasticBox - Manage Instance build step to Update, Reconfigure,
Reinstall, Stop, or Terminate instances
- Update

You can specify build parameters or build environment variables as value of the variables or environment of the box you select to update. . - Reconfigure
Specify tags that are used to find the instances in the selected workspace of ElasticBox - Manage Instance build step to reconfigure

- Reinstall
Similarly to Reconfigure, specify tags used to find instances to reinstall. - Start
Similarly to Reconfigure, specify tags used to find instances to start. - Stop
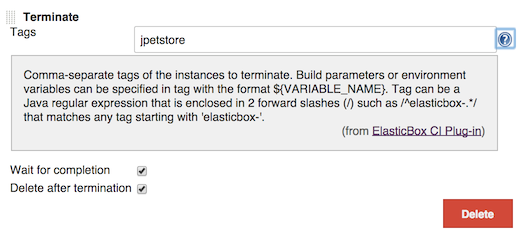
Similarly to Reconfigure, specify tags used to find instances to stop. - Terminate
Similarly to Reconfigure, specify tags used to find instances to terminate. Additionally, you can select to delete the instance after its termination.
- Update