Plugin Information |
|---|
View Atlassian Jira Software Cloud on the plugin site for more information. |
Introduction
Atlassian has built and open-sourced a new Jenkins plugin that is intended to be used specifically for integrating Jenkins with Jira Software Cloud. This plugin exists to provide a free, easy, secure, and reliable way to connect build and deployment information from your Jenkins server to your Jira Software Cloud site.
It uses new OAuth Credentials (2LO), which site admins can create in their Jira Cloud site. This OAuth Credential is explicitly scoped, when creating it, for additional security, so that it can only be used to send build and deployment information and associate that information with Jira issues. This gives your Jenkins server, operating behind the firewall, a mechanism to securely send data, one-way, to your Jira Cloud site without having to open up any ports in your firewall.
There are additional Jira ↔ Jenkins integrations that provide some additional capabilities on top of this, which we encourage you to try out if you are looking for additional features. Otherwise, if you are just getting started, you have find the right tool for the job. This plugin will provide a very straight-forward way to get started and start using Jenkins and Jira Software Cloud together to help your team better track and collaborate on their work.
If you have any questions, please https://support.atlassian.com/contact/, or help contribute to the open-source plugin by raising an issue or PR! Also, you can read more about OAuth Credentials and the Jenkins plugin via Atlassian documentation pages.
What is the value?
By using this integration your team will gain visibility and insight into your CI/CD pipeline, specifically all builds and deployments, related to Jira issues. As long as you are using Jira Issue keys ("TEST-123") in your commit messages and branch names, the Jenkins integrate will automatically connect related builds and deployments as run your pipelines.
- For software engineers, this removes the need to manually update Jira via going into the UI saving time and double-entry.
- For product managers, team leads, and QA engineers this gives visibility into things like failing builds or whether or not a feature went to a staging environment and is actually ready for QA. You can look at a specific issue or search across them using the Jira Query Language (JQL).
Additionally, you can use OAuth Credentials (2LO) to securely integrate these tools together. This credential is tied to a specific Jira site, can be managed by site administrators only, and is used to communicate between your Jira Software Cloud site and Jenkins without having to open any holes in your firewall.
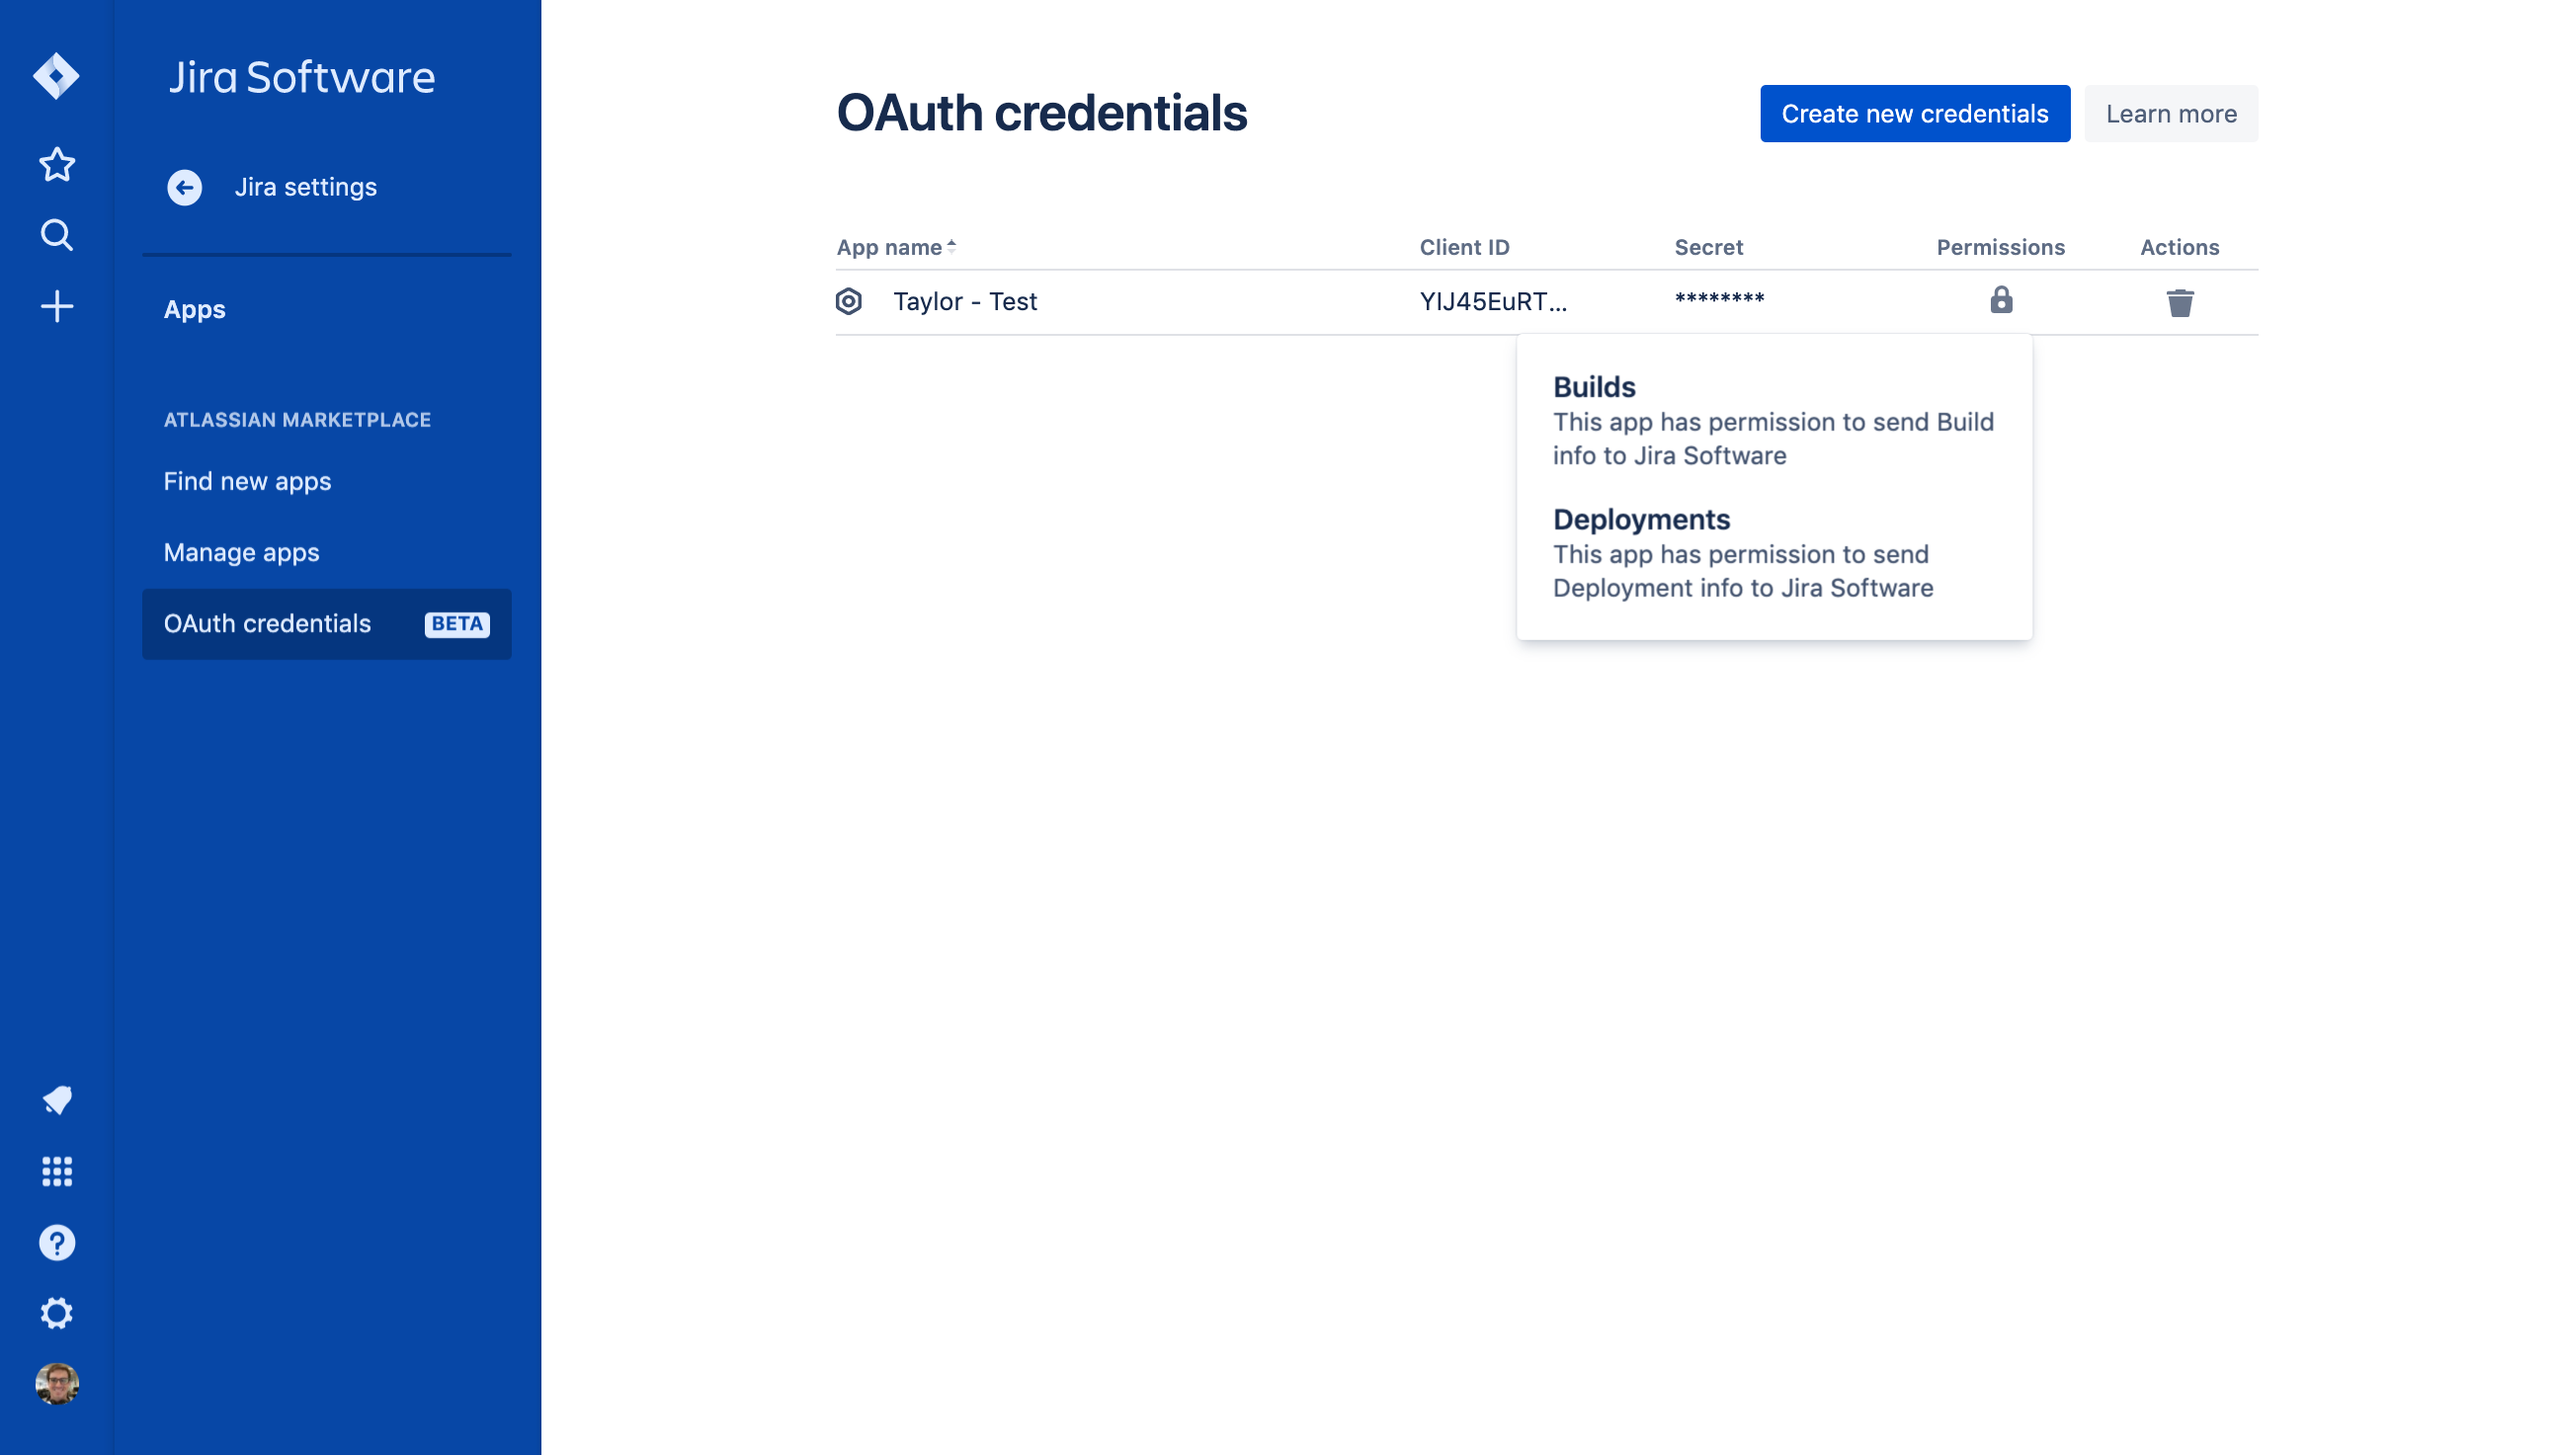
OAuth Credentials - Showing an example credential scoped to be used to send build and deployment information via APIs. This Client ID and Secret would be used with this Jenkins plugin via the configuration.

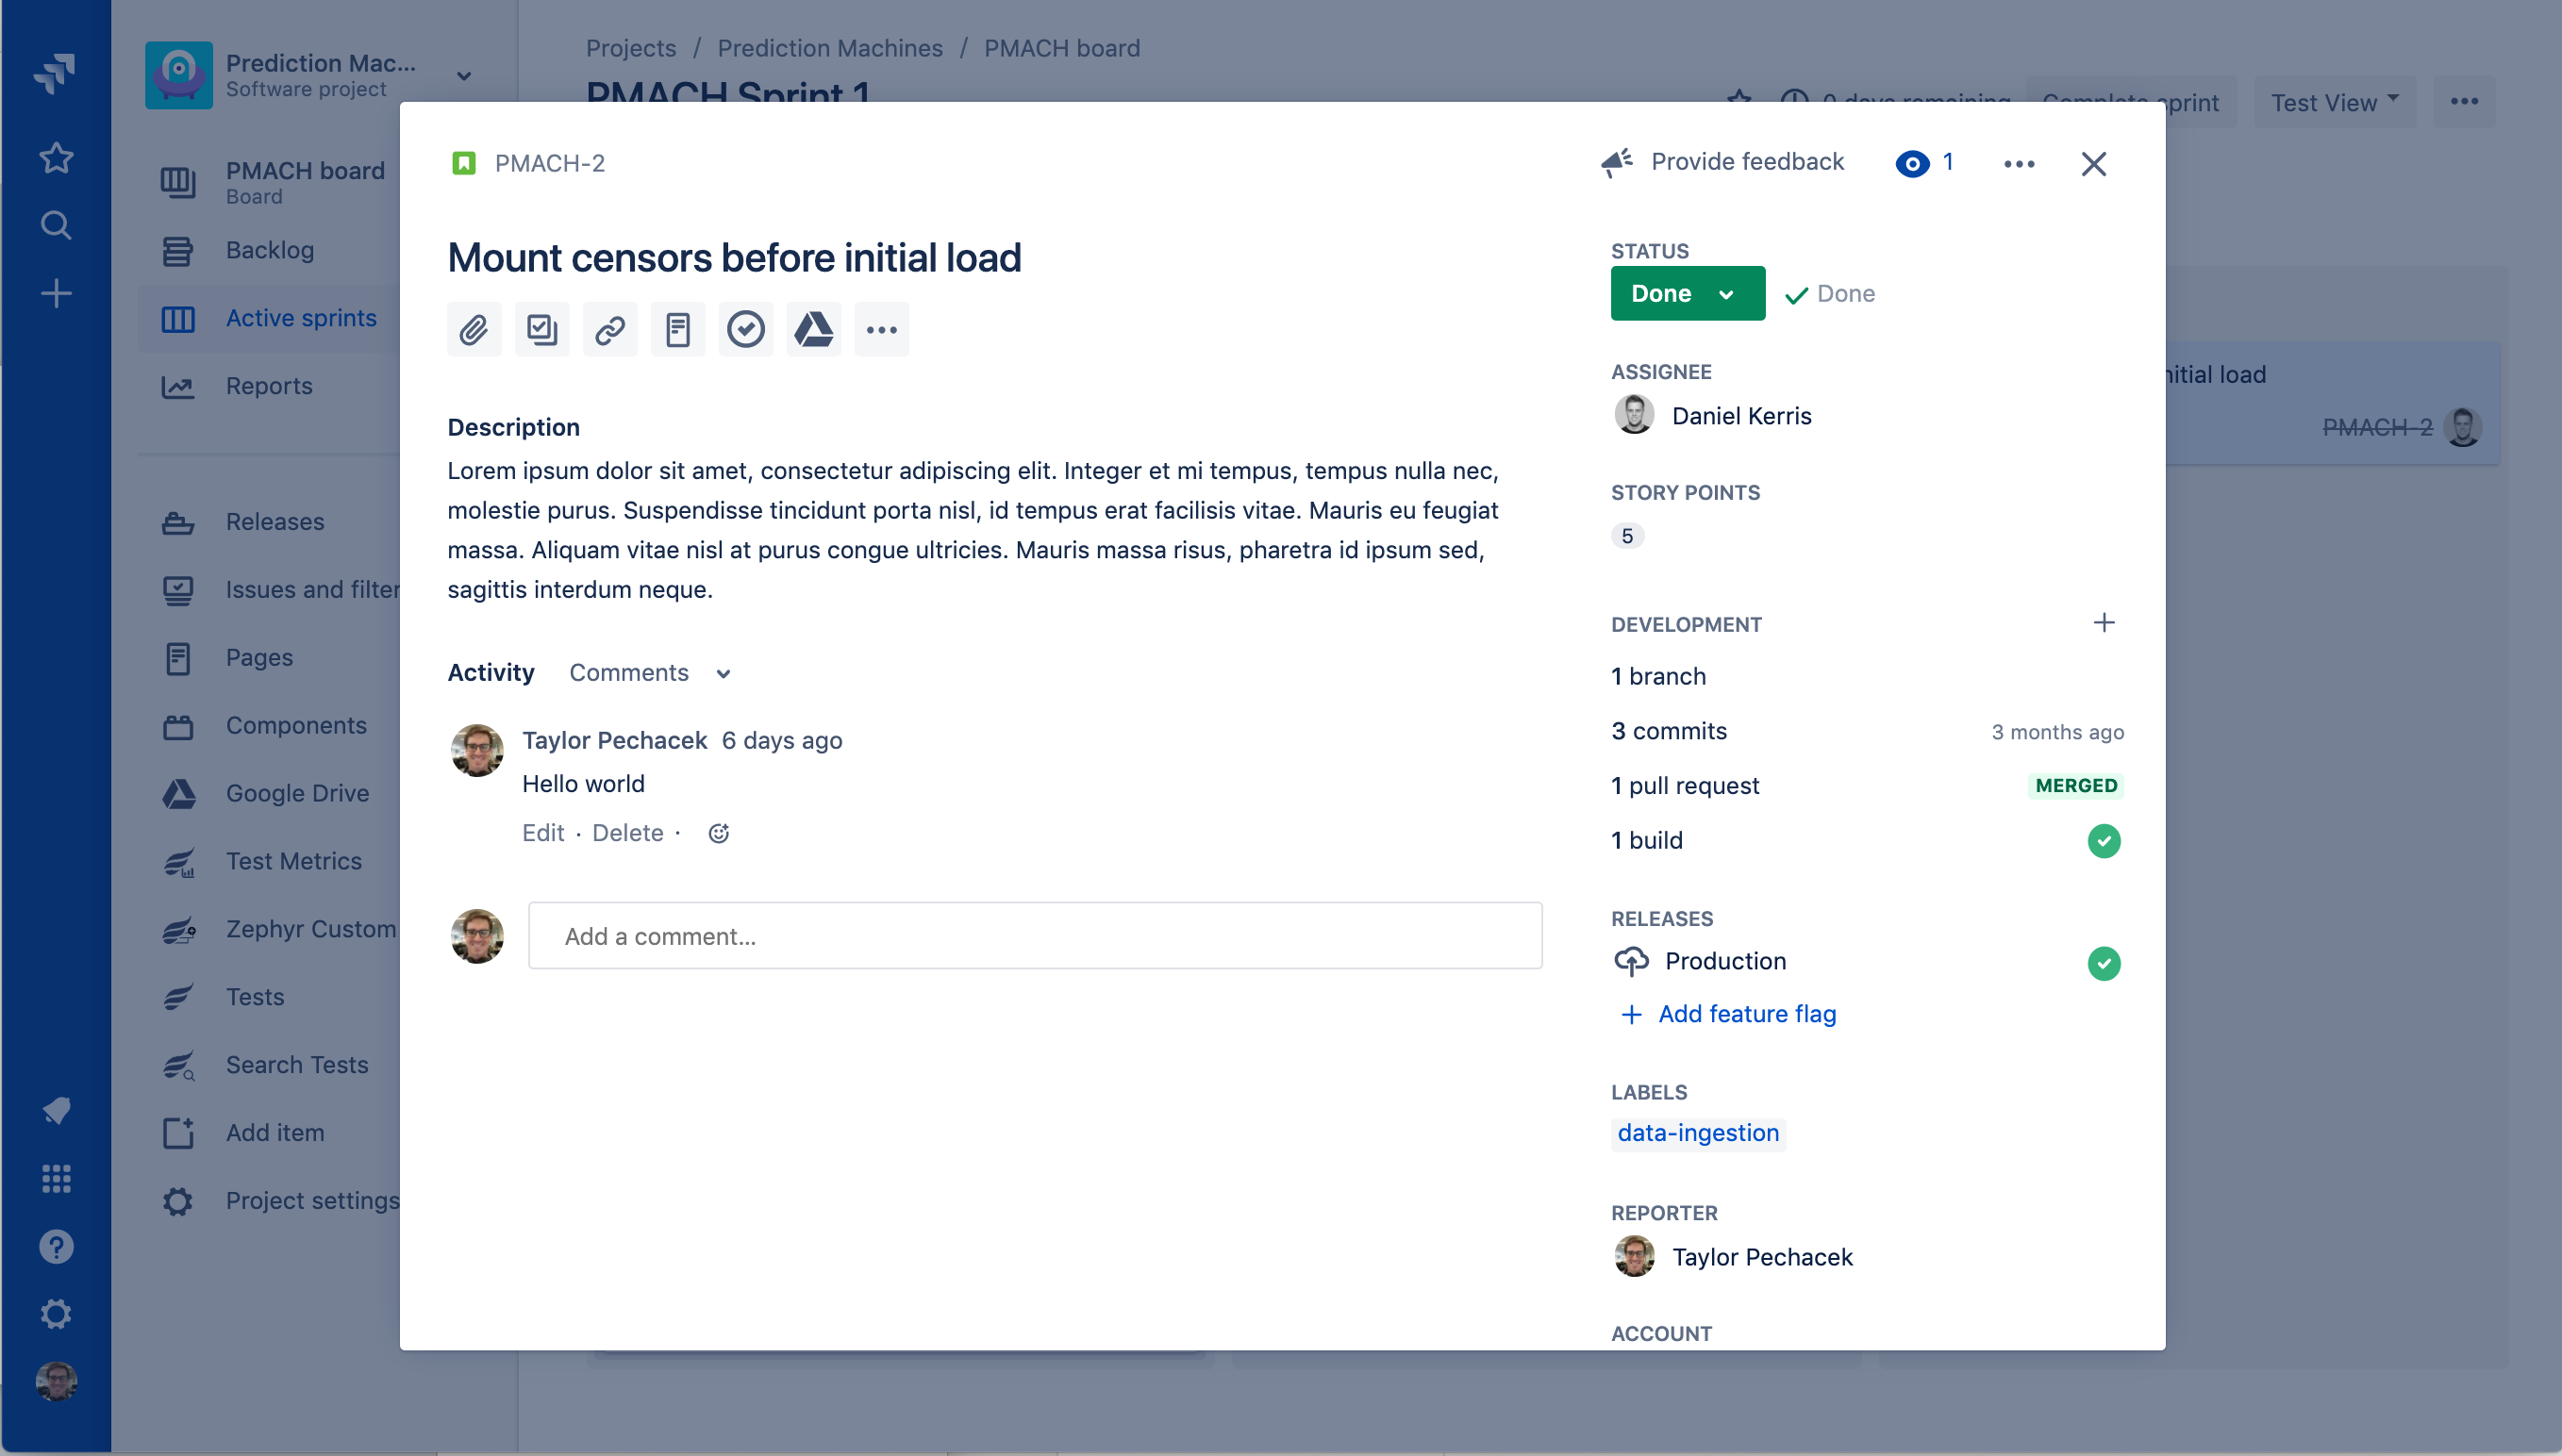
Jira issue detail view, showing the development and releases panel on the right-hand column. You can click into each of these to see more details.
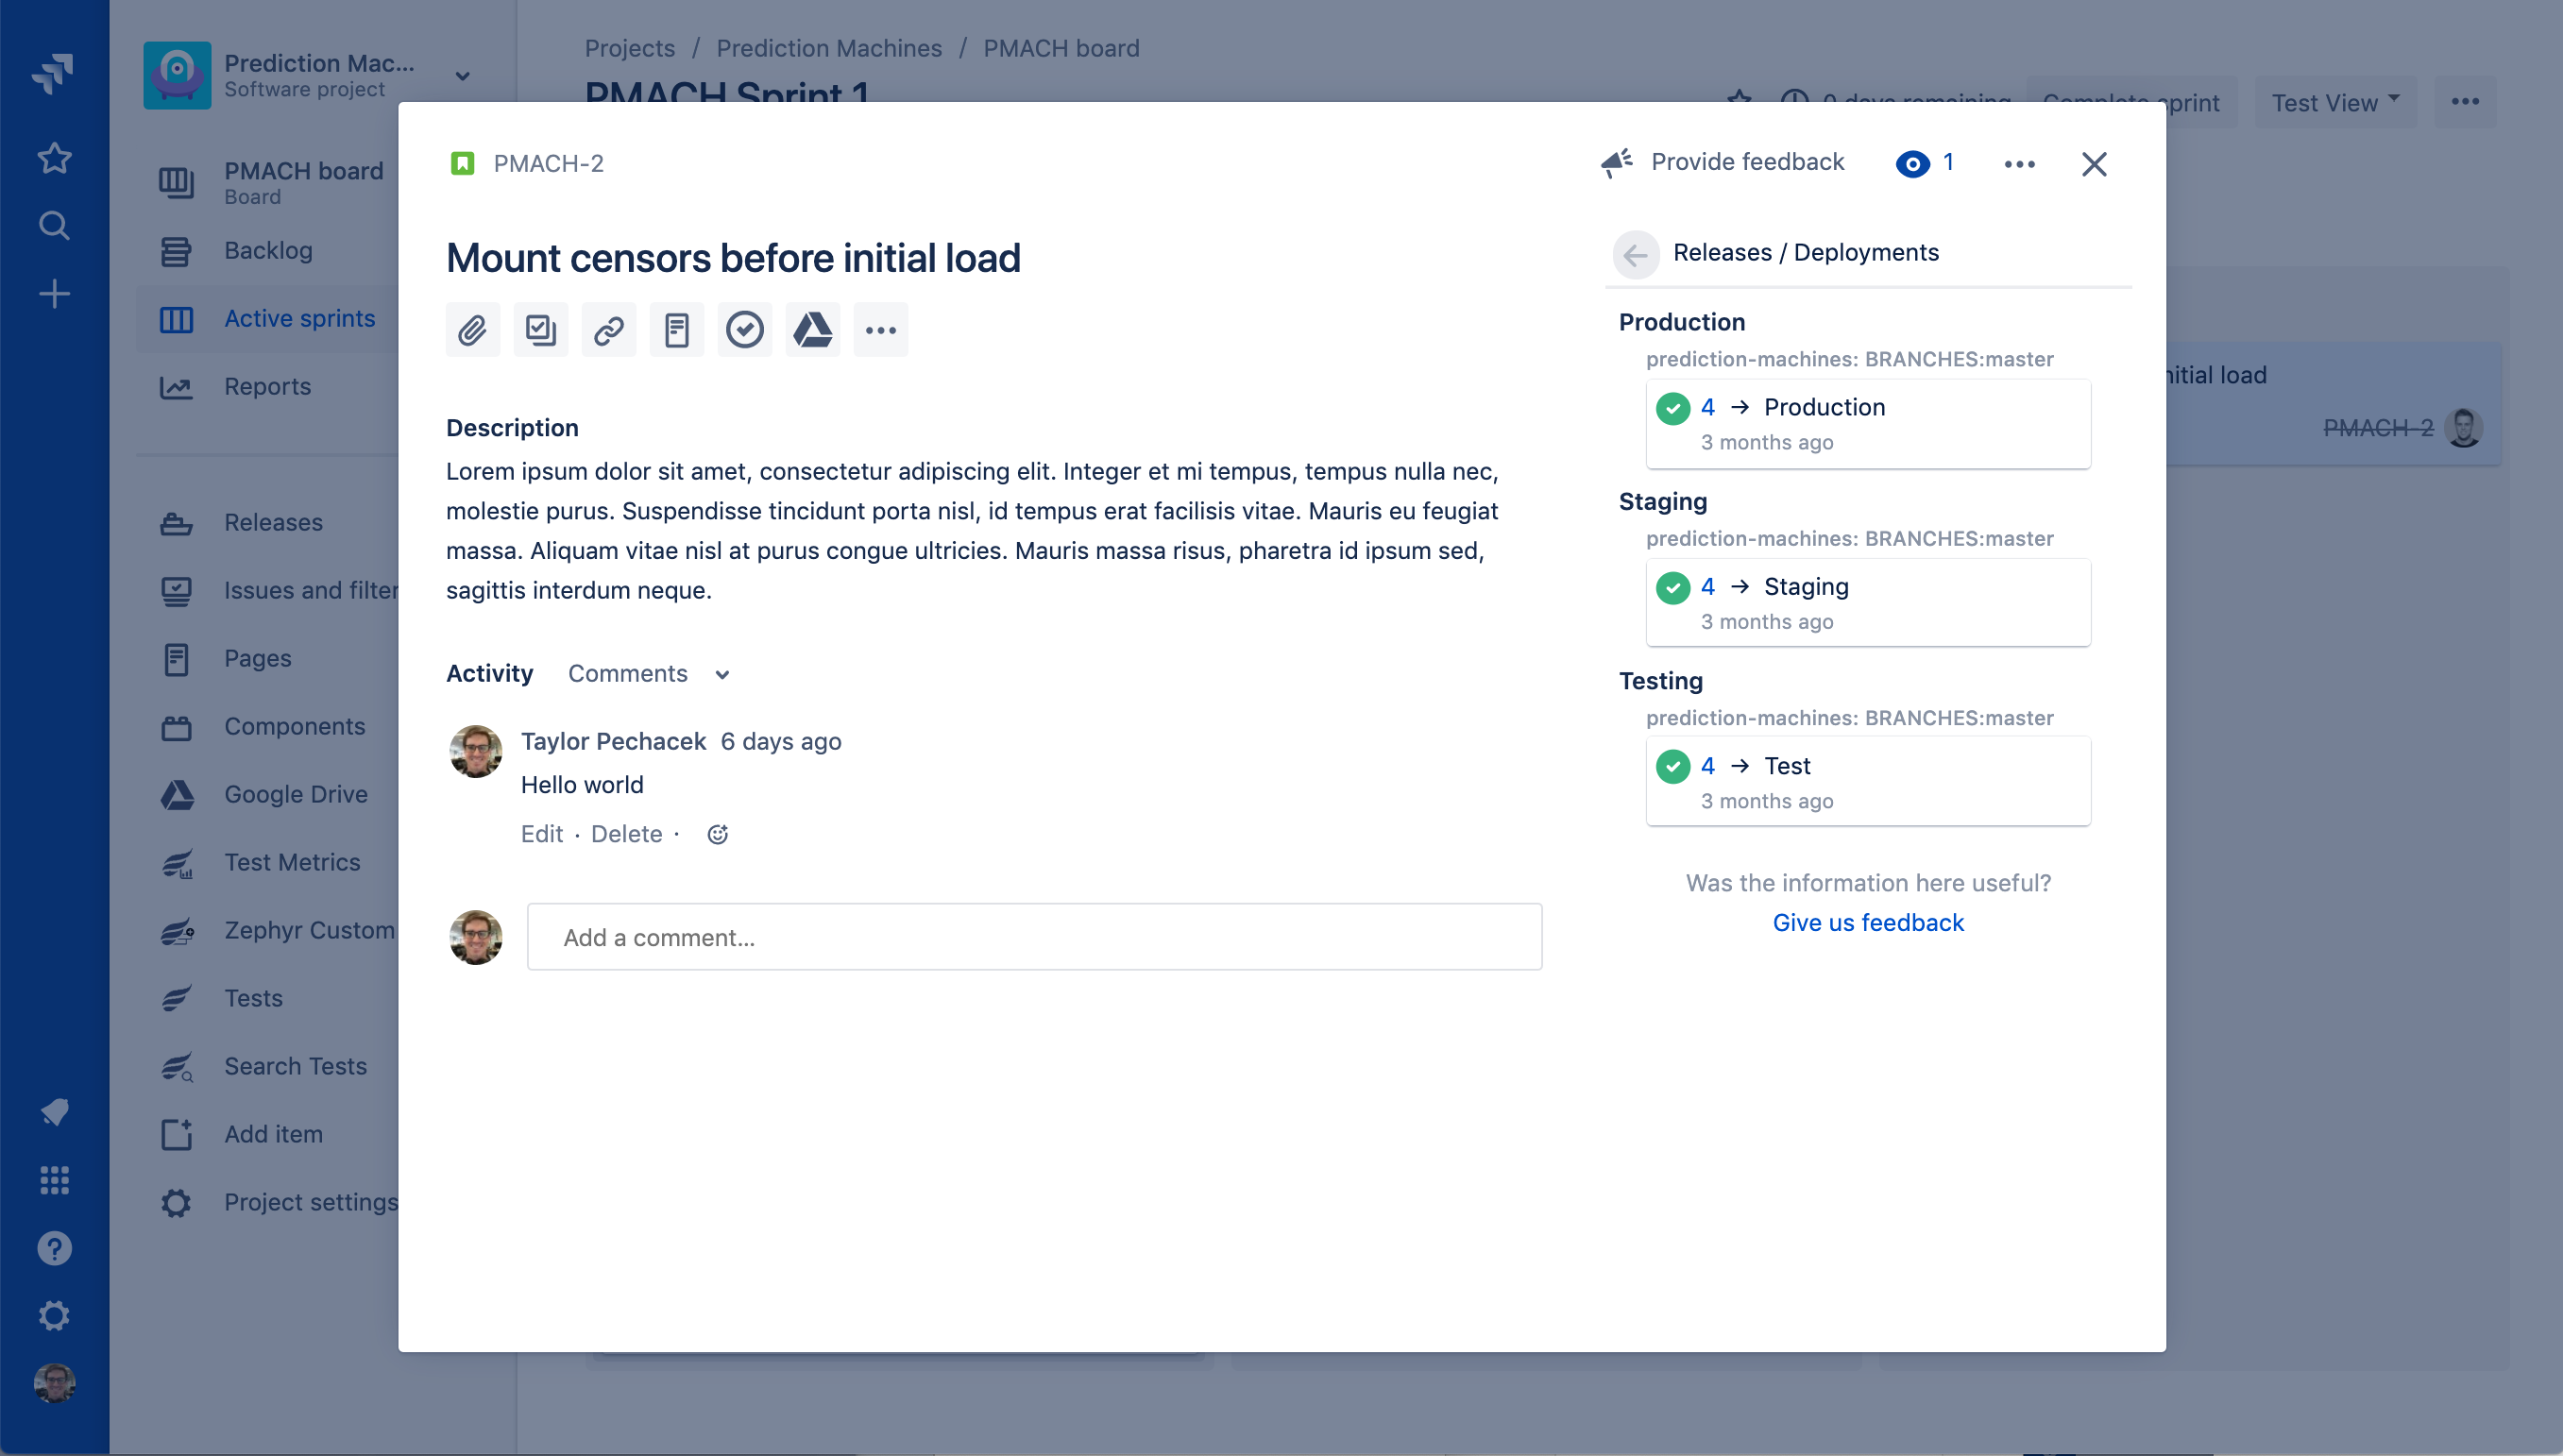
Jira issue detail view, after clicking into the Releases glance summary ('Production" in the previous image) you can see what repos, environments, and deployments this feature is associated with. Here we see it has indeed gone to our production environment in deployment #4.
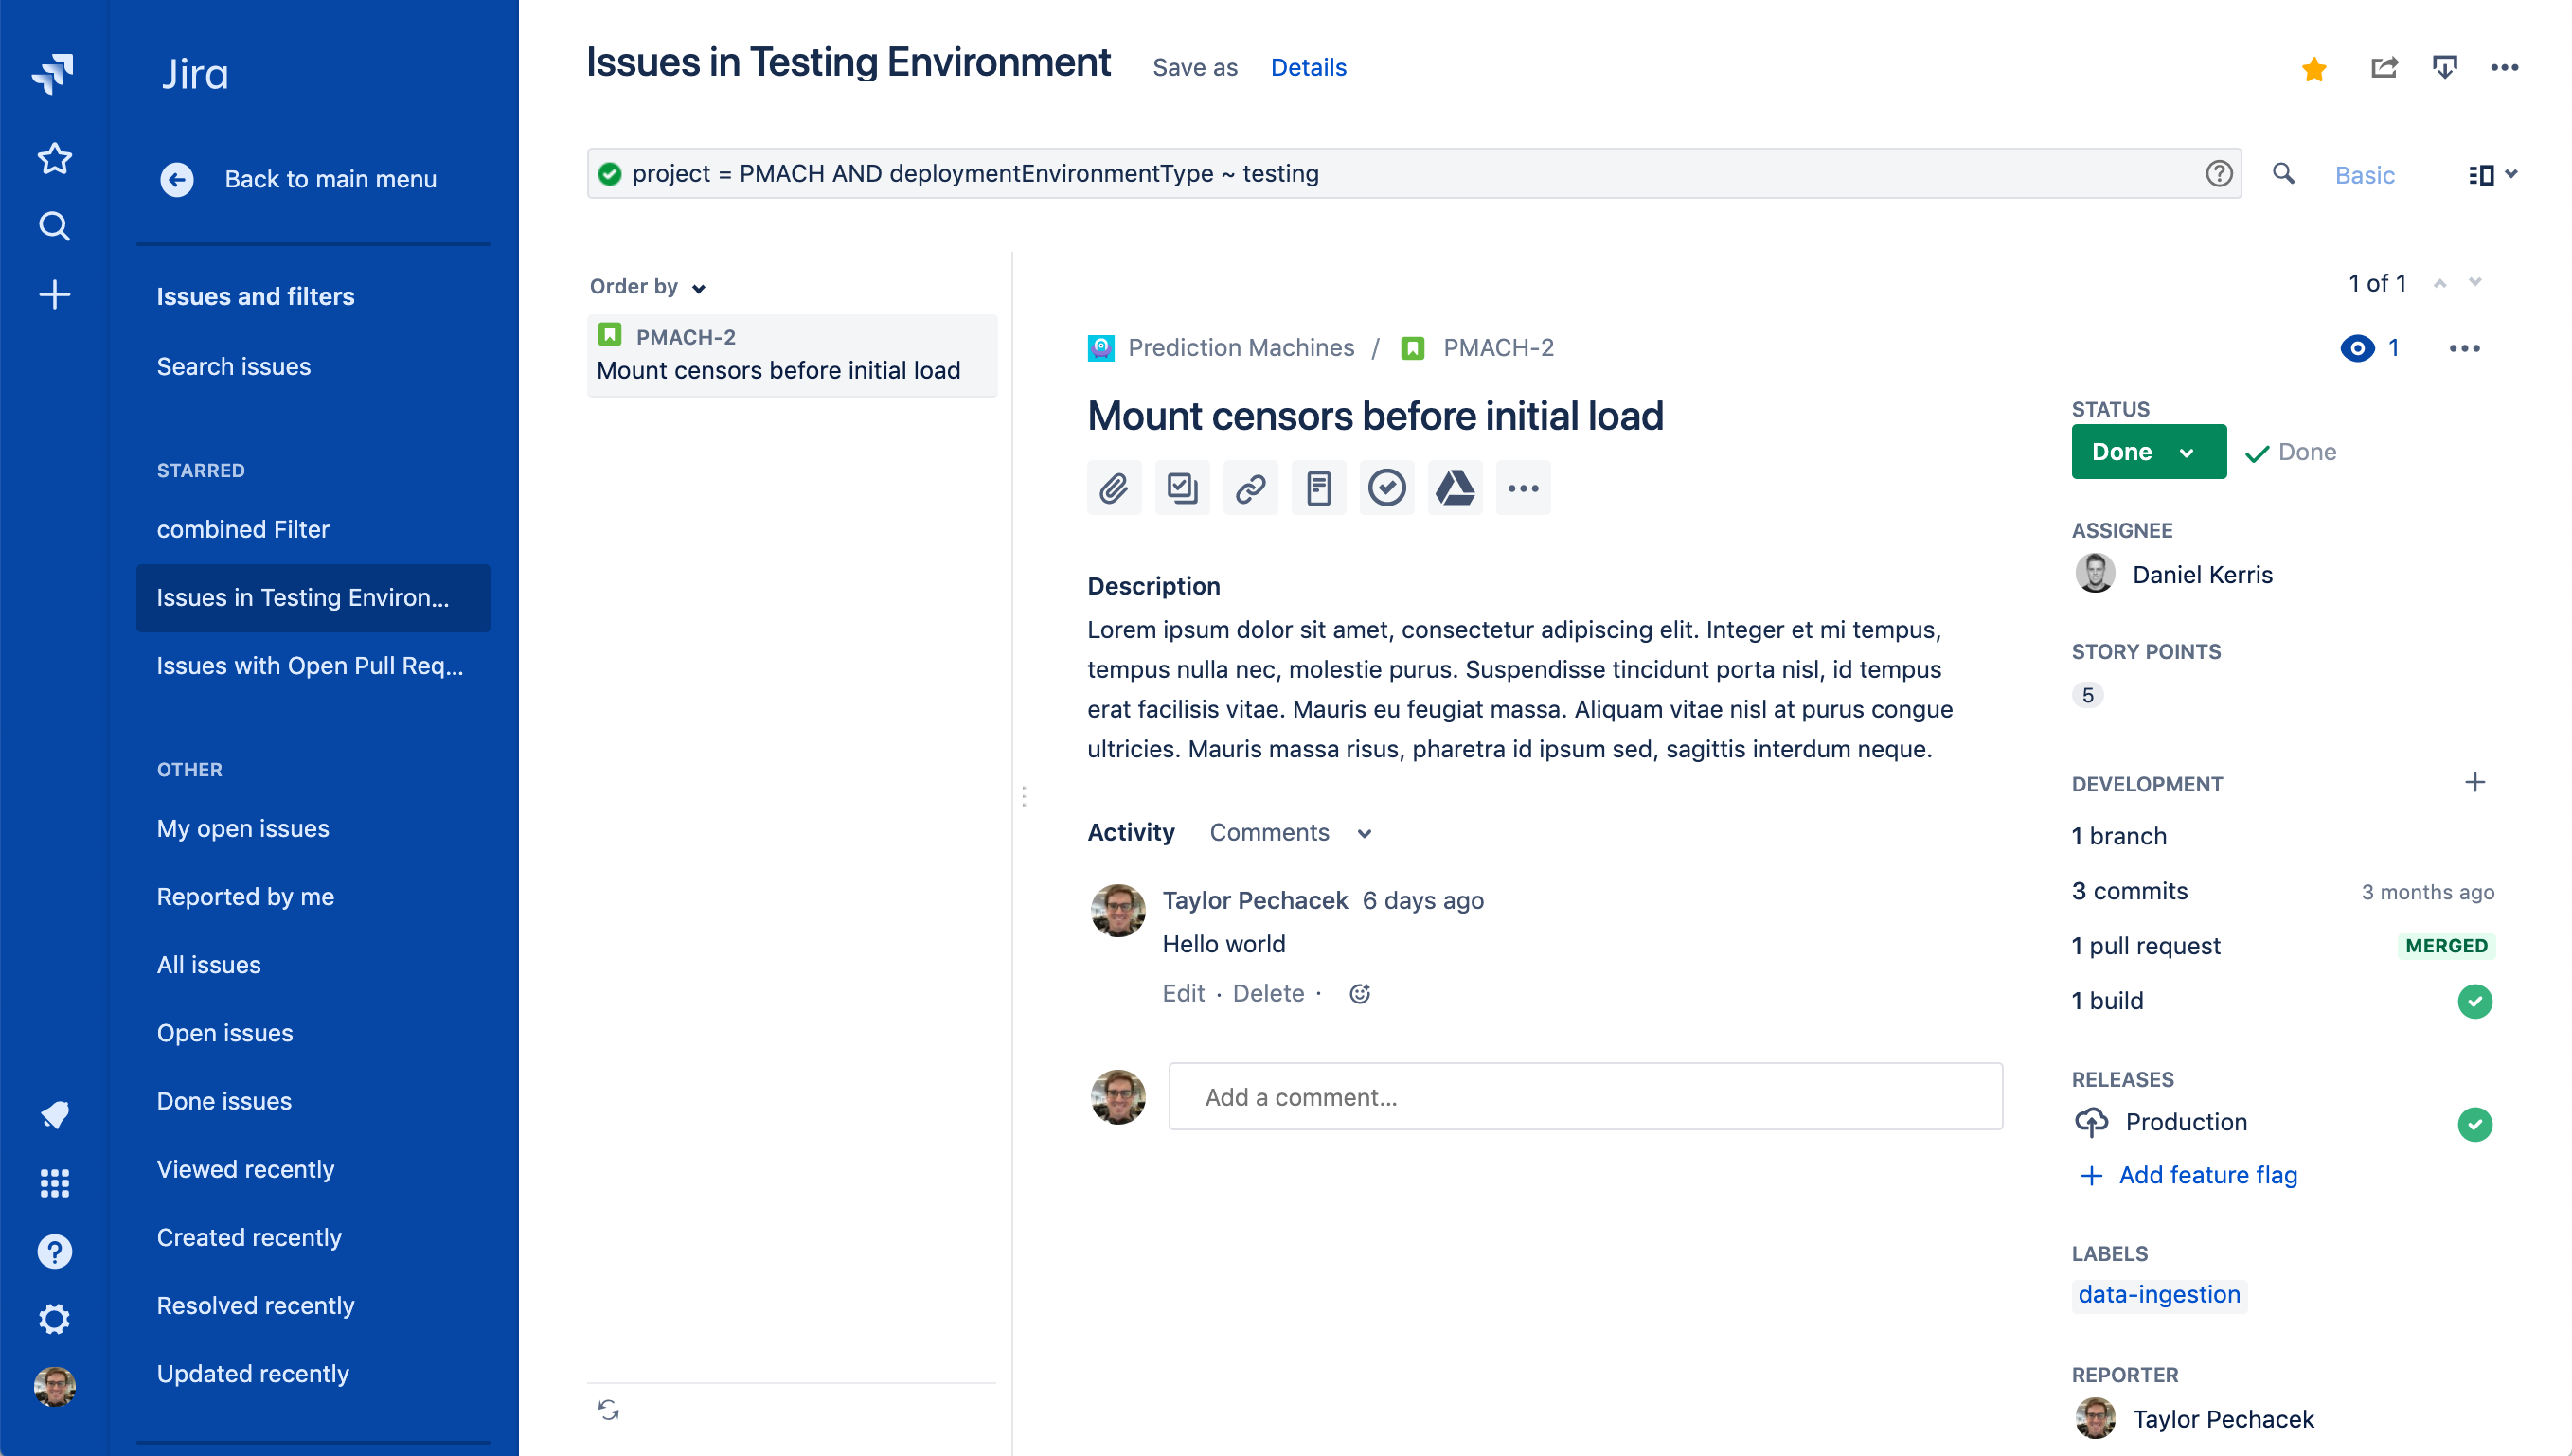
Using the Jira Query Language (JQL), you can search across issues that have been deployed to an environment type or a specific environment name. You can mix and match this information with existing data like epics, versions, components, labels, and much more.
How to get started
In Jira Software Cloud
Create OAuth credentials in Jira for Jenkins
Navigate to Jira home > Jira settings > Apps.
Select OAuth credentials.
Select Create credentials.
Enter the following details:
App name - Jenkins
App logo - A URL to the Jenkins logo, which will be used as an icon in the list of credentials. Eg: https://jenkins.yourcompany.com/logo.png
Server base URL - The URL to your Jenkins server. Eg: https://jenkins.yourcompany.com
In Jenkins
Install the Jenkins plugin
Login to your Jenkins server and navigate to the Plugin Manager.
- Select the 'Available' tab and search for 'Atlassian Jira Software Cloud' as the plugin name then install it.
- The open-source plugin is hosted at on the Jenkins GitHub account. You can check it out here.
Set up Jenkins credentials
In Jenkins, go to Manage Jenkins > Configure System screen and scroll to the Jira Software Cloud integration section.
Select Add Jira Cloud Site > Jira Cloud Site. The Site name, ClientID, and Secret fields display.
Enter the following details:
Site name: The URL for your Jira Cloud site, for example yourcompany.atlassian.net.
Client ID: Copy from OAuth credentials screen (Client ID column).
Secret: Select Add > Jenkins.
For Kind, select Secret text.
For Secret, copy from OAuth credentials screen (Secret column).
For Description, provide a helpful description
Select Test connection to make sure your credentials are valid for your Jira site.
How to use the integration
To start using the integration:
Go into a specific pipeline in Jenkins (
 Note: Your pipeline must be a 'Multibranch Pipeline' ).
From the left-hand menu, select Pipeline Syntax.
In the Snippet Generator, select jiraSendDeploymentInfo or jiraSendBuildInfo from the dropdown list of Sample Steps and fill in the relevant details.
Select Generate Pipeline Script and copy/paste the output into your Jenkinsfile on the relevant Repository you are using. This will be used to notify Jira when you run that pipeline on that repo.
For sending build information
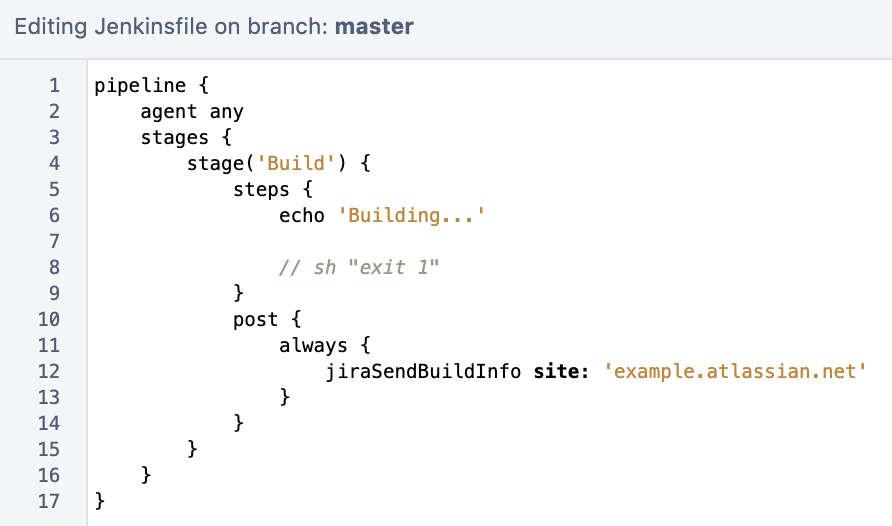
This is an example snippet of a very simple ‘build’ stage set up in a Jenkinsfile. After the pipeline is run, it will post the build information to your Jira Cloud site by looking at the branch name. If there is a Jira issue key (e.g. “TEST-123”) in the branch name, it will send the data over to Jira.
pipeline {
     agent any
     stages {
         stage('Build') {
             steps {
                 echo 'Building...'
             }
             post {
                 always {
                     jiraSendBuildInfo site: 'example.atlassian.net'
                 }
             }
         }
     }
 }
By default, the branch name is fetched from the Jenkins SCM API. Alternatively, the branch name can be explicitly specified as an additional branch parameter. You can also use the branch parameter to post the build result to a specific Jira issue.
pipeline {
     agent any
     stages {
         stage('Build') {
             steps {
                 echo 'Building...'
             }
             post {
                 always {
                     jiraSendBuildInfo site: 'example.atlassian.net', branch: 'TEST-123-awesome-feature'
                 }
             }
         }
     }
 }
For sending deployment information
This is an example snippet of two satges that runs on any change to the staging or master branch. Again, we use a post step to send deployment data to Jira and the relevant issues. Here, the environmentId, environmentName, and environmentType need to be set to whatever you want to appear in Jira.
pipeline {
     agent any
     stages {
         stage('Deploy - Staging') {
             when {
                 branch 'master'
             }
             steps {
                 echo 'Deploying to Staging from master...'
             }
             post {
                 always {
                     jiraSendDeploymentInfo site: 'example.atlassian.net', environmentId: 'us-stg-1', environmentName: 'us-stg-1', environmentType: 'staging'
                 }
             }
         }
         stage('Deploy - Production') {
            when {
                branch 'master'
            }
            steps {
                echo 'Deploying to Production from master...'
            }
            post {
                always {
                    jiraSendDeploymentInfo site: 'example.atlassian.net', environmentId: 'us-prod-1', environmentName: 'us-prod-1', environmentType: 'production'
                }
            }
         }
     }
 }
The entire Jenkinsfile may look something like this. This is only meant to represent an example of what the Jira snippets could look like within a stage or step.
pipeline {
     agent any
     stages {
         stage('Build') {
             steps {
                 echo 'Building...'
             }
             post {
                 always {
                     jiraSendBuildInfo site: 'example.atlassian.net'
                 }
             }
         }
         stage('Deploy - Staging') {
             when {
                 branch 'master'
             }
             steps {
                 echo 'Deploying to Staging from master...'
             }
             post {
                 always {
                     jiraSendDeploymentInfo site: 'example.atlassian.net', environmentId: 'us-stg-1', environmentName: 'us-stg-1', environmentType: 'staging'
                 }
             }
         }
         stage('Deploy - Production') {
            when {
                branch 'master'
            }
            steps {
                echo 'Deploying to Production from master...'
            }
            post {
                always {
                    jiraSendDeploymentInfo site: 'example.atlassian.net', environmentId: 'us-prod-1', environmentName: 'us-prod-1', environmentType: 'production'
                }
            }
         }
     }
 }
If you have any questions, please https://support.atlassian.com/contact/ and they will route it to the correct team to help you.