Configuring a Standard Jenkins job
Freestyle
Let’s create a standard Freestyle job in Jenkins.
- To create a new Jenkins job, click on the New Item option on the Jenkins menu.

2. Provide a name for your job.
Select Freestyle project on the screen and then click OK.

3. Next, the configuration page appears where you can configure your job by various categories: General, Source Code Management (SCM), Build Triggers, Build, and Post build actions.

4. On the Source Code Management tab, select the appropriate option in which you have your source code. For example, here it is “Git”. So, select “Git” and provide the necessary information. (Note: You need to configure GitHub plugin in global configuration).

5. Optionally, you can set Build Triggers.
Select the Build Triggers tab. Let’s just add a periodic trigger which triggers build every minute – every hour – every day (Schedule: * * * * *).

6. Next, Select a build step. You can select from various options: Ant, Maven, Windows batch process, etc. For example, for a maven project, trigger a maven build and specify goals.


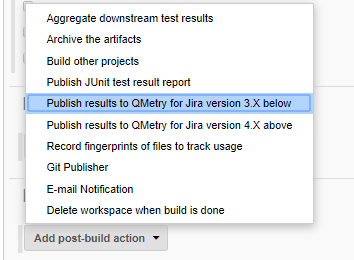
Next step is to add Post-build Actions. Here, add the plugin: “QMetry Test Management for JIRA Plugin”.
Configuring QMetry for JIRA Test Management Plugin as a Post-build Action
Jenkins works as a bridge between QMetry Test Management and JIRA plugin. To publish results in QMetry for JIRA, define another post-build action.
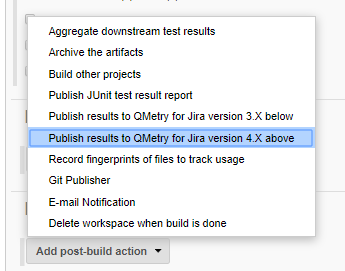
1. On the Add post-build Actions drop-down, select the "Publish test result to QMetry for Jira version 4.X above" option.
2. In case of Cloud instance for QMetry for JIRA, select the Cloud option and fill in the required data.
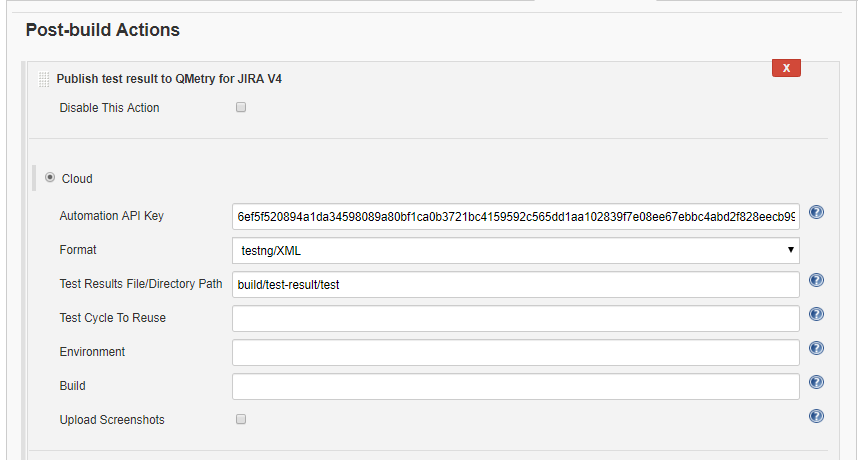
You can get more information regarding fields by clicking on the Help icon for respective fields. It explains what to enter in that particular field.
Parameters for Cloud instance:
Parameter | Type | Required | Description |
API Key | string | Yes | Your API Key. API Key is unique for a specific user in a single project. The result will be imported for the project associated with the given API Key. |
Format | selection | Yes | Format of result file to be imported. Supported formats: cucumber/json testng/xml junit/xml QAF hpuft/xml specflow/json |
File | string | Yes | Path to your result file to be uploaded. Example : The Jenkins plugin is expecting the file in Jenkins Workspace. |
Test Cycle To Reuse | string | No | Key of the test cycle to be reused. |
Upload Screenshots | checkbox | No | Check to upload attachments in execution. Default value: false. |
Environment | string | No | Name of the environment on which test cycle has to be executed. |
| Build | string | No | Name of the build for test cycle execution. |
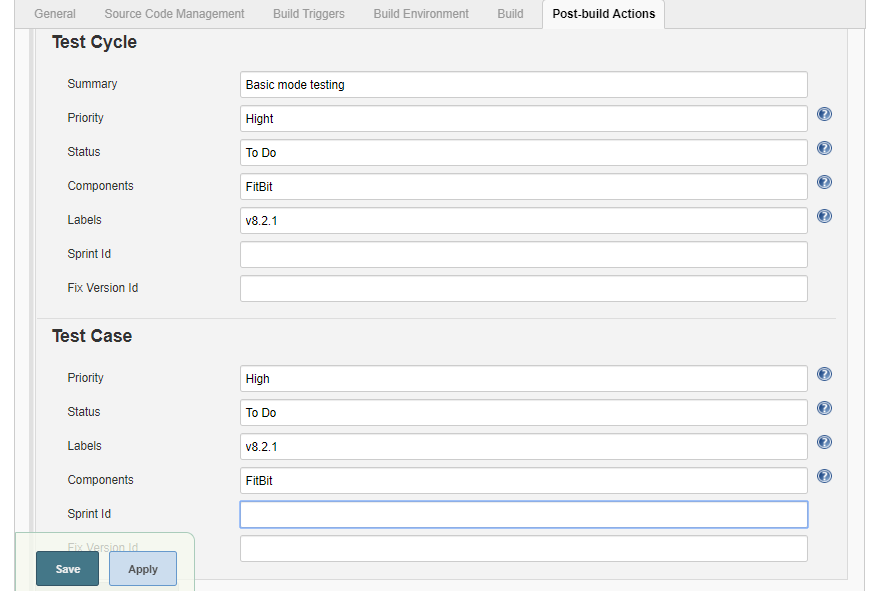
| Test Case and Test Cycle Fields | |||
Parameter | Type | Required | Description |
Summary (For Test Cycle) | string | No | Summary of test cycle. |
Priority | string | No | Priority to be added to the test case/test cycle. |
| Status | string | No | Status to be added to the test case/test cycle. |
| Components | string | No | Comma separated names of Components to be added to the test case/test cycle. |
| Labels | string | No | Comma separated names of Labels to be added to the test case/test cycle. |
| Fix Version Id (How to find the Fix Version Id) | number | No | Id of Fix Version to be added to the test case/test cycle. |
| Sprint Id (How to find the Sprint Id) | number | No | Id of Sprint to be added to the test case/test cycle. |
Pipeline
QMetry Test Management supports Jenkins Pipeline for implementing and integrating continuous delivery pipelines into Jenkins.
Let’s create a standard Pipeline job in Jenkins.
1. To create a new Jenkins job, click on the New Item option on the Jenkins menu.

2. Provide a name for your job.
Select Pipeline on the screen and then click OK.

3. Next, the configuration page appears where you can configure your job by various categories: General, Build Triggers, Advanced Project Options, and Pipeline.

4. Optionally, you can set Build Triggers.
Select the Build Triggers tab. Let’s just add a periodic trigger which triggers build every minute – every hour – every day (Schedule: * * * * *).

5. Advanced Project Options: This is optional. You can give Display Name which will replace the name you gave earlier to the Pipeline project.

6. Jenkins works as a bridge between QMetry Test Management and automation frameworks. To publish results in QMetry, provide Pipeline script.
Enter Pipeline script to define your code repository, generate test result and upload test results into QMetry Test Management.
Code Snippet for Cloud: QMetry for Jira v4.0 and above
stage('Upload Result to QTM4J cloud V4'){
        step([$class: 'TestReportDeployPublisherCloudV4', testToRun: 'CLOUD', apikey: '710110e7143031eec425f2ebd6f813e3530243767467d1984203b0fc2ecf2d73e48d5586c45f06de424a9394a50ba57f512bc6dda6042e30cc73b9fdfc3acd530fb7ba3e6c18a9c86ba6ed92af508738', format: 'cucumber/json', file: 'cucumber', testCycleToReuse: "", attachFile: true, environment: "Chrome", build: "1.0.0 beta",
testCycleLabels: "label1,label2", testCycleComponents: "component1", testCyclePriority: "High", testCycleStatus: "To Do", testCycleSprintId: "10000", testCycleFixVersionId: "10000", testCycleSummary: "Test Cycle Summary", testCaseLabels: "label1,label2", testCaseComponents: "component1", testCasePriority: "High", testCaseStatus: "To Do", testCaseSprintId: "10000", testCaseFixVersionId: "10000"
		])
    }
Syntax of format:
- cucumber/json
- testng/xml
- junit/xml
- QAF
- hpuft/xml
- specflow/json

Parameters for Cloud
Parameter | Type | Required | Description |
API Key | string | Yes | Your API Key. API Key is unique for a specific user in a single project. The result will be imported for the project associated with the given API Key. |
Format | selection | Yes | Format of result file to be imported. Supported formats: cucumber/json testng/xml junit/xml QAF hpuft/xml specflow/json |
File | string | Yes | Path to your result file to be uploaded. Example : The Jenkins plugin is expecting the file in Jenkins Workspace. |
Test Cycle To Reuse | string | No | Key of the test cycle to be reused. |
Upload Screenshots | checkbox | No | Check to upload attachments in execution. Default value: false. |
Environment | string | No | Name of the environment on which test cycle has to be executed. |
| Build | string | No | Name of the build for test cycle execution. |
| Test Case and Test Cycle Fields | |||
Parameter | Type | Required | Description |
Summary (For Test Cycle) | string | No | Summary of test cycle. |
Priority | string | No | Priority to be added to the test case/test cycle. |
| Status | string | No | Status to be added to the test run. |
| Components | string | No | Comma separated names of Components to be added to the test case/test cycle. |
| Labels | string | No | Comma separated names of Labels to be added to the test case/test cycle. |
| Fix Version Id (How to find the Fix Version Id) | number | No | Id of Fix Version to be added to the test case/test cycle. |
| Sprint Id (How to find the Sprint Id) | number | No | Id of Sprint to be added to the test case/test cycle. |
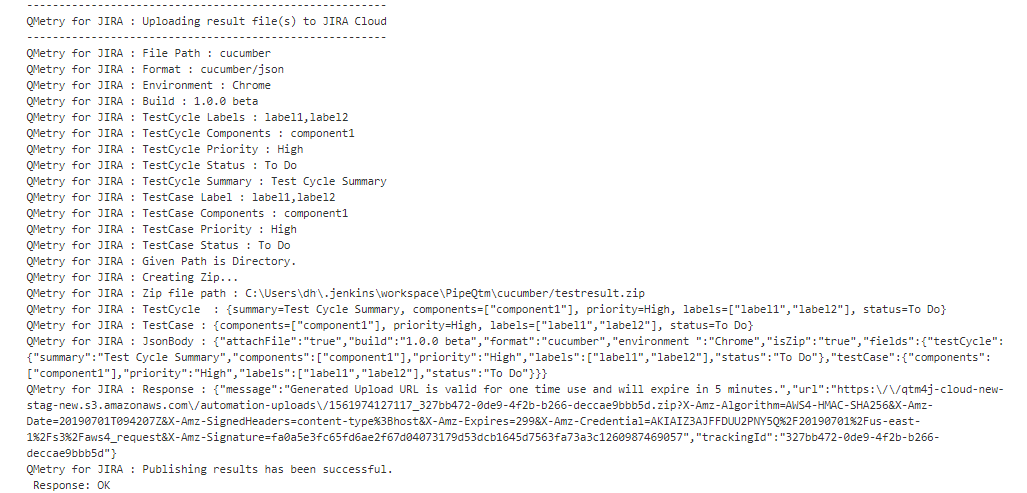
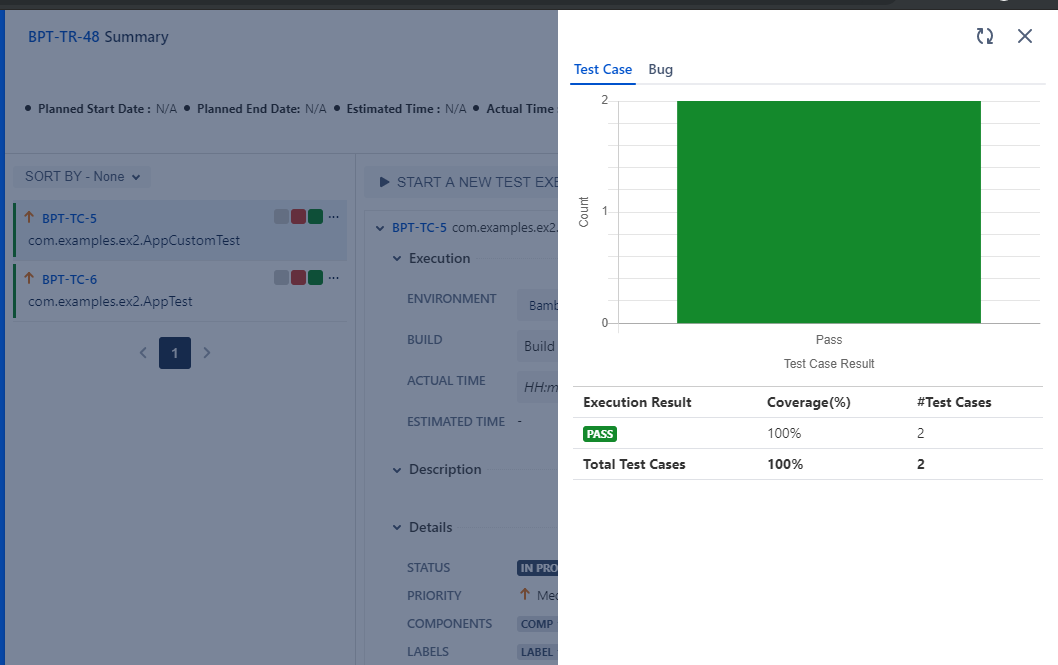
7. On successful completion of the process, you can see the console output. It displays success message for uploading the result file.
8. Finally check test execution page in QMetry and review your test run results.