 Configure the Job to Execute a Selenium Script
Add Build Step  Execute Windows Batch Command
pybot "/path/to/selenium/script/on/slave/script.robot"
Warning: The Selenium build step must be placed before the Execute ZAP build step. So the life cycle is Execute ZAP > Run Selenium Tests > Scan URLs with ZAP
.
Configure the Job to Execute ZAP
Add Build Step Execute ZAP
Admin Configurations

- workspace
- Represents the directory to the job's workspace on the Slave machine.
Info: In this directory the ZAP session(s), report(s) and log(s) will be saved.
- Represents the directory to the job's workspace on the Slave machine.
- Host and Port
Required: The host and port set here should be the SAME set in Firefox and in the ZAP security tool.
Notice: This should be the IP address of the Slave (the machine where ZAP security tool is installed).
Info: Can override the default ZAP host (e.g. "localhost") and default ZAP port (e.g. "8090") for this job which were set under Jenkins Settings: ZAP Proxy Settings. Overriding the host and/or port allows to run multiple concurrent builds on different host(s) and/or port(s).
Info: Accepts System Environment Variables, Build Variables as well as Environment Inject Plugin Variables(cannot be used during pre-build).
Startup
- Run as Pre-Build Step –
 Set to Checked
ZAP is started before all other build step (i.e. in a pre-build step).
Info: This will allow ZAP security tool to act as an Intercepting Proxy. It will map all of the requests the Selenium script makes to a web app and all of the responses ZAP receives from it.
Java
Select the JDK used by ZAP –
Leave as inheritFromJobNotice: ZAP security tool requires Java 7 or higher to run.
Installation Method
ZAP Jenkins plugin requires Zed Attack Proxy 2.5.0+ to run and can be installed via either of the following methods:
Recommended: installation is System Installed.
 Custom Tools – Documentation, how to setup ZAP for use with Jenkins and the Custom Tools plugin can be found here.
Info: A generic tool installer. You define how tools get installed, and the plugin will automatically install them when needed.
- System Installed – Documentation, how to setup ZAP for use with Jenkins as a System Installation can be found here.
Info: Requires
ZAPROXY_HOMEto be defined as a System Environment Variable.
Run Configurations
Clicking the Advanced... button, a new block appears below:
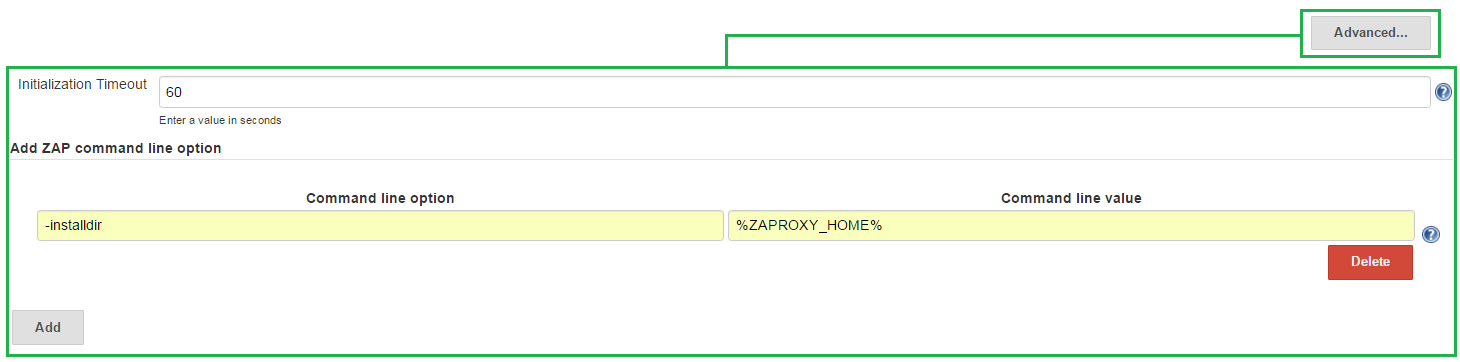
- Initialization Timeout
- Total time (in seconds) to wait for ZAP to initialize.
Warning: If ZAP has not been initialized after the specified time then the program is stopped and the build is marked as a FAILURE.
- Total time (in seconds) to wait for ZAP to initialize.
- Add ZAP command line option
- This fields allows you to add ZAP command line options.
Recommend: If having followed the System Installed guide above, it is recommended to set the
installdircommand line option.Info: Please see HelpCmdline for more information.
Warning: Adding a ZAP command line option can interfere with other UI options of the ZAP Jenkins plugin. Use with caution!
- This fields allows you to add ZAP command line options.
ZAP Settings
- Path
- Path to the 'default directory' that ZAP uses on the Slave (the machine where ZAP security tool is installed).
Info: Please see FAQconfig for more information.
Info: Accepts System Environment Variables, Build Variables as well as Environment Inject Plugin Variables(cannot be used during pre-build).
Warning: Do not override with command line options.
- Path to the 'default directory' that ZAP uses on the Slave (the machine where ZAP security tool is installed).
Session Management
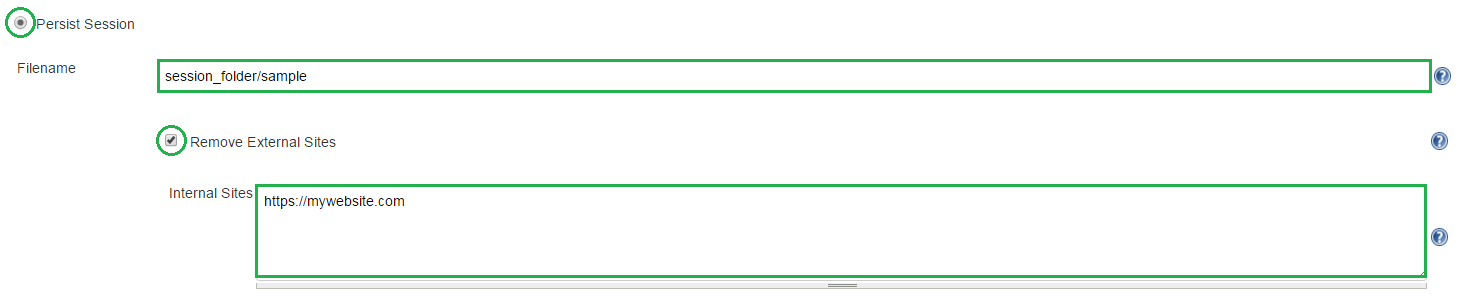
- Persist Session
- Filename
Specify a filename for the ZAP Session.
Info: The file extension is not necessary (".session" extension will be automatically added).
Info: The report will be saved into the 'Jenkins Job's Workspace'.
e.g.
session/filenameor simplyfilename.
- Remove External Sites
- Specify if after ZAP complete's it's Pre-Build Selenium tests, the Site Tree will be cleared of all external URL's.
- Specify if after ZAP complete's it's Pre-Build Selenium tests, the Site Tree will be cleared of all external URL's.
- Internal Sites
List of URL which will be flagged as internal sites and preserved, all other URL's are considered external sites and will be cleared from the Site Tree.
Info: Each line is a URL Regex and should be in the form of:
e.g.https://mywebsite.com
e.g.https://myotherwebsite.comInfo: Accepts System Environment Variables, Build Variables as well as Environment Inject Plugin Variables(cannot be used during pre-build).
- Filename
Session Properties
- Context Name
Provide a unique name for the context.
Info: Append the Build Variable
BUILD_IDto the Context Name to ensure a unique name. e.g.My Context ${BUILD_ID}
Info: Accepts System Environment Variables, Build Variables as well as Environment Inject Plugin Variables(cannot be used during pre-build).
Warning: The context should not exist in the loaded session.
- Include in Context
List of URLs which will be included in the Context unless also excluded.
Info: Each line is a URL Regex and should be in the form of:
e.g.http://localhost:8180/bodgeit.*
e.g.\Qhttp://localhost:8180/bodgeit\E.*
e.g.http://localhost:8180/bodgeit/logout.php
e.g.\Qhttp://localhost:8180/bodgeit/logout.php\EInfo: Accepts System Environment Variables, Build Variables as well as Environment Inject Plugin Variables(cannot be used during pre-build).
- Exclude from Context
List of URLs which will be excluded from the Context.
Info: Each line is a URL Regex and should be in the form of:
e.g.http://localhost:8180/bodgeit.*
e.g.\Qhttp://localhost:8180/bodgeit\E.*
e.g.http://localhost:8180/bodgeit/logout.php
e.g.\Qhttp://localhost:8180/bodgeit/logout.php\EInfo: Accepts System Environment Variables, Build Variables as well as Environment Inject Plugin Variables(cannot be used during pre-build).
- Alert Filters – Placeholder for New Feature Addition. (Go to step 5. for now)
- Authentication – ZAP will perform the Attacks (Spider and/or Active Scan) as an authenticated user.
Attack Mode

- Starting Point
- The starting point is the request you desire from which you would like all attacks to originate from.
Info: Specify a URL as the starting point in the form of:
e.g.http://localhost:8180/bodgeit/Info: Accepts System Environment Variables, Build Variables as well as Environment Inject Plugin Variables(cannot be used during pre-build).
- The starting point is the request you desire from which you would like all attacks to originate from.
- Spider Scan – Evaluates URL for Passive Alerts.
- Recurse – Default: True
Info: If you select 'Recurse' then all of the nodes underneath the one specified will also be used to seed the spider.
- Subtree Only – Default: False
Info: If you select 'Subtree Only' the spider will only access resources that are under the starting point (URI). When evaluating if a resource is found within the specified subtree, the spider considers only the scheme, host, port, and path components of the URI.
- Max Children to Crawl – Default: 0
Info: Specify the 'Max Children to Crawl'. This parameter limits the number of children that will be crawled at every node in the tree. This is useful for data driven applications that have large numbers of 'pages' that are in fact exactly the same code but containing different data, for example from a database. By default this is set to zero which means there are no limits applied to the number of child nodes crawled.
- Recurse –
- AJAX Spider
- In Scope Only – Default: False
Info: If you select 'In Scope Only' then any URLs which are out of scope will be ignored.
Notice: Does not support authentication.
- In Scope Only –
- Active Scan – Evaluates URL for Active Alerts.
- Policy
Info: Select a ZAP policy to use for the Active Scan. The policies must be stored in the Path provided for 'ZAP Settings'. "Default Policy" is used if no policy is specified.
- Recurse – Default: True
Info: If you select 'Recurse' then all of the nodes underneath the one selected will also be scanned. Custom input vectors are only supported if this option is not selected.
- Policy
Finalize Run
- Generate Reports – The security alerts found by ZAP will be saved into a report file in the build's workspace.
- Generate Report – Documentation, how to generate the default report(s) can be found here.
Info: This generates a new report containing the alerts raised in a supported format (.html
 , .xml
  ).
).Info: This is the default method of report generation for ZAP.
- Export Report – Documentation, how to export customized report(s) can be found here.
Required: A plugin called Export Report which can be found in
ZAP > Manage Add-ons > Marketplace.Info: An official ZAP marketplace extension which allows you to customize content and export in a desired format (.xhtml
, .xml , .json  ). Supports GUI, command line and API calls.
- Generate Report –
- Create JIRA Issues – Documentation, how to Create JIRA Issues can be found here.
Warning: An unofficial ZAP extension which allows you to create JIRA issues. It is an add-on NOT bundled with ZAP, nor available in the marketplace. DOWNLOAD AT YOUR OWN RISK AND DISCRETION.