Plugin Information |
|---|
View Compuware Source Code Download for Endevor, PDS, and ISPW on the plugin site for more information. |
Overview
The Compuware Source Code Download for Endevor, PDS, and ISPW plugin allows users to download Endevor, PDS, and ISPW members from the mainframe to the PC. Source can then be accessed on the PC, for example, for SonarQube analysis and reporting.
Prerequisites
The following are required to use this plugin:
- Jenkins
- Jenkins Credentials plugin
- Topaz Workbench CLI. Refer to the Topaz Workbench Install Guide for instructions.
For PDS and Endevor downloads, a Topaz for Program Analysis license is required.
- Host Communications Interface
Installing in a Jenkins Instance
- Install the Compuware Source Code Download for Endevor, PDS, and ISPW plugin according to the Jenkins instructions for installing plugins. Dependent plugins will automatically be installed.
- Install the Topaz Workbench CLI on the Jenkins instances that will execute the plugin. The Topaz Workbench CLI is available in the Topaz Workbench installation package. If you do not have the installation package, please visit go.compuware.com. For Topaz Workbench CLI installation instructions, please refer to the Topaz Workbench Install Guide.
Configuring Host Connections
In the Jenkins system Jenkins/Manage Jenkins/Configure System screen, go to the Compuware Configurations section, do one of the following:
In the Windows Topaz Workbench CLI home field, point to the Windows installation location of the CLI. If necessary, change the default values given to match the correct installation location.
In the Linux Topaz Workbench CLI home field, point to the Linux installation location of the CLI. If necessary, change the default values given to match the correct installation location.
Note: The Topaz Workbench CLI must be installed on the machine that is configured to run the job.
If no host connection appears in the Host Connections section, click Add Host Connection and add a host connection by entering the following information:
In the Description field, enter a description of the connection.
In the Host:port field, enter the z/OS host to connect to.
- From the Encryption protocol list, select the desired encryption protocol to be used for this connection. The encryption protocol is used to encrypt data sent to and from the host. The default is 'None'.
From the Code page list, select the desired code page to be used for this connection. The code page is used to translate data sent to and from the host. The default is 1047.
In the Read/write timeout (minutes) field, enter the number of minutes for the plugin to wait for a response from the host before timing out.
Note: Click Delete Host Connection to delete an existing connection.
Downloading Endevor or PDS members
On the Configuration page of the job or project, select one of the following from the Source Code Management section:
Endevor
PDS
From the Host connection list, select the host connection to be used to connect to the z/OS host. Alternatively, to add a connection, click Manage connections. The Host connections section of the Jenkins configuration page appears so a connection can be added.
In the Login credentials field, select the stored credentials to use for logging onto the z/OS host. Alternatively, click Add to add credentials using the Credentials plugin. Refer to the Jenkins documentation for the Credentials plugin.
In the Filter pattern field, enter the datasets for which to download members, delimiting datasets with white space or commas.
Note: Wildcards can be used for the last character only.
Note: For Endevor, if the stage is wildcarded, only the most recent revision of each source member will be downloaded.
Note: Migrated PDSs are recalled before being downloaded.- In the File extension to assign field, enter the extension to be added to the downloaded files.
Optionally, in the Source download location field, enter the absolute or relative path to the project workspace location to which to download the source. If this field is left blank, source is downloaded to a folder based on the filter name relative to the default location (the project workspace). For each PDS, a directory is created with the name of the PDS relative to the filter folder that contains the members that were downloaded.
Click Save. When the project or job runs, files are downloaded to the location in the Source download location field or, if that field was left blank, to the default location (the project workspace location).
Optionally, to perform SonarQube analysis, install the SonarQube plugin and refer to the documentation for the SonarQube plugin at https://jenkins-ci.org/.
Downloading ISPW Container members
On the Configuration page of the job or project, select ISPW Container from the Source Code Management section.
- From the Host connection list, select the host connection to be used to connect to the z/OS host. Alternatively, to add a connection, click Manage connections. The Host connections section of the Jenkins configuration page appears so a connection can be added.
- In the Runtime configuration field, enter the host runtime configuration. To use the default configuration, leave the field blank.
- In the Login credentials field, select the stored credentials to use for logging onto the z/OS host. Alternatively, click Add to add credentials using the Credentials plugin. Refer to the Jenkins documentation for the Credentials plugin.
- Use the Filter section to identify the ISPW members to be downloaded:
- In the Container name field, enter the name of the container to target for the download.
- In the Container type list, do one of the following:
- Select Assignment if the specified Container name is an assignment.
- Select Release if the specified Container name is a release.
- Select Set if the specified Container name is a set.
- Optionally, use the Level field to identify components at a specific level in the life cycle to download (such as DEV1, STG1, or PRD).
- Optionally, use the Component type field to identify components of a specific type to download (such as COB, COPY, or JOB).
- Optionally, use the Force download of unchanged source to indicate that all source matching the current filter should be downloaded, regardless of whether it has been changed recently or not. If this box is left unchecked, it will delete any files in the workspace that no longer match the filter specified above. Leaving it unchecked will also only download source that has been changed since the last time the job was run.
- Click Save. When the project or job runs, by default the following occurs:
- Mainframe source is downloaded to the project's or job's workspace into an <ISPW Application name>/MF_Source folder.
- Folder components are downloaded into an <ISPW Application name> folder.
- Optionally, to perform SonarQube analysis, install the SonarQube plugin and refer to the documentation for the SonarQube plugin at https://jenkins-ci.org/.
Downloading ISPW Repository members
On the Configuration page of the job or project, select ISPW Repository from the Source Code Management section.
From the Host connection list, select the host connection to be used to connect to the z/OS host. Alternatively, to add a connection, click Manage connections. The Host connections section of the Jenkins configuration page appears so a connection can be added.
In the Runtime configuration field, enter the host runtime configuration. To use the default configuration, leave the field blank.
In the Login credentials field, select the stored credentials to use for logging onto the z/OS host. Alternatively, click Add to add credentials using the Credentials plugin. Refer to the Jenkins documentation for the Credentials plugin.
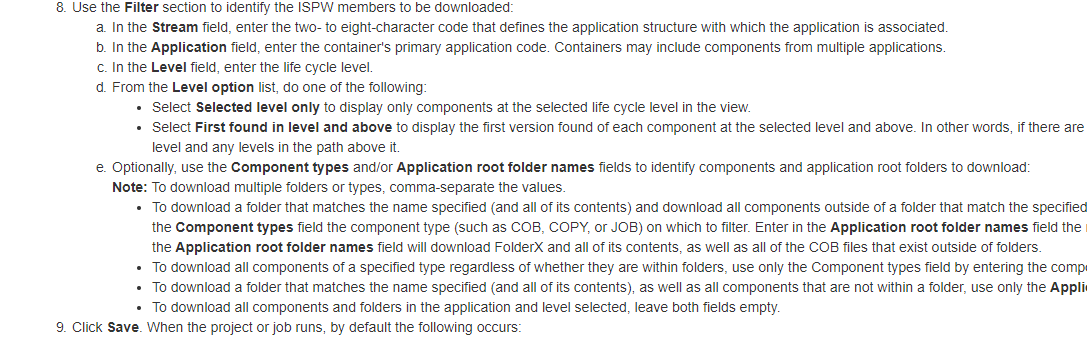
Use the Filter section to identify the ISPW members to be downloaded:
In the Stream field, enter the two- to eight-character code that defines the application structure with which the application is associated.
In the Application field, enter the container's primary application code. Containers may include components from multiple applications.
In the Level field, enter the life cycle level.
From the Level option list, do one of the following:
Select Selected level only to display only components at the selected life cycle level in the view.
Select First found in level and above to display the first version found of each component at the selected level and above. In other words, if there are multiple versions in the life cycle, display one version of the component that is the first one found at the selected level and any levels in the path above it.
Optionally, use the Component types and/or Application root folder names fields to identify components and application root folders to download:
To download a folder that matches the name specified (and all of its contents) and download all components outside of a folder that match the specified type, enter values in both the Component types and Application root folder names fields. Enter in the Component types field the component type (such as COB, COPY, or JOB) on which to filter. Enter in the Application root folder names field the name of the folder on which to filter. For example, entering COB in the Component types field and FolderX in the Application root folder names field will download FolderX and all of its contents, as well as all of the COB files that exist outside of folders.
To download all components of a specified type regardless of whether they are within folders, use only the Component types field by entering the component type (such as COB, COPY, or JOB) on which to filter.
To download a folder that matches the name specified (and all of its contents), as well as all components that are not within a folder, use only the Application root folder names field by entering the name of the folder on which to filter.
To download all components and folders in the application and level selected, leave both fields empty.
Note: To download multiple folders or types, comma-separate the values.
- Optionally, use the Force download of unchanged source to indicate that all source matching the current filter should be downloaded, regardless of whether it has been changed recently or not. If this box is left unchecked, it will delete any files in the workspace that no longer match the filter specified above. Leaving it unchecked will also only download source that has been changed since the last time the job was run.
Click Save. When the project or job runs, by default the following occurs:
Mainframe source is downloaded to the project's or job's workspace into an <ISPW Application name>/MF_Source folder.
Folder components are downloaded into an <ISPW Application name> folder.
Optionally, to perform SonarQube analysis, install the SonarQube plugin and refer to the documentation for the SonarQube plugin at https://jenkins-ci.org/.
Using Pipeline Syntax to Generate Pipeline Script
Do one of the following:
When working with an existing Pipeline job, click the Pipeline Syntax link in the left panel. The Snippet Generator appears.
When configuring a Pipeline job, click the Pipeline Syntax link at the bottom of the Pipeline configuration section. The Snippet Generator appears.
From the Sample Step list, select checkout: General SCM.
From the SCM list, select Endevor, ISPW Container, ISPW Repository, or PDS as the version control system from which to get the code.
Complete the remaining fields for the selected SCM.
Click Generate Pipeline Script. The Groovy script to invoke the Compuware Source Code Download for Endevor, PDS, and ISPW plugin appears. The script can be added to the Pipeline section when configuring a Pipeline job. A sample script is shown below:
checkout([$class: 'PdsConfiguration',
    connectionId: 'f5264789-8b54-6522-al25-ag54gh85re42',
    credentialsId: 'f4393474-9b86-4155-ae2c-ac11ab71ae47',
    fileExtension: 'cbl',
    filterPattern: 'abc.def'])
Note: The Include in polling? and Include in changelog? check boxes have no effect in the Compuware Source Code Download for Endevor, PDS, and ISPW plugin.
Product Assistance
Compuware provides assistance for customers with its documentation, the FrontLine support web site, and telephone customer support.
Compuware Support Center
You can access online information for Compuware products via our Support Center site at https://go.compuware.com. Support Center provides access to critical information about your Compuware products. You can review frequently asked questions, read or download documentation, access product fixes, or e-mail your questions or comments. The first time you access Support Center, you must register and obtain a password. Registration is free.
Compuware also offers User Communities, online forums to collaborate, network, and exchange best practices with other Compuware solution users worldwide. Go to http://groups.compuware.com/ to join.
Contacting Customer Support
At Compuware, we strive to make our products and documentation the best in the industry. Feedback from our customers helps us maintain our quality standards. If you need support services, please obtain the following information before calling Compuware's 24-hour telephone support:
The name, release number, and build number of your product. This information is displayed in the About dialog box.
Installation information including installed options, whether the product uses local or network databases, whether it is installed in the default directories, whether it is a standalone or network installation, and whether it is a client or server installation.
Environment information, such as the operating system and release on which the product is installed, memory, hardware and network specification, and the names and releases of other applications that were running when the problem occurred.
The location of the problem within the running application and the user actions taken before the problem occurred.
The exact application, licensing, or operating system error messages, if any.
You can contact Compuware in one of the following ways:
Phone
- USA and Canada: 1-800-538-7822 or 1-313-227-5444.
- All other countries: Contact your local Compuware office. Contact information is available at https://go.compuware.com.
Web
You can report issues via Compuware Support Center.
Note: Please report all high-priority issues by phone.
Corporate Web Site
To access Compuware's site on the Web, go to https://www.compuware.com. The Compuware site provides a variety of product and support information.
Change Log
Version 2.0.8
- Handle multi-threaded source downloading for PDS and Endevor files. Create a unique TopazCLI workspace for each Topaz download step.
Version 2.0.7
- Updated to keep compatible with latest Jenkins pipeline change (require Jenkins 2.130 or above, include fixes in v2.0.6, but lower requirement for Jenkins version)
Version 2.0.6
- Updated to keep compatible with latest Jenkins pipeline change (require Jenkins 2.181 or above, original Jenkins version where pipeline is reported incompatible)
Version 2.0.5
- Updated referenced Compuware Common Configuration plugin version
Version 2.0.4
This release requires Topaz Workbench CLI version 19.04.01 or higher.
- Added support for encryption protocol for a host connection.
Version 2.0.0
- The plugin now integrates with the Compuware Common Configuration plugin, which allows the Host Connection configurations and Topaz Workbench CLI to be defined centrally for other Compuware Jenkins plugins instead of needing to be specified in each Jenkins project's configuration. Host Connection configuration is now defined in the Jenkins/Manage Jenkins/Configure System screen.
- Jenkins console logs produced by the plugin have been streamlined to improve readability.
- ISPW filters can now be specified to only download specified folders in the ISPW repository.
- ISPW mainframe source files will now be downloaded to the following directory structure under the Jenkins Workspace <Jenkins Project>/<ISPW Application Name>/MF_Source directory instead of to the root of the <ISPW Application Name> directory.
- PDS and Endevor configurations now allow a source download folder to be specified in the configuration.
- Version checking has been introduced between the plugin and the Topaz Workbench CLI.
Upgrade considerations
- The 18.2.3 version of the Topaz Workbench CLI is required. The Topaz Workbench CLI is included in the Topaz Workbench installation media provided by Compuware.
- Existing Freestyle Jenkins projects will automatically migrate data into the new versions plugin, but the user should validate the project settings and save the updates before executing the project.
- Existing Pipeline Jenkins projects will need to be updated to the new plugins syntax. Please see the section regarding Pipeline Syntax.
Version 1.8
- ISPW is now a separate option from PDS in the SCM section of the configuration. By using ISPW, users are able to configure the source download using the same selection and filtering options as the ISPW Repository Explorer in Topaz Workbench.
Version 1.7
- Maintenance release
Version 1.6
- Maintenance release
Version 1.5
- Support for the Jenkins Pipeline Syntax
- Support for Cloudbees Folder plugin